Create Portals & Sub-Portals
The Portal feature appears to be an ideal solution for teams and organizations seeking efficient management of course enrollment and learner access. Here's why:
- Portal Creation and Seat Limits : Administrators can create portals within the platform and designate specific group of users to each portal. They also have the capability to set seat limits for portal, ensuring effective resource allocation.
- Public User Portal Creation via eCommerce : Public users can create portals via the eCommerce feature by purchasing products in bulk. To learn more about creating a portal via eCommerce please click here. .
- Branding: Portals have the flexibility to define their own branding, enabling them to personalize their identity within the platform. This customization promotes a sense of ownership and community among portal members.
- Reports : Reports generated within the platform are scoped to the portal(s) that the associate or portal admin has access to. This ensures that Portal Admins have access to relevant data and analytics pertaining to their specific portals.
Overall, these features empower Portal Admins to efficiently manage their respective portals within the AOM platform. Staff with sufficient permissions to create new Portals within the platform, and Portal Admins to create Portals via eCommerce purchases, provides flexibility and convenience for managing organizational structures and access to courses. Portal Admin holds a significant role within the AOM platform for overseeing and managing a specific portal. Learner on an AOM platform is a user who is actively engaged in taking courses or participating in learning activities.
Creating Portal
Portals allow to train own B2B Customers in bulk where customers get fully white-labeled branded platform to train their employees/learners, etc.
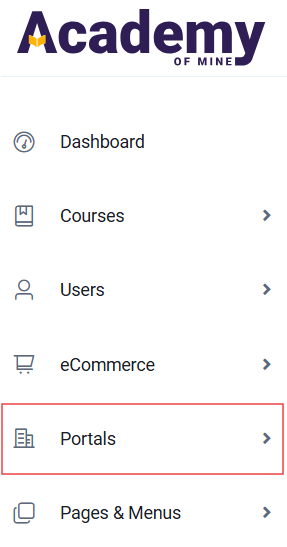
Now, let's proceed with creating a Portal. To create a Portal, go to Admin Dashboard, then click on 'Portals' in the sidebar menu .
Create a Portal
Creating a Portal is a breeze with just 3 simple steps.
- Click on Portals -> All Portals .
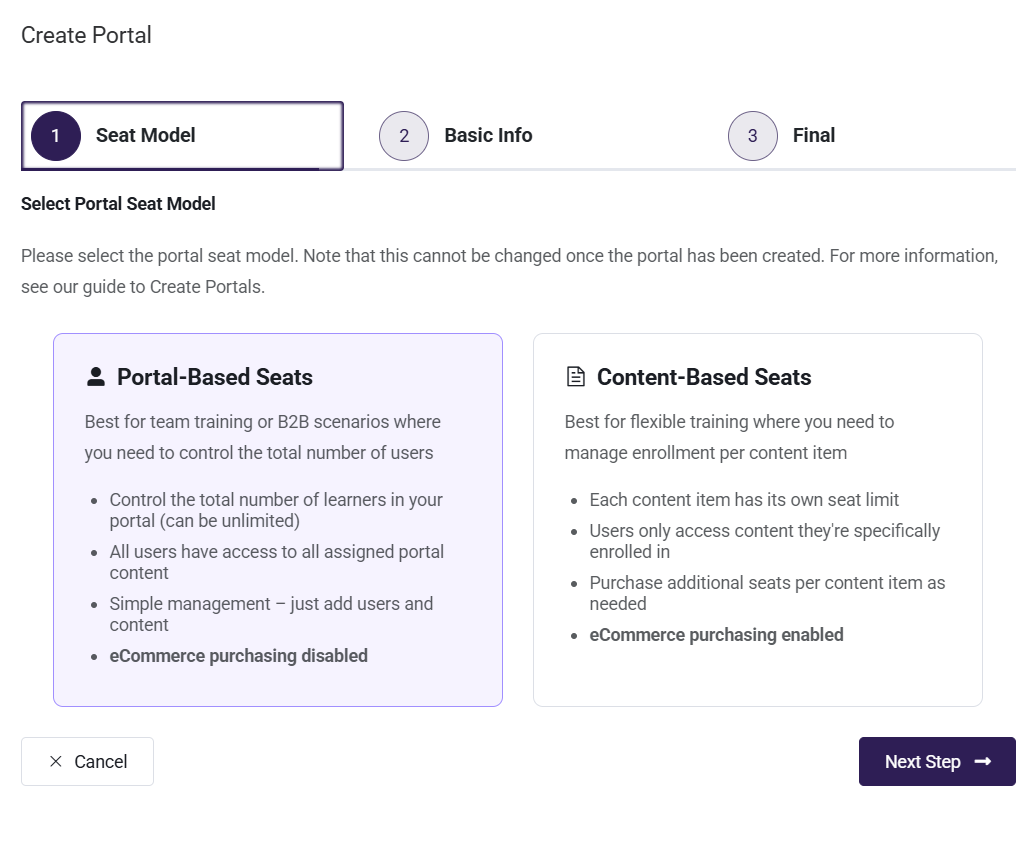
Click on Create Portal button. A "Create Portal" pop-up form will appear. In the Seat Model tab, select the desired model. There are two seat models available:
-
Portal-Based Seat
-
Content-Based Seat
Content-Based Seats : In this model, seat allocation is managed at the Portal Content Level. Each Content(such as a course, learning path, or membership) has its own specific number of seats. This allocation determines how many users can be enrolled in that specific content.
-
Example: if a course has 50 seats, 50 different users can be enrolled into that course.
-
Once the seat limit is reached, no new users can be enrolled unless increase the seat count or remove existing enrollments.
-
This model offers flexibility by allowing to set and control enrollment limits for each content item independently.
Portal-Based Seats : In this model, seats are allocated at the Portal Learner level, limiting the total number of learners that can be added to the portal.
- Example: If portal is assigned 20 seats, then only 20 learners can be added to the portal at any time.
- Once the portal’s learner limit is reached, no additional portal learners can be added unless seats are freed up or the seat allocation is increased.
- This model emphasizes overall learner capacity for the portal rather than per content item limits.
After selecting Seat Model go to the next Tab that is Basic Info tab :
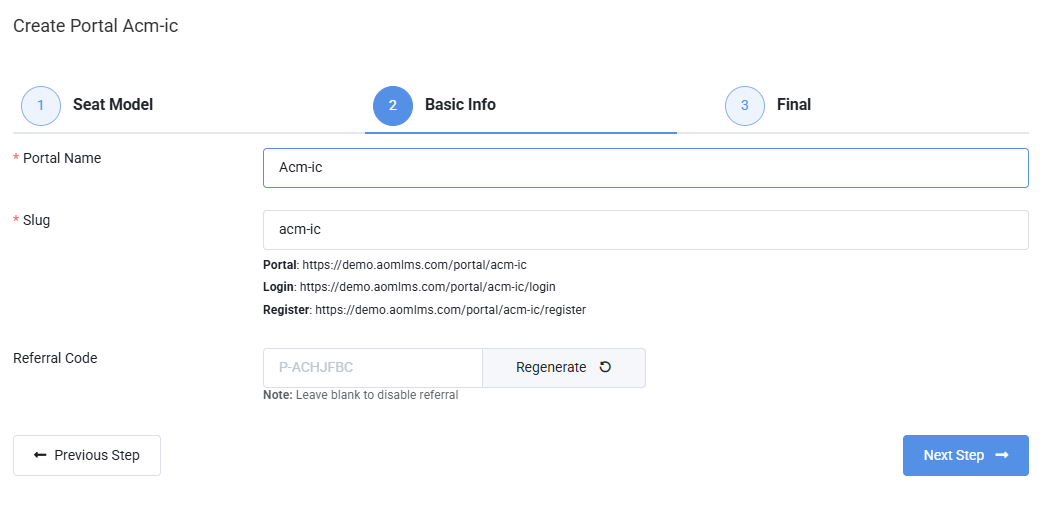
- Portal Name: Specify the Portal name.
- URL slug: A slug is generated based on the Portal name which can then be used to create a unique Portal URL for customer organization. Also Portal cab be customized according to preference.
- Referral Code: The referral code generates a unique registration link for learners from the customer organization to self-enroll. If a referral code is added, it becomes mandatory for users during registration. If the referral code is left blank, it will not be visible or required when users register.
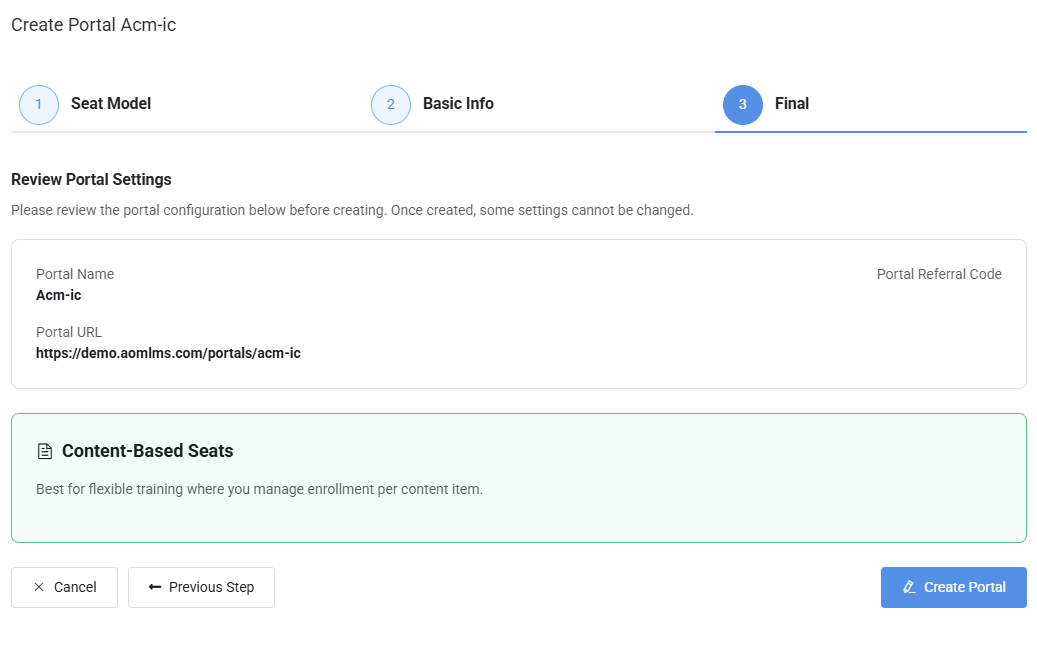
- To complete the portal setup, click on the 'Next Step' button. This will take to the Final Step of the process. On the Final Step screen, review all the setting carefully. When portal is ready, click the 'Create Portal' button to finalize the creation of portal