Learning Paths
Learning Paths are one of the most powerful features of the Academy of Mine, designed to streamline learners' progress and reward achievements. You may specify a sequential order to the courses and even lock courses--for instance if one of the courses is a prerequisite for another in the Learning Path and must be completed before the learner can continue.
In this guide, we'll be going over why you'd use a Learning Path, how to create and enroll learners in a Learning Path, and what the learner experience is.
Why Use Learning Paths?
Learning Path lets you group multiple courses into a structured program, guiding learners step-by-step to achieve a specific learning goal. With Learning Paths, you can award certificates to learners once they complete all the courses in the path. You can also control the order of courses, ensuring learners complete prerequisites before moving forward.
Learning Paths make it easy to enroll learners in several courses at once. For example, you can enroll a single learner or a group of learners in all the courses within a Learning Path with just one action.
Once a Learning Path is created, you can use it in different ways. For instance, you can sell access to courses by linking a Learning Path to a product. Learners who purchase the product are automatically enrolled in all the courses included in that path. For more information on Products, please see this article: Using Products to Offer Self-Enrollment in Courses. You can also enroll users in Learning Paths through the bulk upload feature, making it easy to manage large groups, learn more here. You can also choose to enroll an individual learner into a learning path.
Creating a Learning Path
Create your Learning Path by following these steps:
-
From the Owner Dashboard, click Courses, then Learning Paths in the left sidebar.
-
Click Create Learning Path in the upper-right corner.
-
Enter the necessary information:
-
Name: Enter the name of the Learning Path. This will also be the name of the certificate if the user is assigned one after completing the Learning Path.
-
Courses & Order: Type the name of the courses you'd like to add to the Learning Path and select them from the list. A Learning Path must contain a minimum of 2 courses.
noteOnce the courses have been selected, you can reorder them and specify the order by dragging and dropping them. You may also specify whether a course is a prerequisite to the courses after by locking the course.
-
Credits: This is an optional field. If you are awarding credits to your Learners you can add them here. The number of credits can appear on the Learning Path certificate if you choose the learning_path_credit field.
-
Choose Learning Path Categories--these are helpful in quickly bundling learning paths. If you have already created Learning Path Categories, you can apply them to your learning path here.
-
Certificates: This is an optional field. You may select the certificate(s) the user will receive after completing all courses in the Learning Path.
noteNote that a course within a Learning Path cannot have the same certificates as the Learning Path.
If you are using the Accredible integration, you can select the Accredible group you'd like to add.
-
-
Once you are done filling out the details for the Learning Path, you may click "Save Learning Path" to create it.

Managing a Learning Path
Once your learning path has been created, you'll need to manage everything that happens within.
This includes various learning path actions, enrolling learners, viewing learning path and learner activity, removing learners, assigning certificates, and many more. In this section, we'll go over all those functions available to you when managing a learning path.
The Learning Path Manage page can be accessed by clicking Actions Menu > Manage, or by hovering over the Learning Path name and then selecting Manage. There is a lot of information available from the Manage Learning Path page including:
- Learning Path Statistics
- Enrolling Learners
- Manage Learning Path Page Actions Menu (to view progress, activity, access, and more for a learner)
- Make Bulk Action changes
- View Learner Course Activity
Now, let's go into each part.
Learning Path Statistics
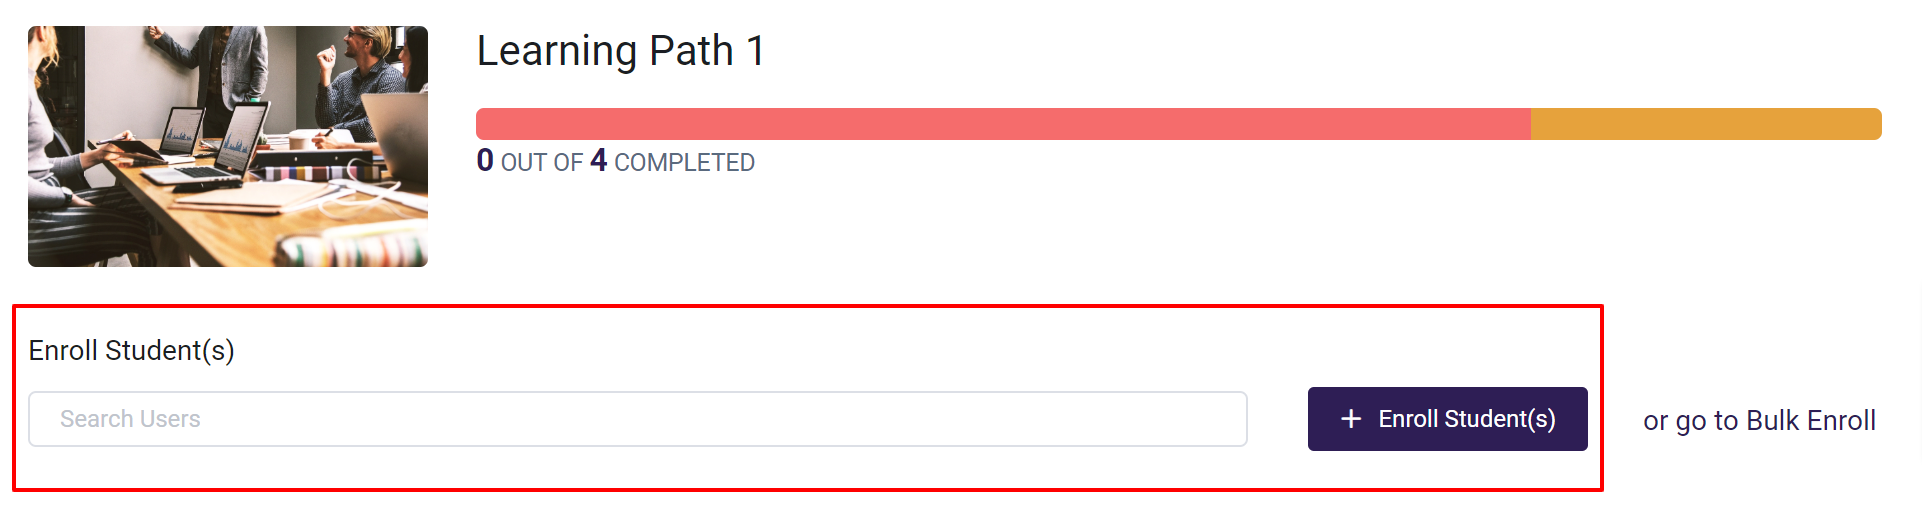
At the top of the Manage Learning Path page is a Learning Path Statistics bar, which displays Learner progress at a glance. When you hover your mouse over the bar, you'll be able to quickly see the number of learners who have not started, are in progress, or have completed this Learning Path.
Enrolling Learners
If a user profile already exists for a learner, you can search for them by name and add them to the Learning Path by clicking the "Enroll Student" button. This can be done with more than one user at a time.
Bulk Enrolling Learners: If you would like to bulk enroll a large number of learners, you can use the Bulk Upload option. If someone does not yet have a user profile, the bulk upload process will create one for them.
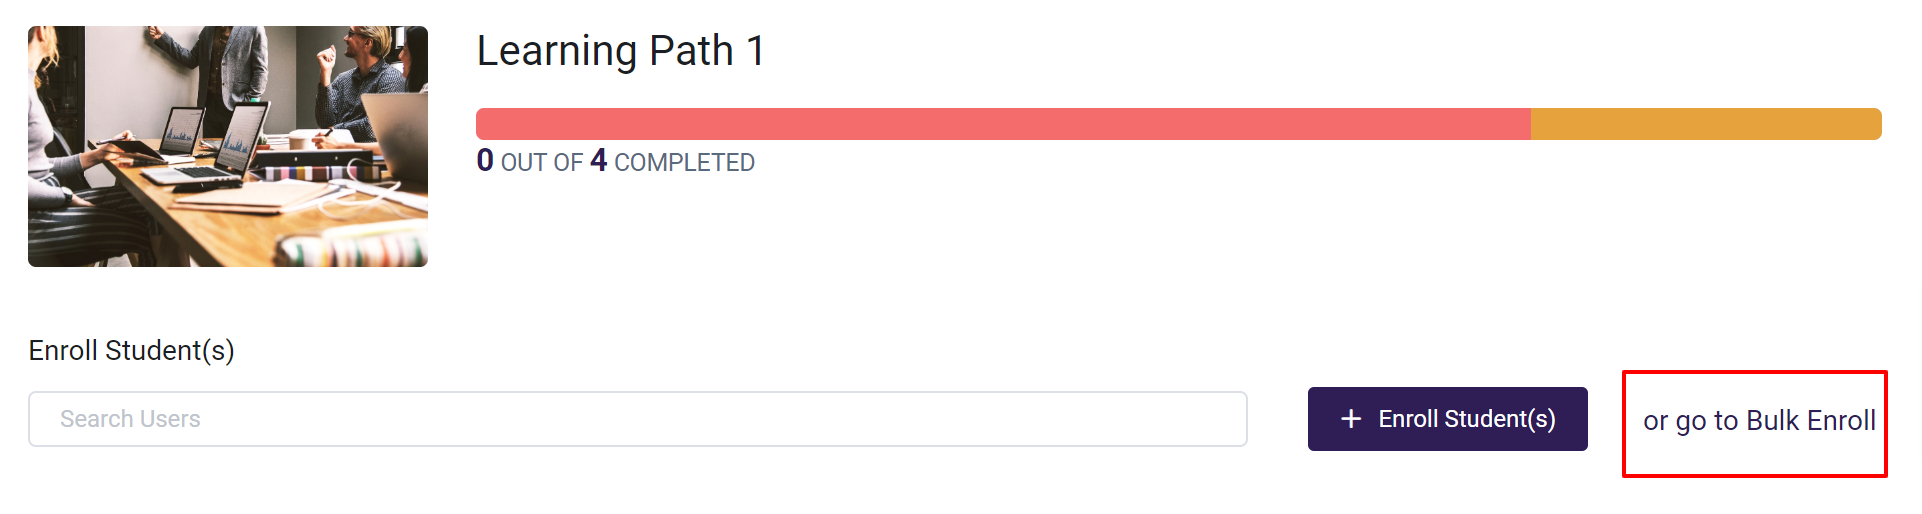
Clicking "Go to Bulk Enroll" will bring you to the Bulk Enroll page. For more information, see the Bulk Enrolling Learners section of the Enrolling Students article.
Manage Learning Path Page Actions Menu
The Action Menu for managing an individual Learning Path allows you to change multiple settings and access learner data such as learner activity. Access this menu by clicking on the 3 dots to the far right of the learner's name. We'll go through what each action is below.
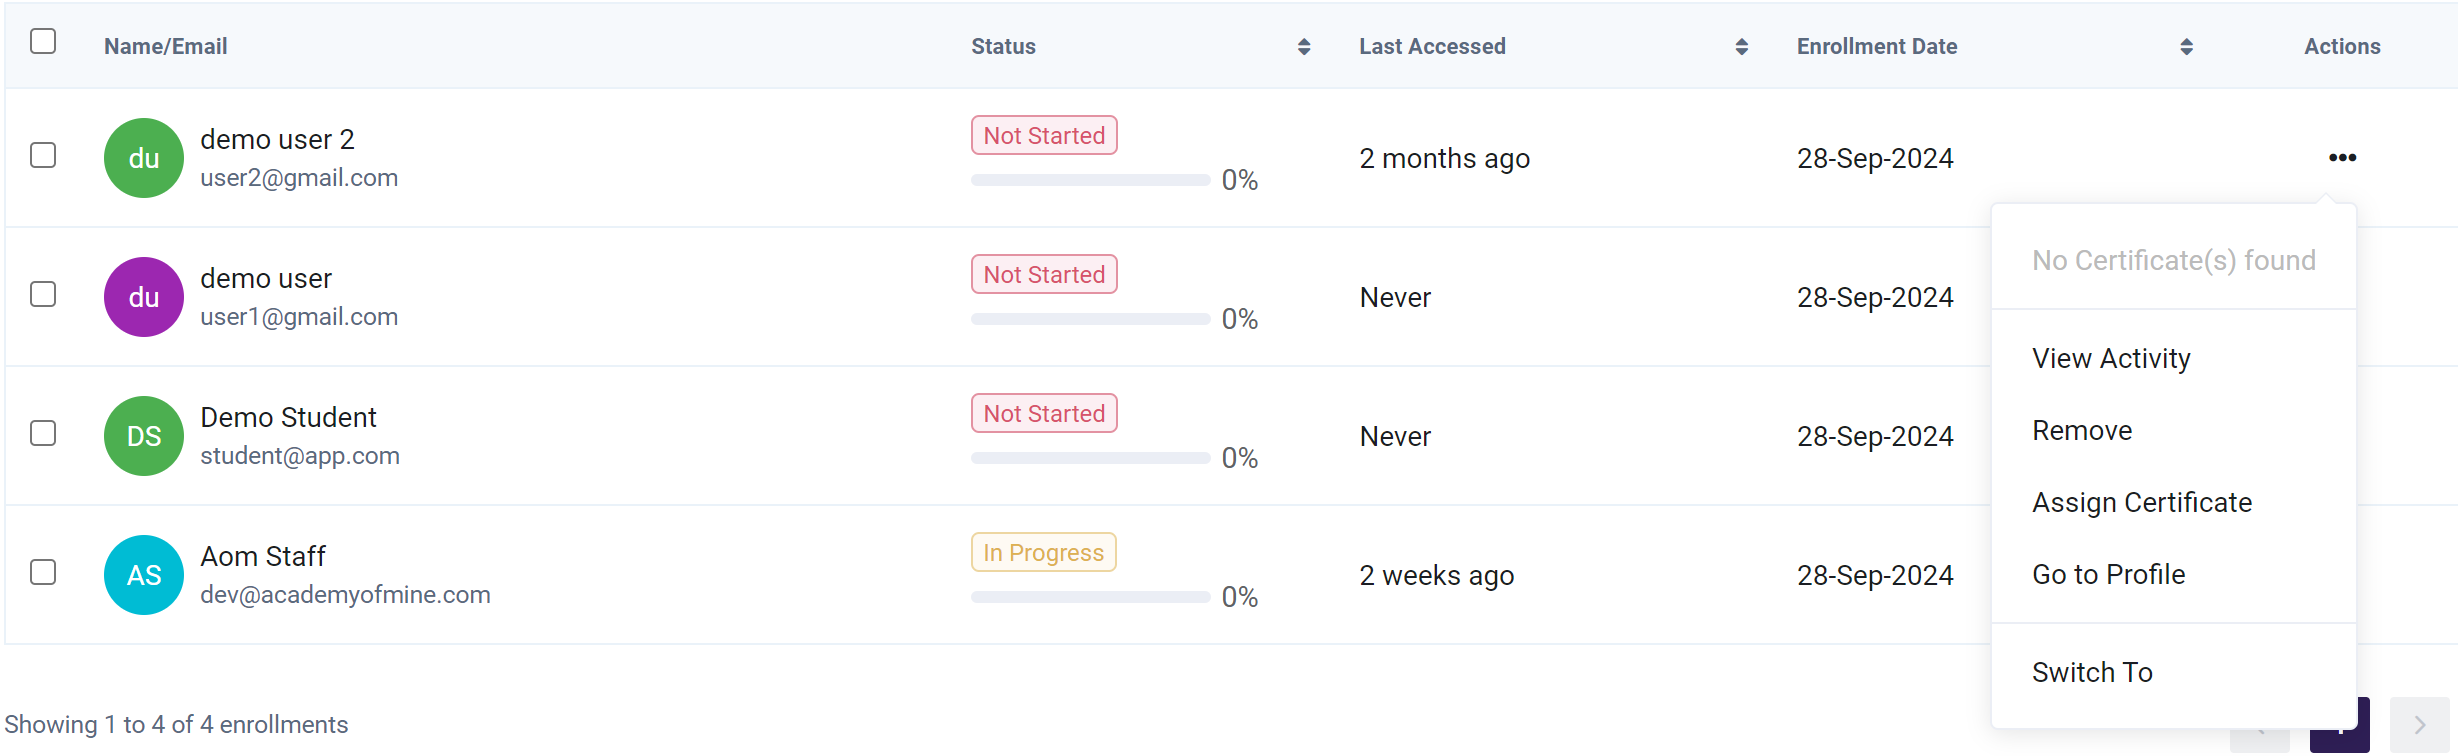
- View Activity: Here you can view the Learning Path Activities page of the learner. These activities include when the learner was enrolled in a Learning Path, accessed a Course, and started and completed the Learning Path.
- Download Certificate: If the learner has completed the learning path, you can download a copy of the certificate the learner has received.
- Remove: This will remove the learner from the learning path. This is a permanent action and can not be restored. Please note that removing learners from the learning path will not remove them from the associated courses.
- Assign Certificate: If a certificate has been attached to a learning path, it will automatically be assigned to the learner either upon learning path completion. There may be times when an Admin may want to award a certificate to a learner separately. Examples may include situations where the learning path was created without a certificate attached, or if the wrong certificate was attached. When the situations in these examples have been corrected, the admin can use this function to assign a certificate immediately to the learner.
- Switch To (available to Owner/Staff only): This function can be accessed from multiple places on the platform and will allow an Admin to view a learner's account from the learner's point of view. This is helpful if troubleshooting is needed on the learner's profile or to quickly review progress on Courses assigned to the learner.
Manage Learning Paths Page Bulk Actions Menu
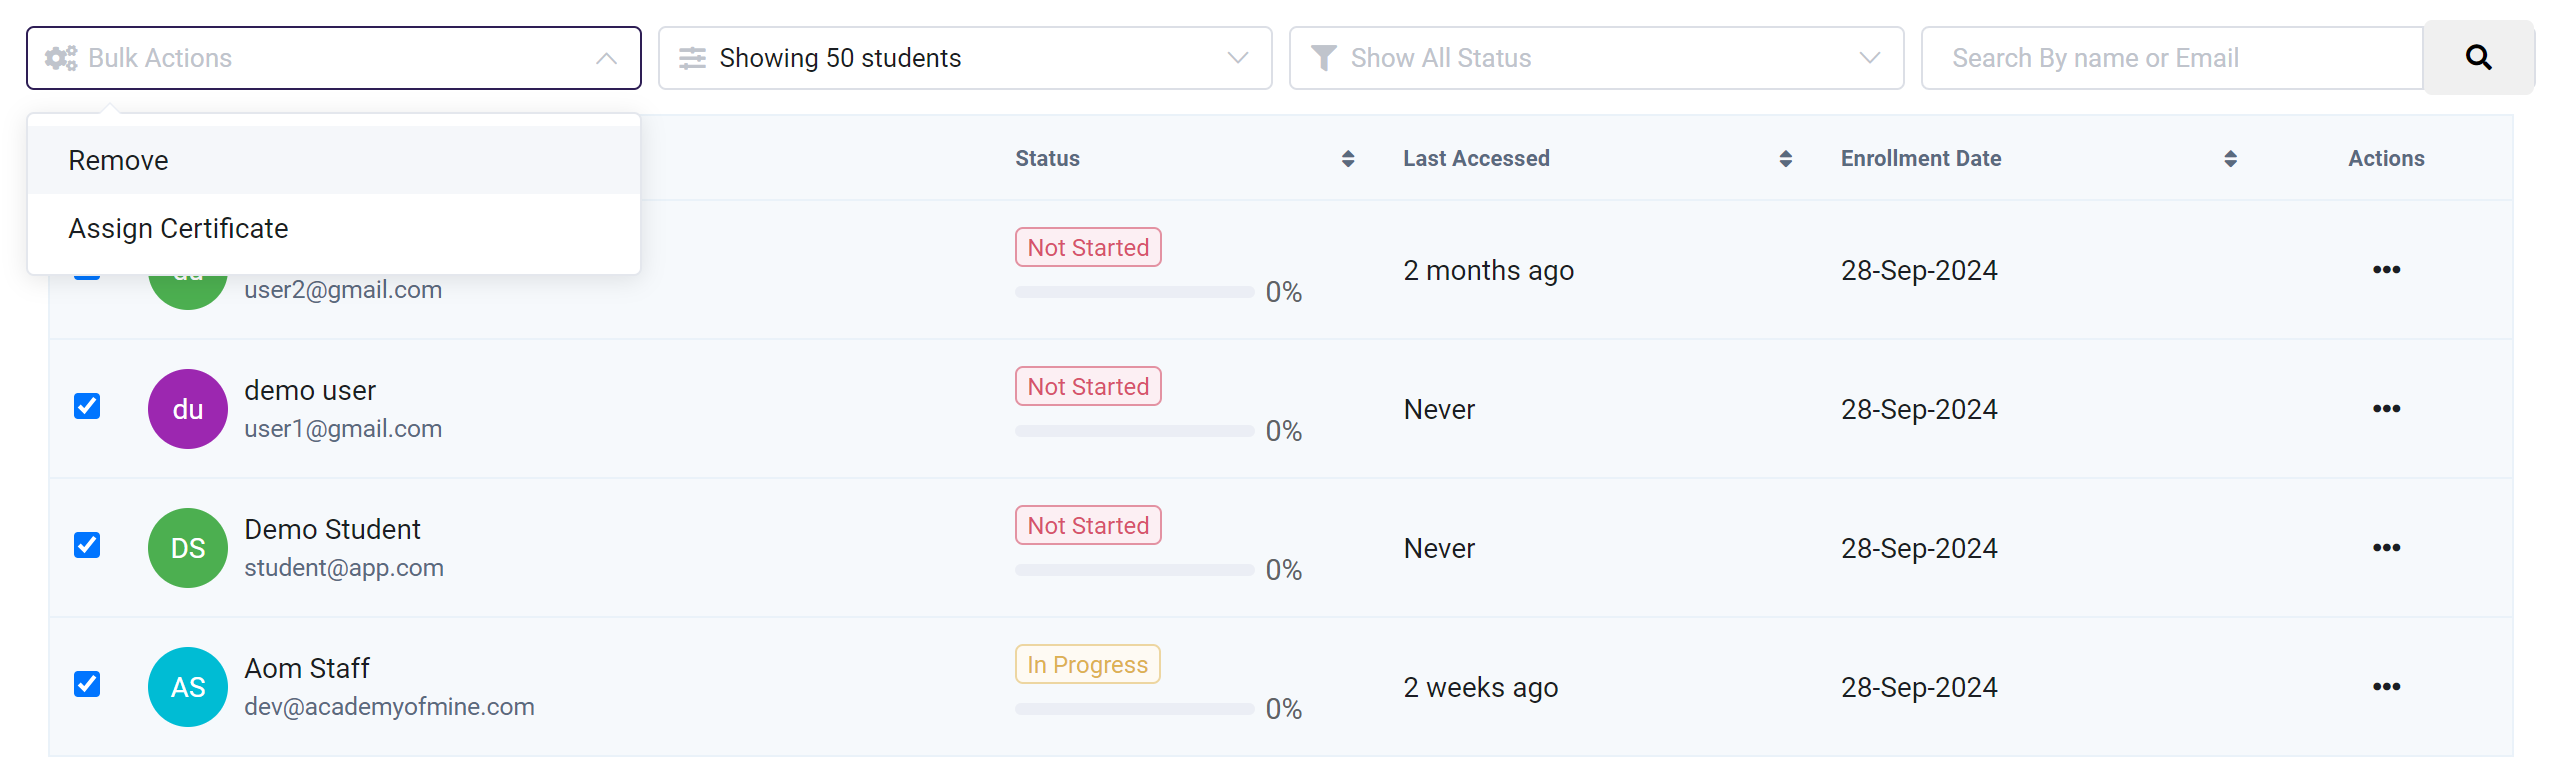
The Bulk Actions menu allows you to change settings for multiple learners at once. Check the boxes next to learner names before starting a bulk action, or use the Actions menu.
Checking the Select All on Page box at the very top here will select all users on the page, but will not include names not populated on the page. In the example below, there are only 4 learners enrolled in the Learning Path, and the page is set to show 10 learners. So any Bulk Actions will affect all 4 users if the Select All on Page box is checked. However, if there were 15 learners enrolled and the page was still set to show 10 learners, using the Select All on Page box would only affect the 10 learners showing on the page.
Now, let's go over the bulk action items available. As you can see, there is an overlap in what you can do compared to the individual action menu:
-
Remove: This will remove the learners selected from the Learning Path. This is a permanent action. If a user is removed from the Learning Path, they will not be removed from the underlying courses of the learning path.
-
Assign Certificate: If a certificate has been attached to a learning path, it will automatically be assigned to the learners either upon learning path completion or when the learner meets or surpasses the grading criteria.
Enrolling a Learner in a Learning Path
A learner can be manually enrolled in a learning path using two methods: either at the learning path level, through the Manage Learning Path page, or at the learner level, through the All Users page.
Enrolling Existing Learner(s) via Manage Course
You may enroll single or multiple learners into a Learning Path via the Manage Learning Path page. This is handy if there are several learners you'd like to enroll in a Learning Path.
- From your Dashboard, choose Courses, then Learning Paths
- Click the three-dot Action Menu to the right of the Learning Path you'd like to enroll the learner in and choose Manage Learning Path
- Type in the name/email of the learner(s) you want to enroll and click Enroll Student(s)
Enrolling an Existing Learner via All Users
- If the learner you'd like to enroll is already added to your account, you may enroll them by following these steps from their profile as well:
- From your Dashboard, choose Users, then All Users
- Click the three-dot Action Menu to the right of the learner you'd like to enroll and choose Enroll in a Course/Learning Path
- Type in the name of the Learning Path(s) you want to enroll them in. Once they have been entered, click Confirm
Enrolling Multiple Existing Learners via All Users
You can also enroll multiple learners into a Learning Path(s) via All Users by following these steps:
- From your Dashboard, choose Users, then All Users
- Check the box next to the learners you wish to enroll, or click the top box to select all learners on the page
- Click Bulk Actions, and choose Quick Edit
- Select the Learning Path(S) you want to enroll the selected learners in
- Click Confirm
Bulk Enrolling Learners into Learning Path
With the Bulk Upload feature, you can easily add up to 500 learners by using a simple, formatted Excel file. If a learner is not already in the system, their profile will be created. Even for existing learners, you can use this to bulk enroll them in a learning path based on their email.
-
From the Admin Dashboard, select Users, then Import Users. (Selecting the Bulk Enroll option on the Manage Learning Path page will take you to the Bulk Upload Users page.)
-
You will get two options to import Users. One being Excel and the other being Hubspot.
-
Importing using Excel
3.1. Follow the instructions on the page to upload the Excel file. The file must be in Excel format and comply with the header structure as presented in the instructions. A sample file is available to download on the Bulk Upload Users page. It has the header columns formatted correctly and only requires you to add the learner records.
The file must be formatted with the following header/first-row values:

Email (mandatory): If the email address is already in use by a user profile, the existing user will be enrolled in the courses selected.
First_Name (mandatory).
Last_Name (optional): The Last_Name column does not need to be filled in for the user but can be used to immediately populate this value.
Password (optional): If a password is not provided in the file, one will be auto-generated for the learner and sent to them in their New Account email (which is enabled by default). They can change this password later on.
There is a limit of 500 learners that can be uploaded per file to ensure there are no timeouts in the middle of the upload. If you have more than 500 learners, please separate them into multiple files, and upload them back-to-back.
3.2. You can select one or more Learning Paths to enroll your learners.
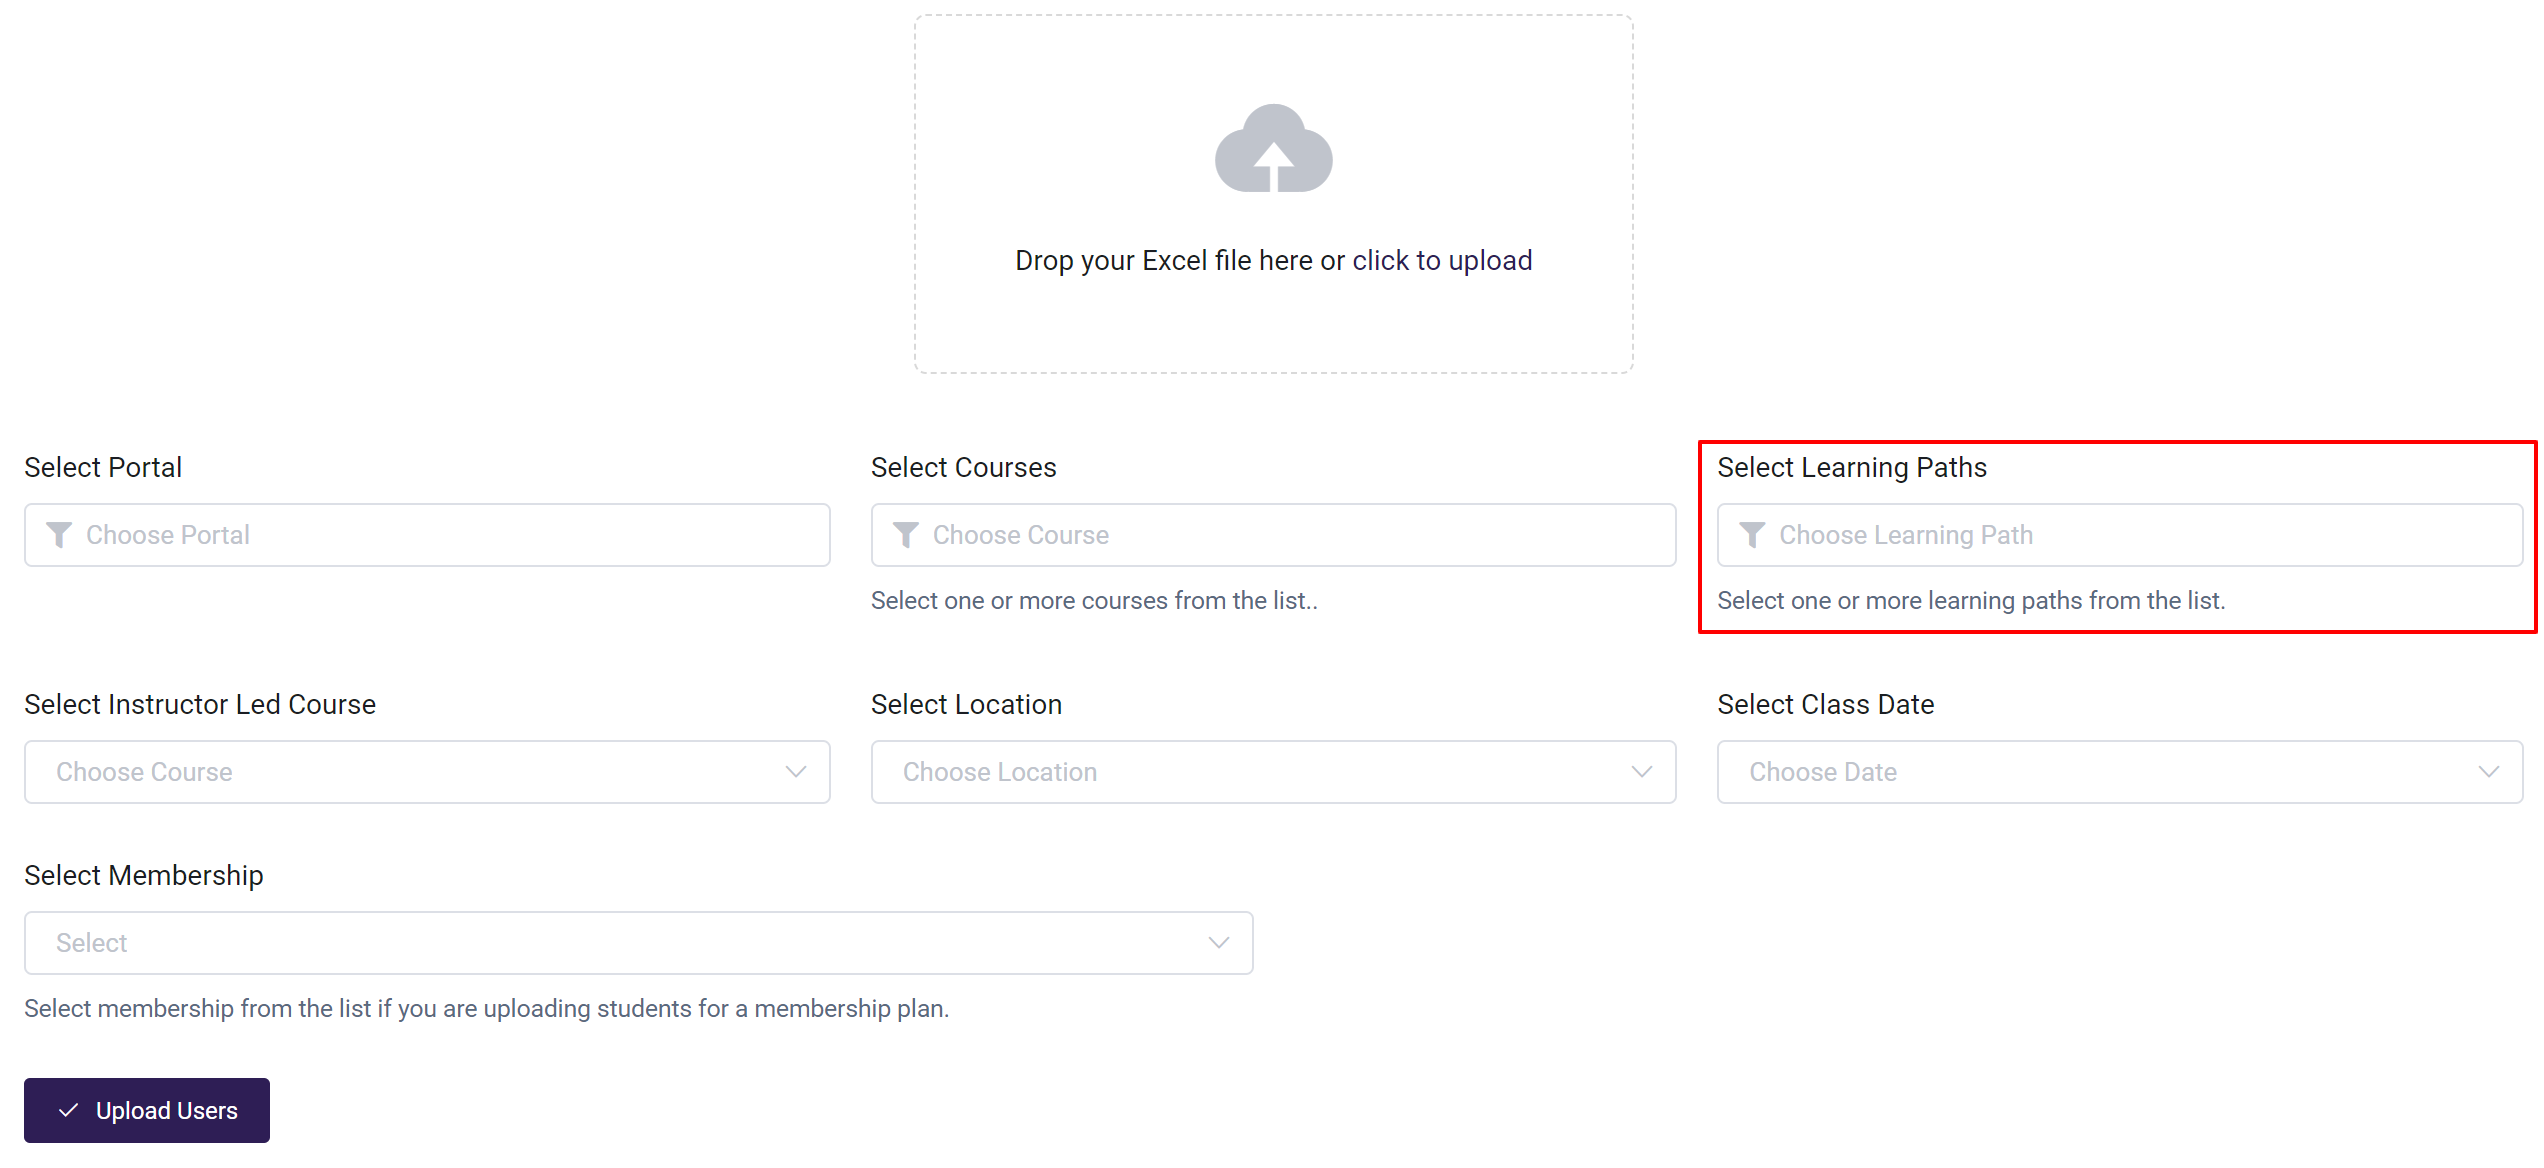
- Import Using Hubspot. To import users using HubSpot follow the steps mentioned in Integrating HubSpot with your LMS
- Lastly, Click Upload Users
Once a learner is enrolled in a Learning Path, they will receive an email notification! This notification can be configured in your Email Templates. Please click here to learn more about the Learning Path Enrollment Email Template
Viewing, Editing, and Cloning Learning Paths
-
From the Admin Dashboard, select Courses, then Learning Paths
-
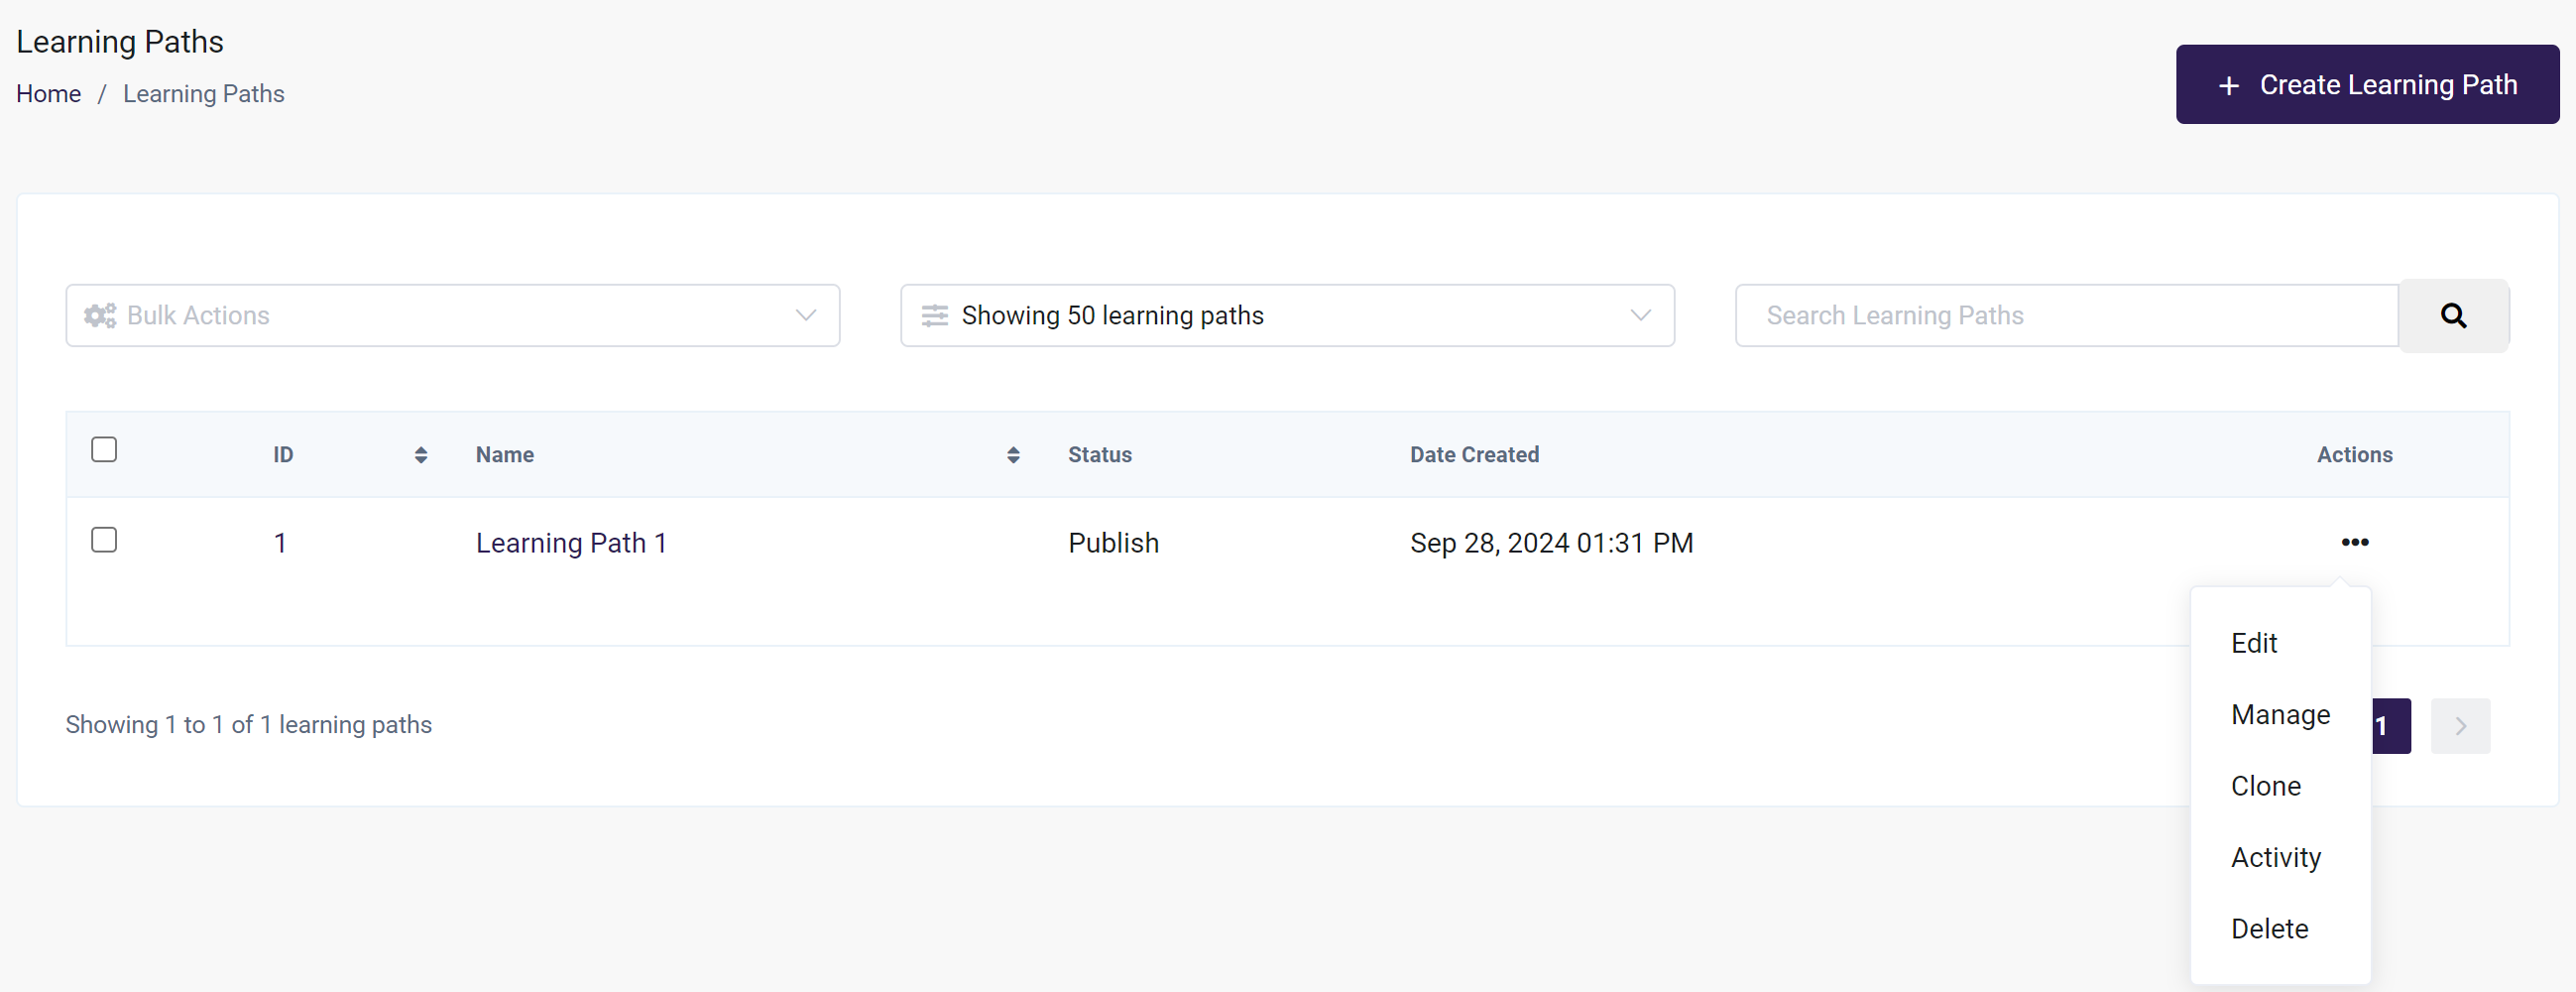
From this page, you can Create/Edit/Delete a Learning Path as well as see information regarding the learning paths:
- ID: The unique identifier for the Learning Path. If clicked, you'll be taken to the Edit page for that Learning Path
- Name: The Name of the Learning Path. If clicked, you'll be taken to the Edit page for that Learning Path
- Status: The status of the Learning Path
- Date Created: Date the Learning Path was created
- Actions: The three-dot menu will show an Edit, Manage, View Activity, Clone, and Delete option.
Editing Learning Path
If you need to change anything for a learning path, such as editing the description, adding or removing a course, applying the lock, changing the order of the course, and adding/removing a certificate, the process for updating or editing a learning path is very similar to creating a learning path:
- Select "Courses" from the sidebar on the left and then "Learning Path".
- Locate the learning path you need to update or edit.
- Use the "Actions" menu on the right to select the "Edit" option.
- Or by hovering over the Learning Path name and then selecting Edit.
- Once you are on the "Edit Learning Path" page, you will recognize the steps that were taken when the learning path was created. From here, you'll use the same steps you did when creating a learning path to update or edit the Course.
- Once your update is complete, make sure you select "Update Learning Path" at the top right to save your progress.
If you make any changes to a learning path that has learners already enrolled, the enrolled users will not be automatically enrolled in the newly added courses. Similarly, any courses that are removed from the learning path will not be removed from the already enrolled users' accounts. This means that these users will still be able to see the courses that were part of the learning path when they were enrolled.
For Example, suppose that a learner is enrolled in a learning path that has courses A, B, and C. Later, if you update the learning path to include courses A, D, and E, the already enrolled user will still see courses A, B, and C.
Cloning Learning Paths
This can be useful if you want to make changes to an already existing learning path.
- From the Dashboard menu go to Courses -> Learning Paths and select the learning path you want to clone.
- Click the three-dot action menu and select Clone
- The confirmation box will appear. Select Clone.
- A confirmation will appear and a new learning path will be created with the same name and a "_copy" suffix. This will include all the same information from the original learning path.
Deleting Learning Path
To delete a learning path:
- From the Dashboard menu go to Courses -> Learning Paths and select the learning path you want to delete.
- Click the three-dot action menu and select Delete.
Deleting a learning path will permanently remove it from your account. Remember, anything that gets deleted can not be recovered.
Learner Experience of Learning Paths
If a learner is enrolled in a Learning Path, in their Dashboard they will see a "My Learning Paths" menu item on their left sidebar.
Once the learner clicks on the "My Learning Paths" button, they will be redirected to a page showing them the Learning Paths they are enrolled in. If the learning path is in draft mode, users will not be able to launch it.
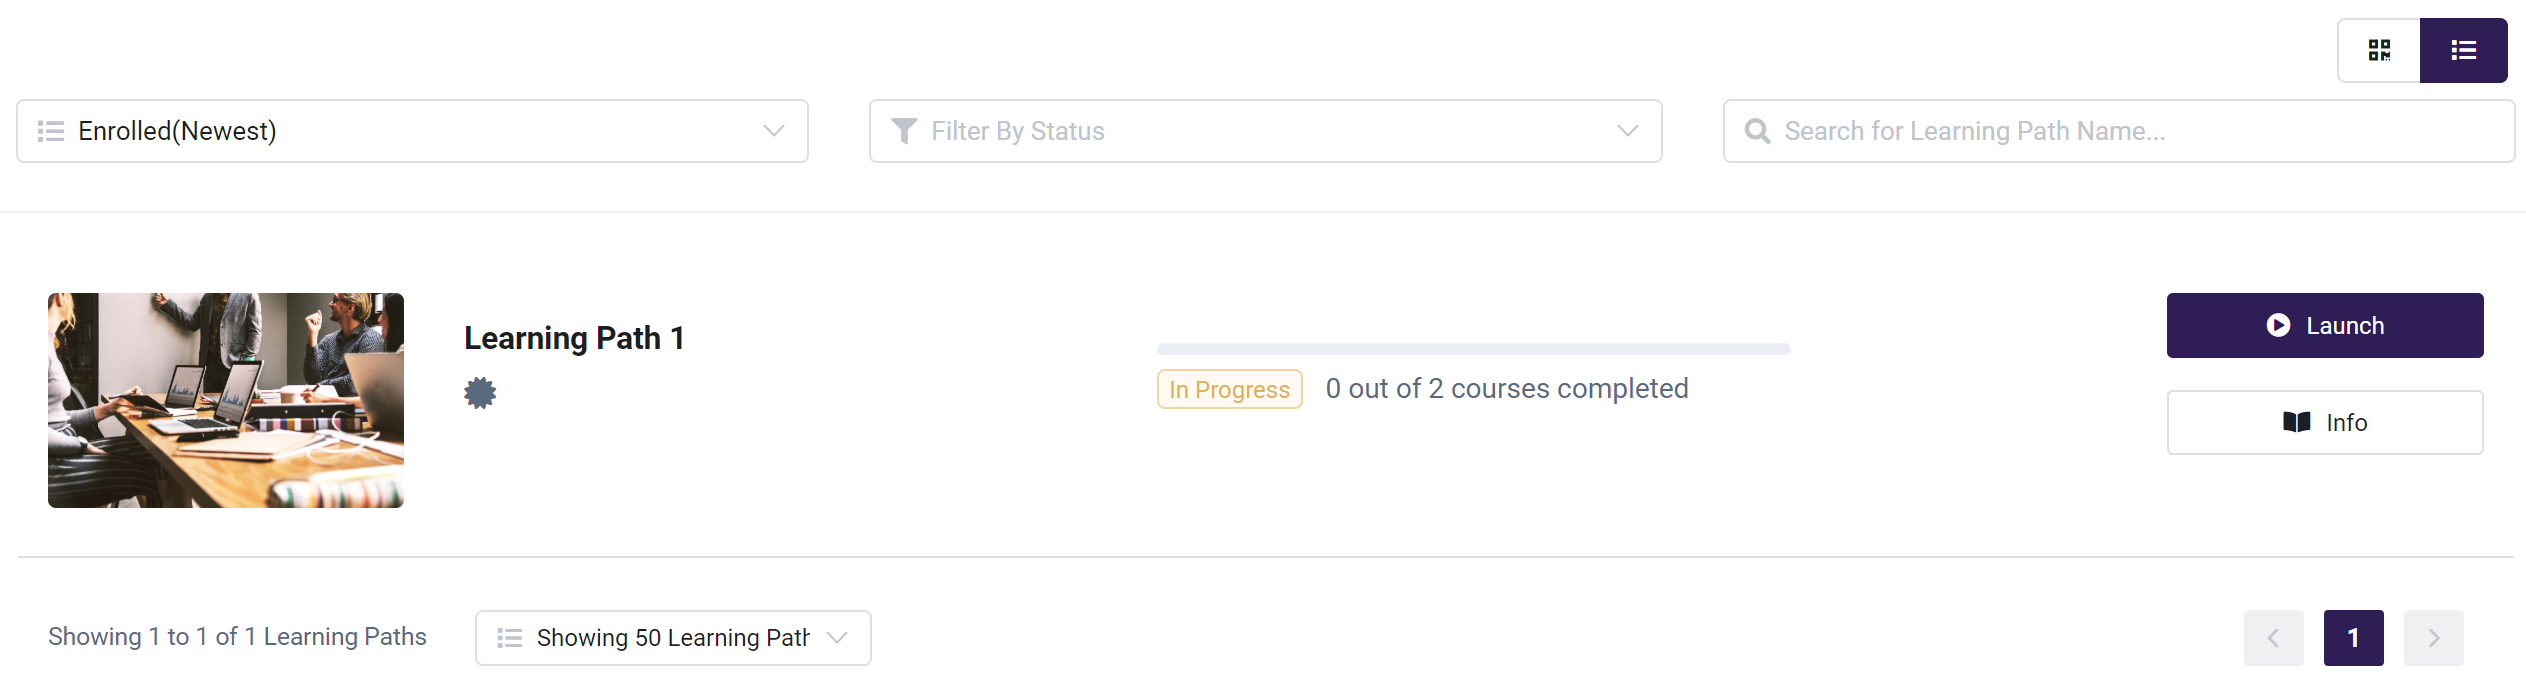
Users can also view the details and underlying courses of learning path from the Info button available.
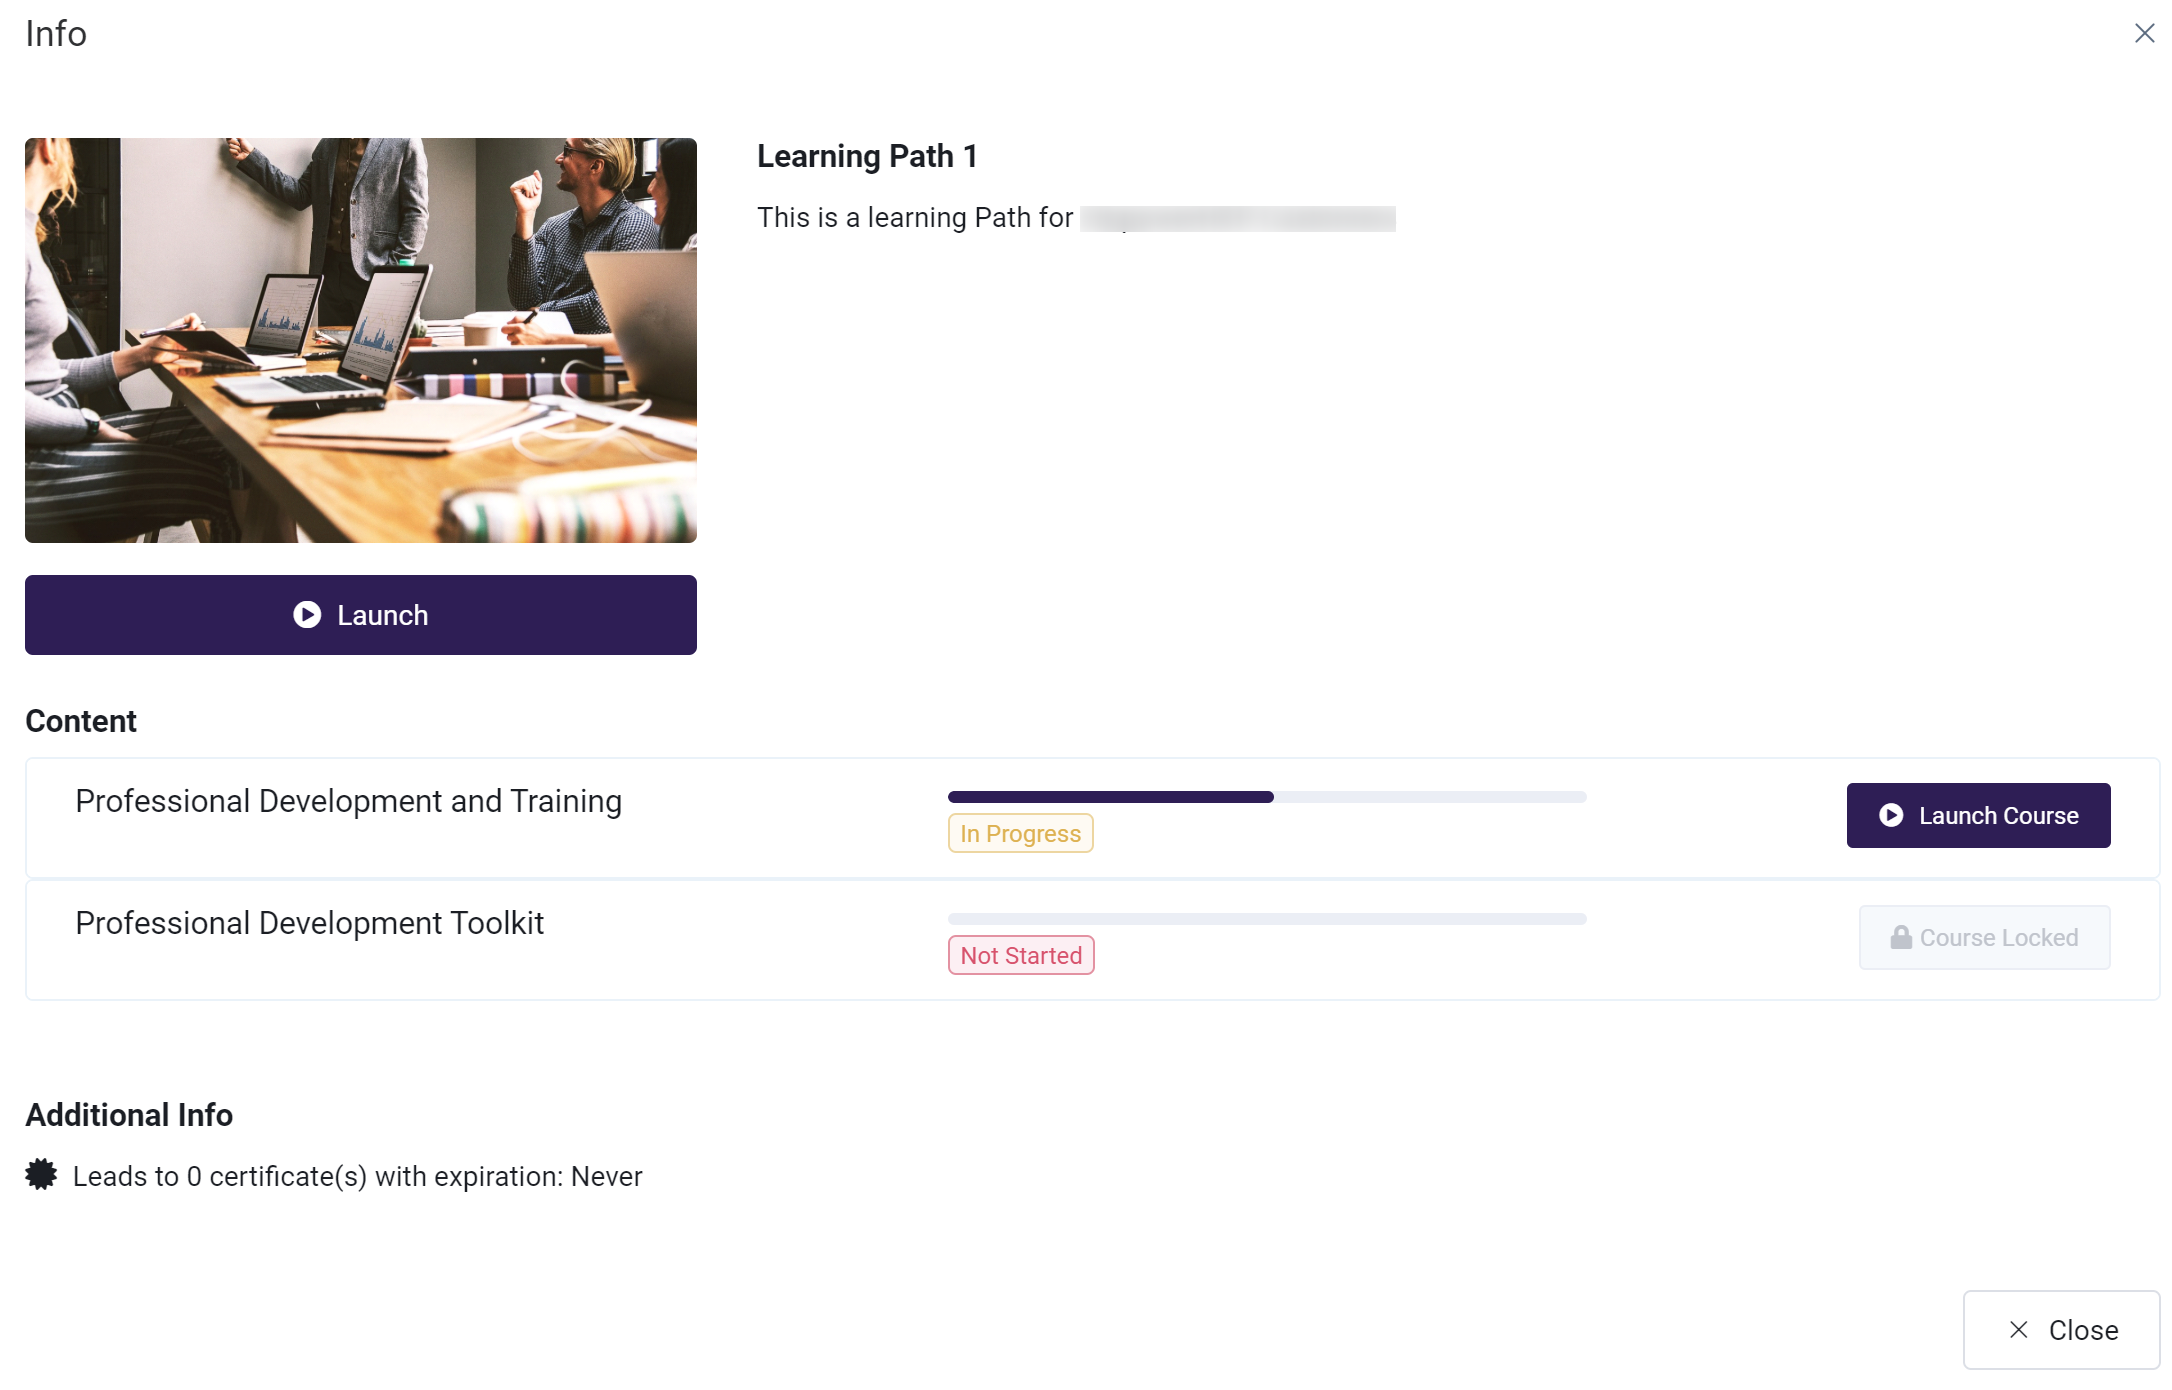
Once the user launches a learning path they will see the following details:

Once a learner has completed a Learning Path, they will receive an email notification! This notification can be configured in your Email Templates. Please click here to learn more about the Learning Path Completed Email Template
The courses included in the learning path can only be accessed from the My Learning Paths tab. Learners will not find them on their My Courses page.
Next Step
Now that you learned about the learning path, you'll want to add your learning path to a Product so users can purchase and enroll in it. This guide will help you with those steps: