Salesforce Integration with your LMS
Academy of Mine provides clients with a Salesforce Integration that allows you to track student activity and progress in the LMS, and trigger changes in Salesforce data accordingly. For example, this can be used to update Salesforce Contact details with changing user information, or even to track and sync progress data for specific course enrollments of a student (Custom Object properties in Salesforce can be leveraged to track a particular student x course enrollment combination and update it with detailed progress information). It can also be used to sync your courses in Salesforce, again using custom objects.
This integration will recognize LMS events such as New Account Created, Account Details Updated, Course Completed, and more, and pass data along to Salesforce, allowing you to keep your Contacts and other objects synced. Note: the data changes and storage are specifically related to Contacts and custom objects (Courses and Enrollments, specifically) in Salesforce.
In this guide, we will go through how to set up the Salesforce integration with AOM. Each major step is broken down so that you can easily get this connected!
Step 1: Create an App in Salesforce
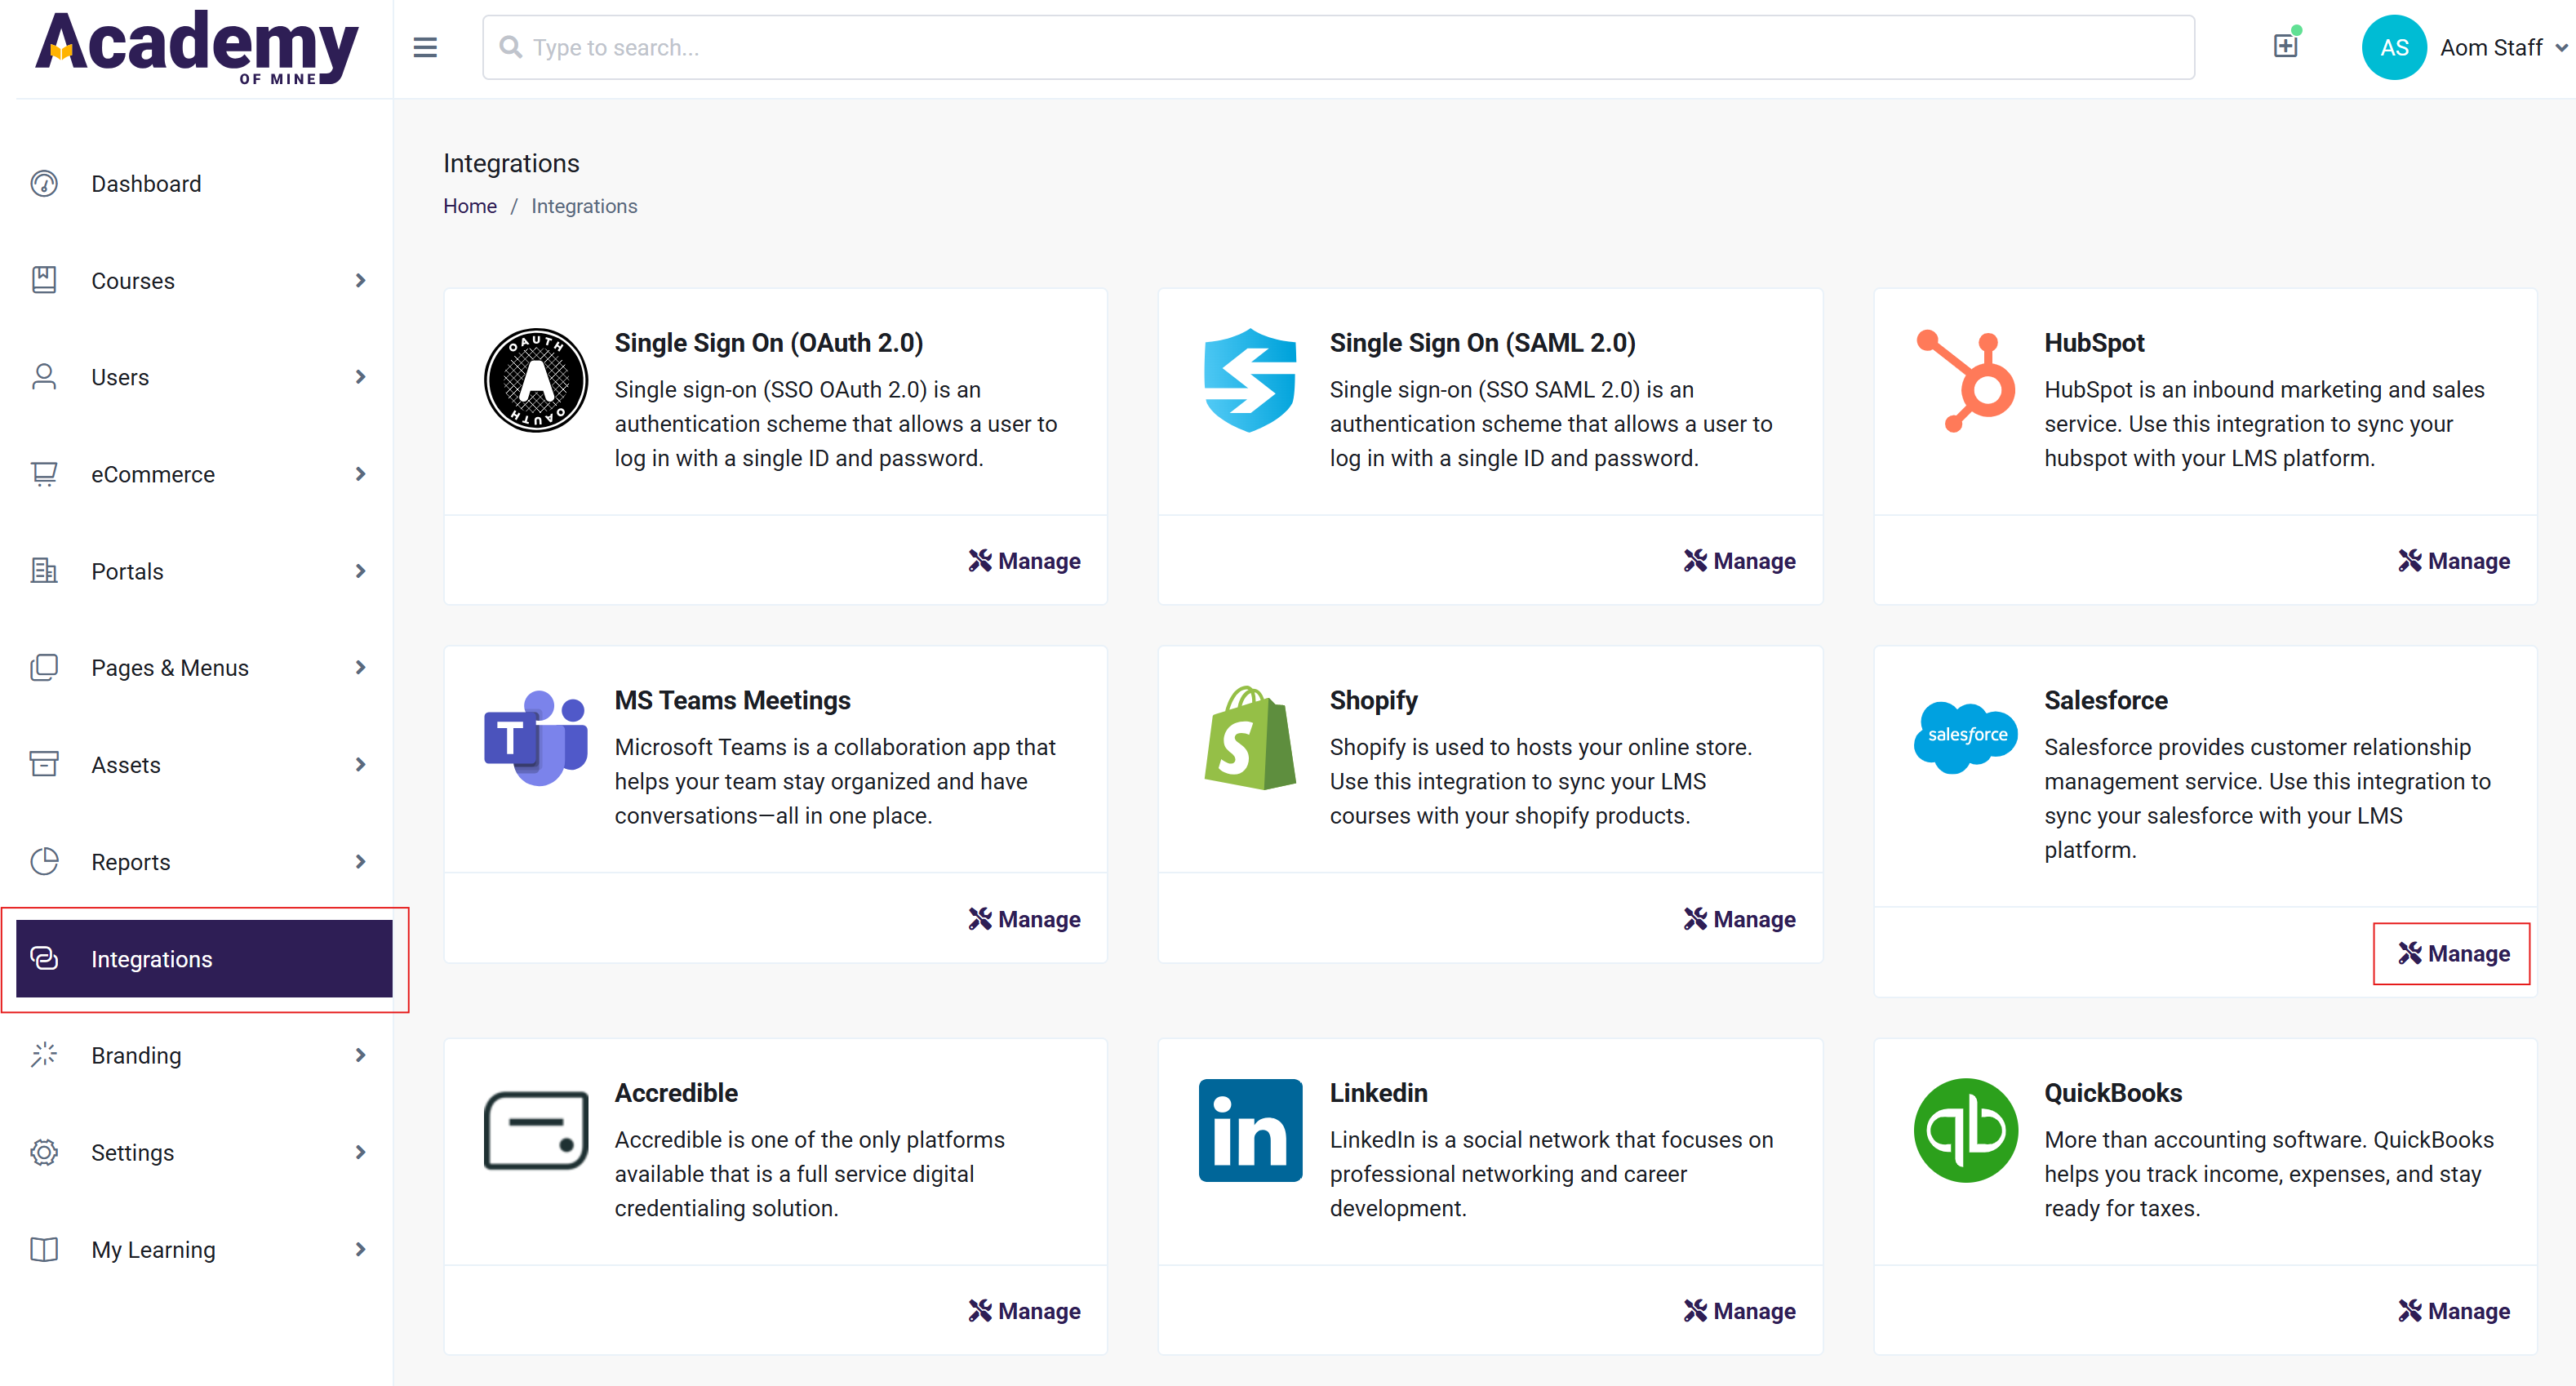
- From the Admin Dashboard, navigate to the Integrations tab in the Admin Dashboard, which you can find in the sidebar on the left.
- Click on the Manage button for the Salesforce Integration
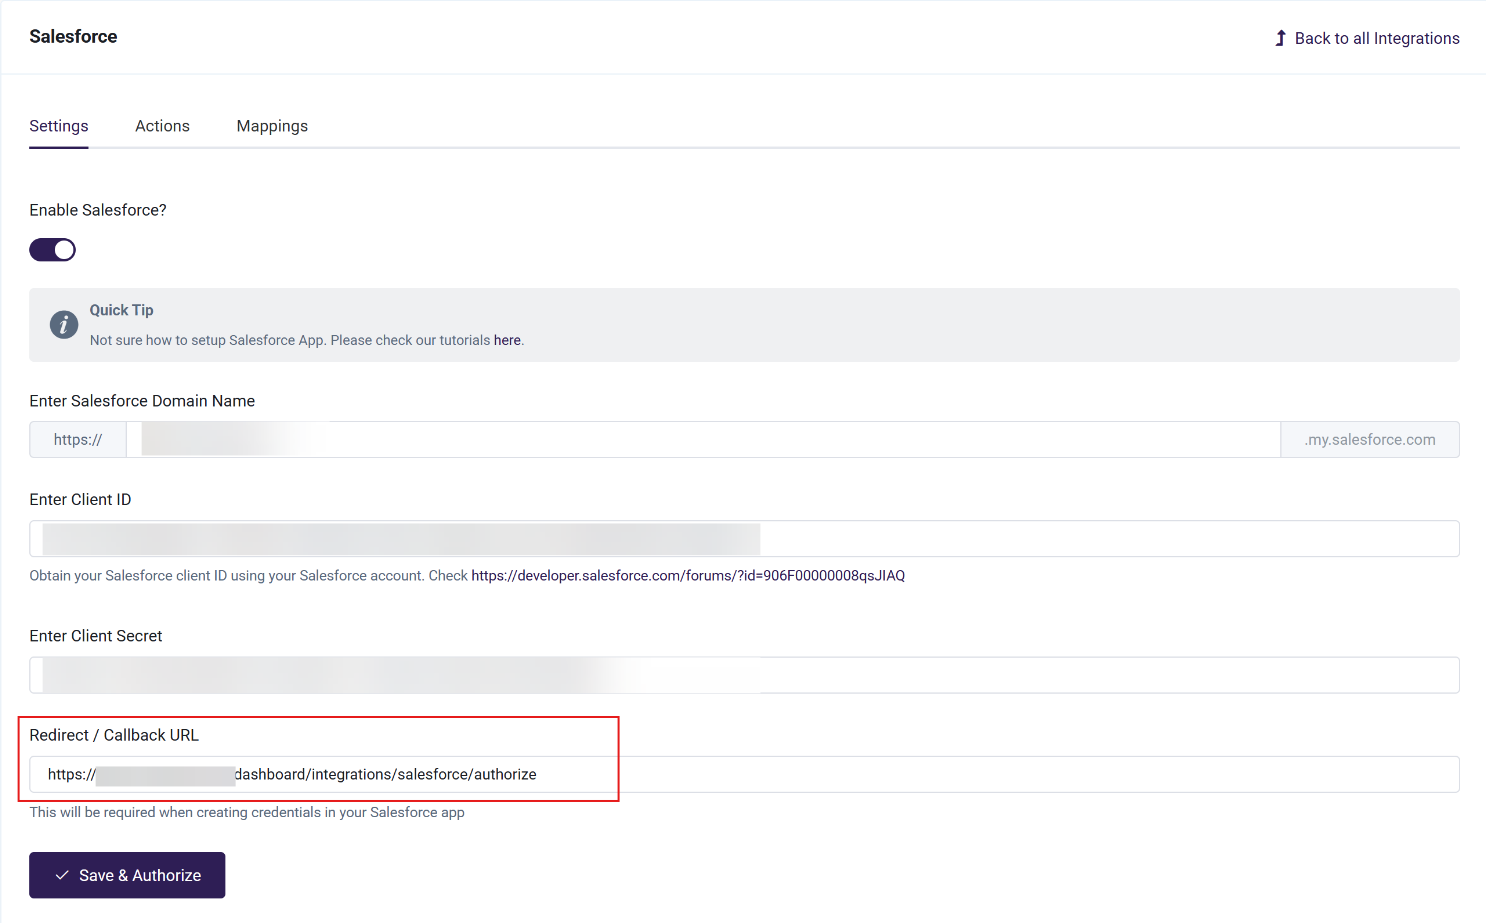
- On this page, you will see a field called "Redirect/Callback URL". Copy this URL, as it will be used later in Salesforce.
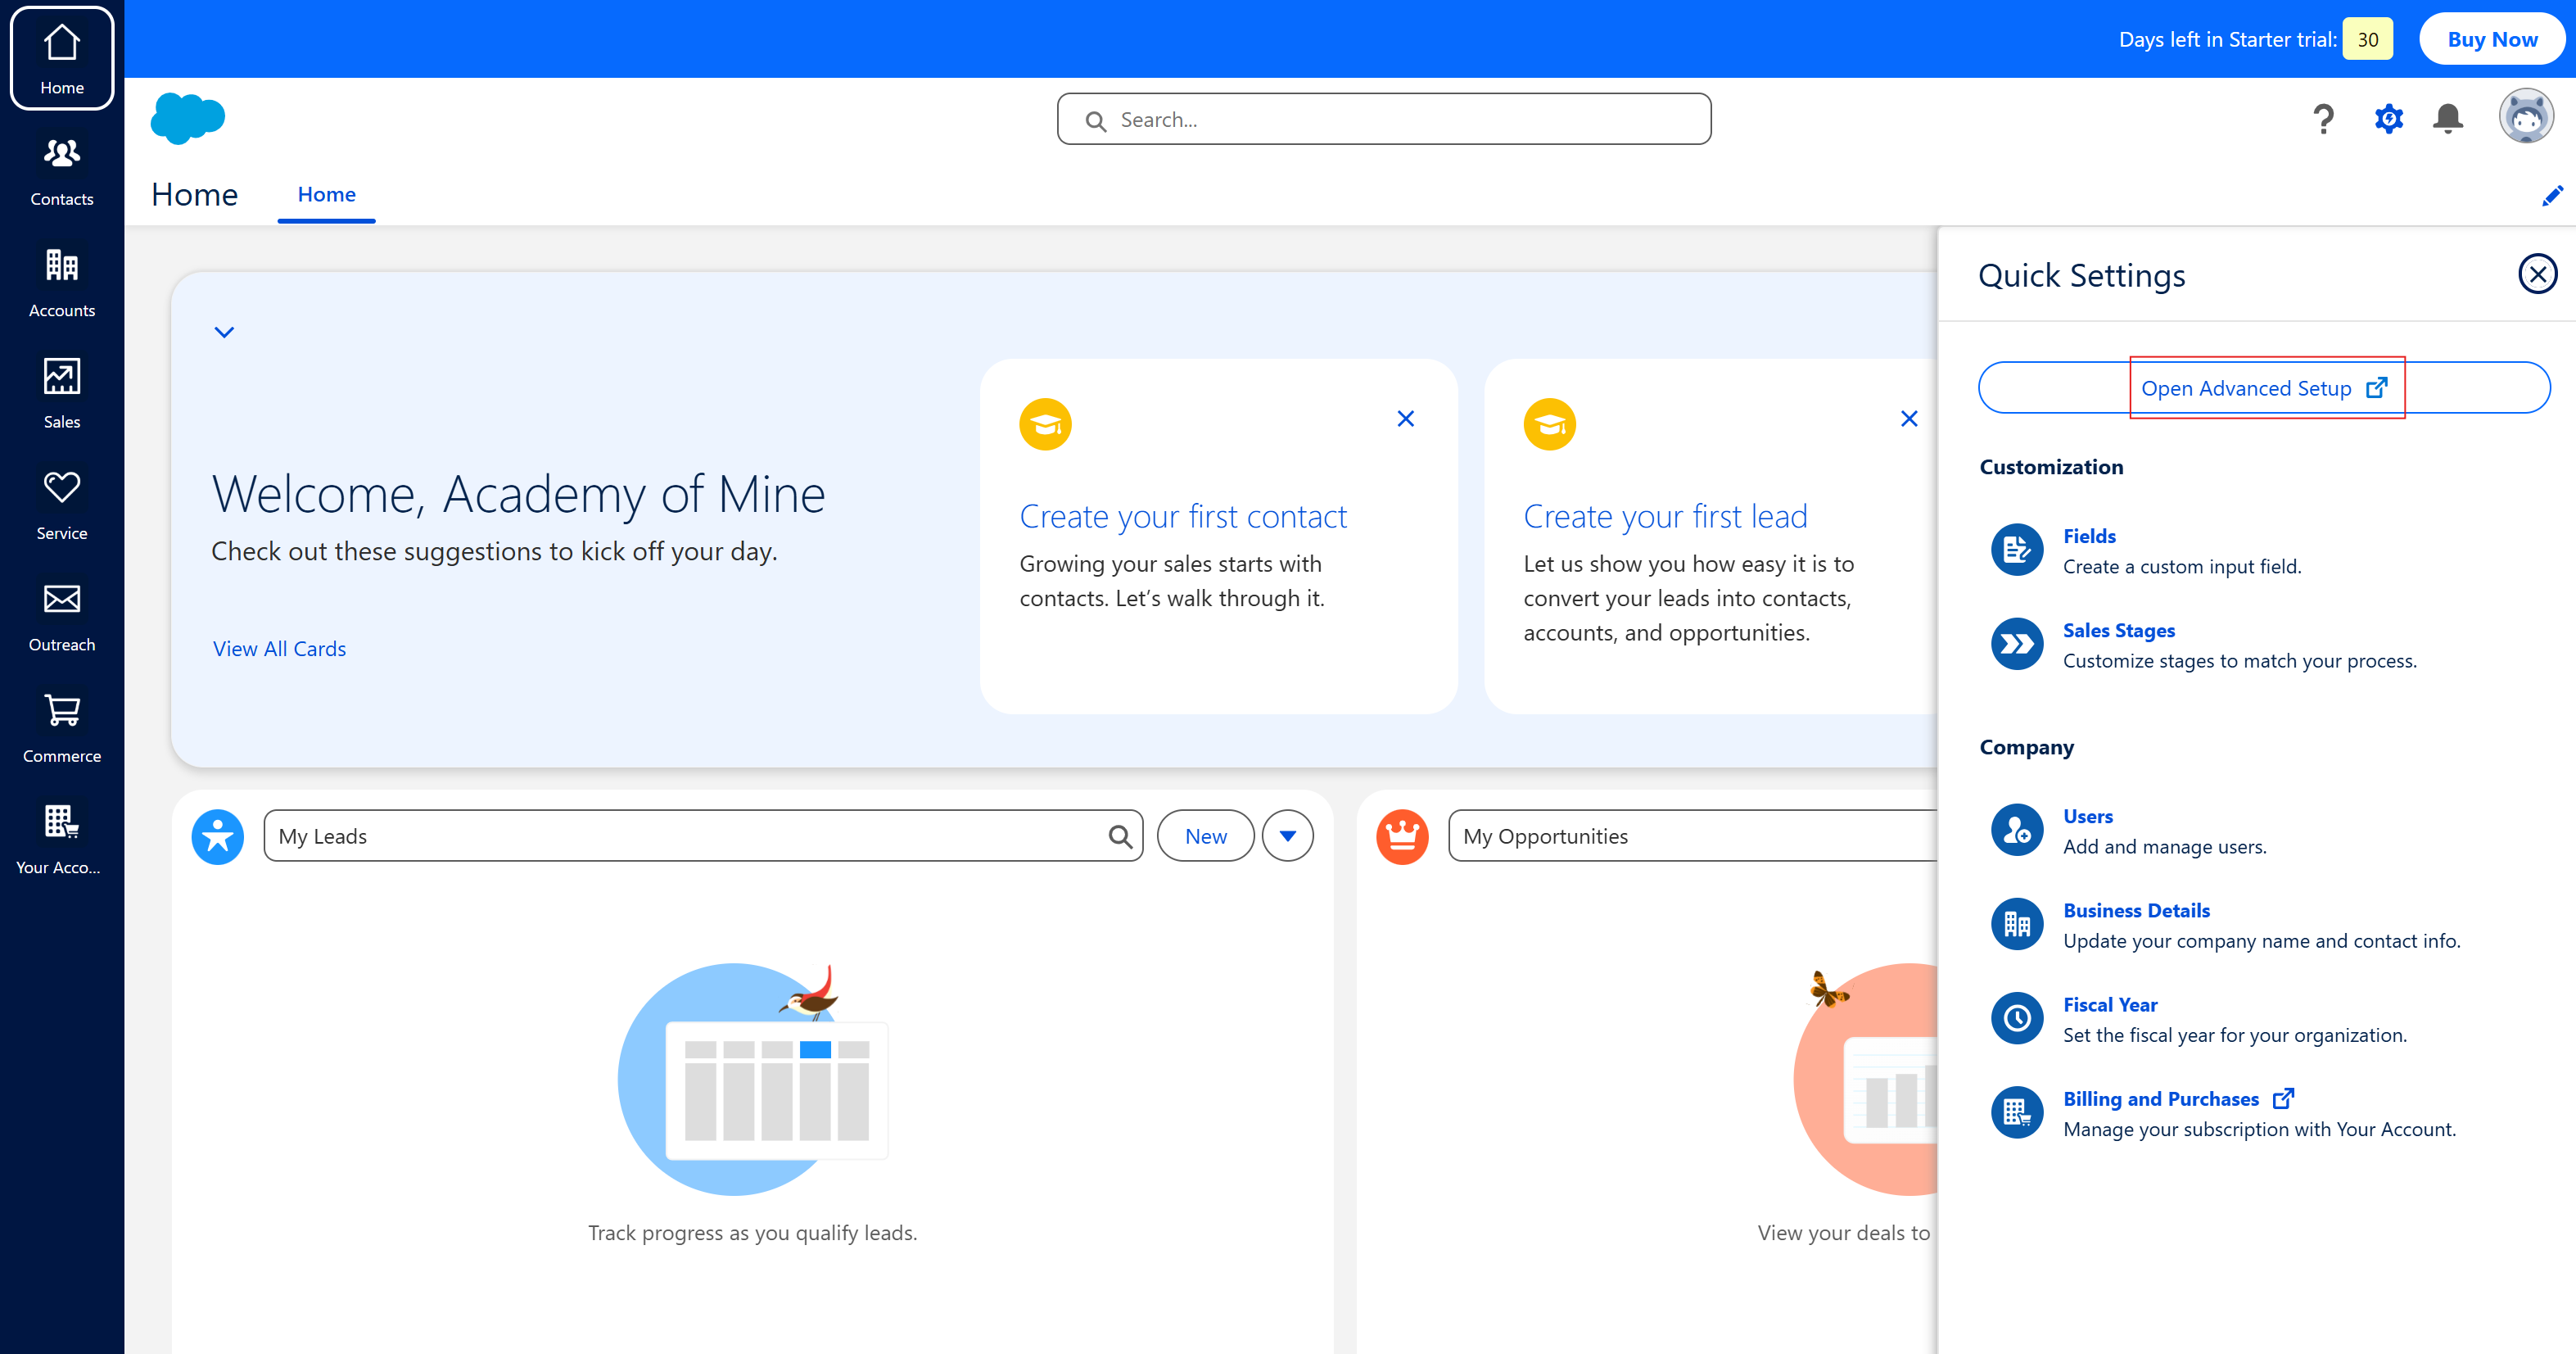
- Open a new tab and navigate to your Salesforce Portal.
- Click on the settings gear icon, then click on Open Advanced Setup.
- Type "App Manager" into the Quick Find box, then click on "App Manager".
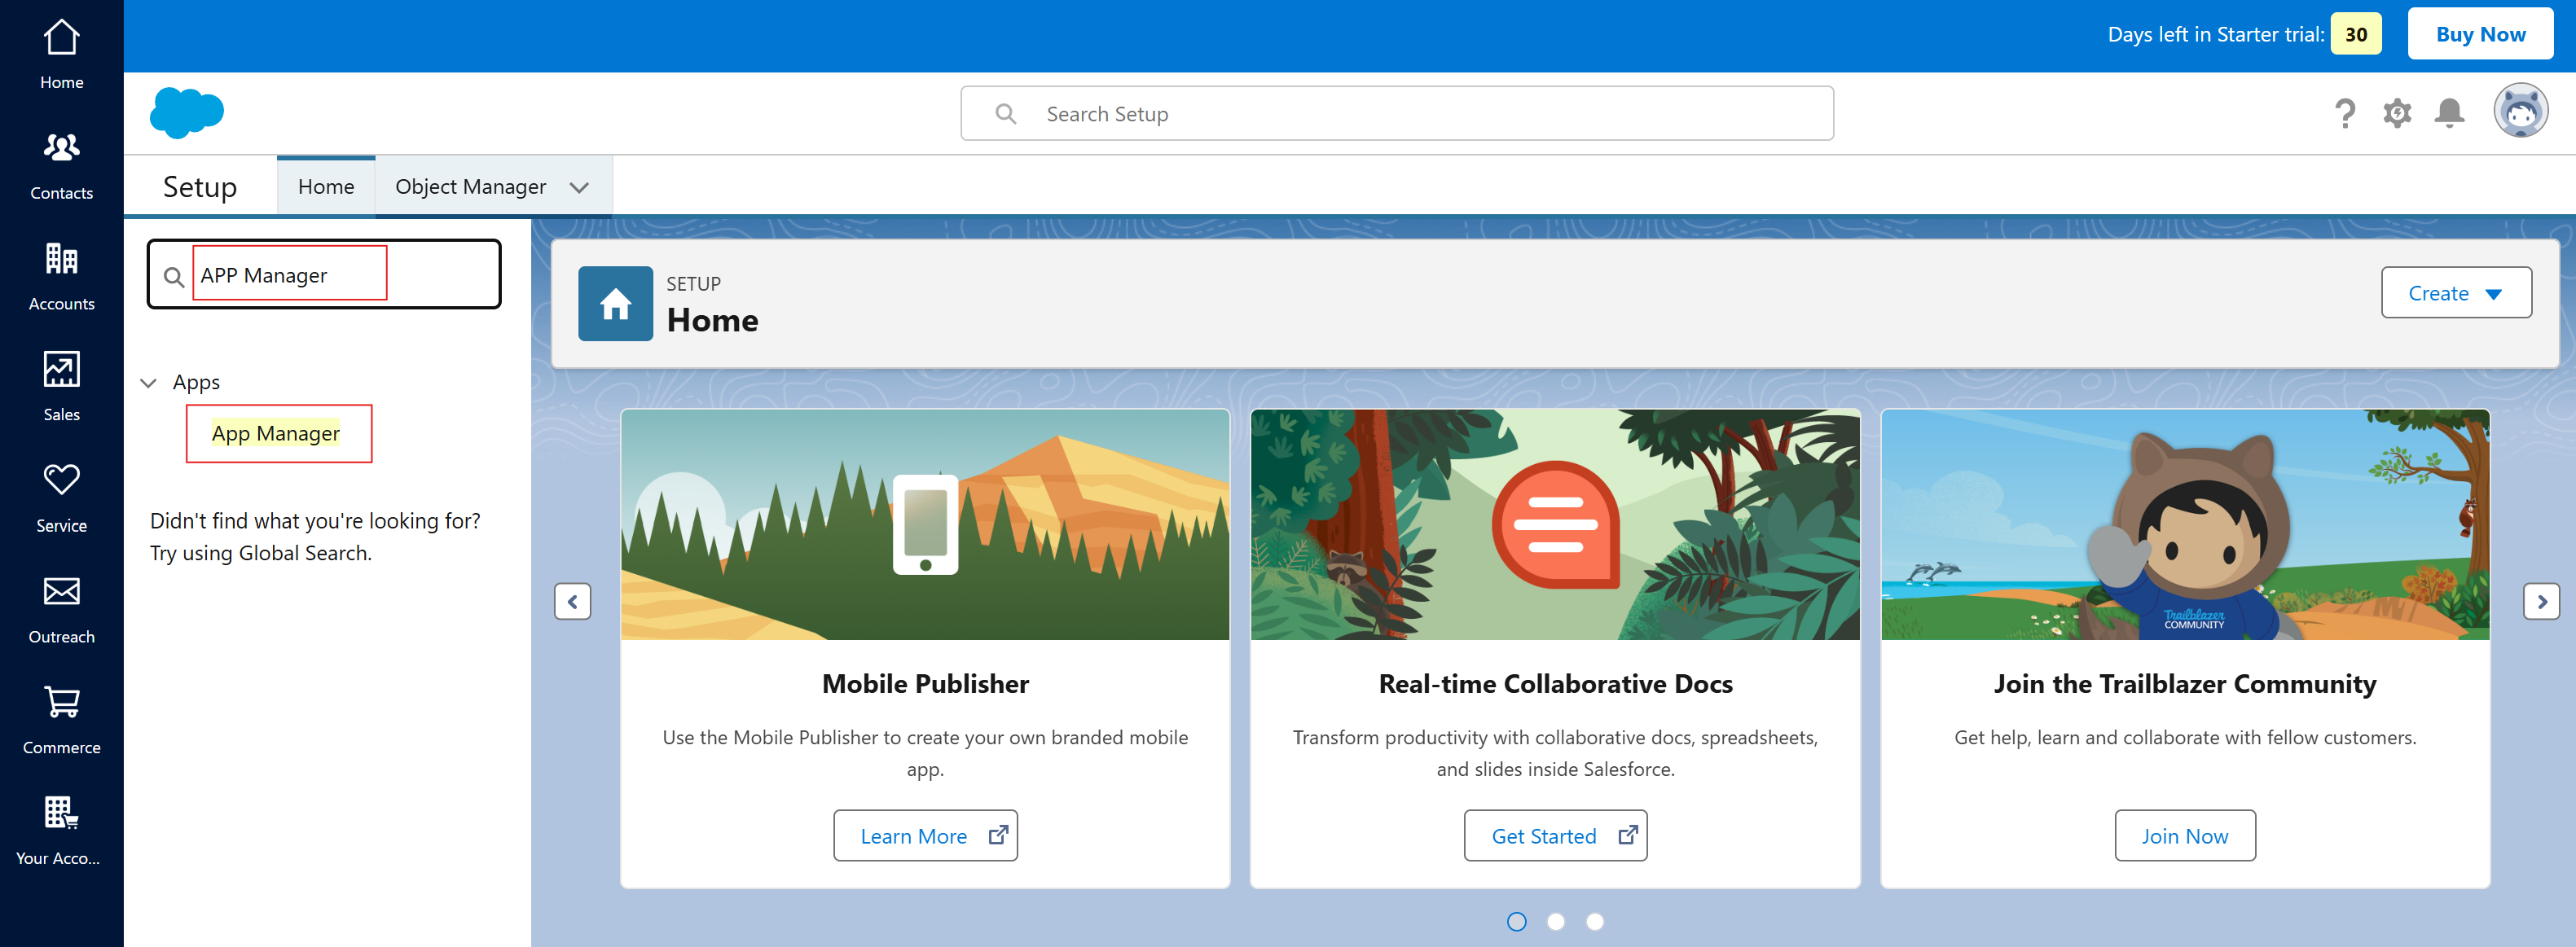
- First, you need to create a new app to integrate Salesforce with your LMS. Click on the "New Connected App" button on the right side of the screen.
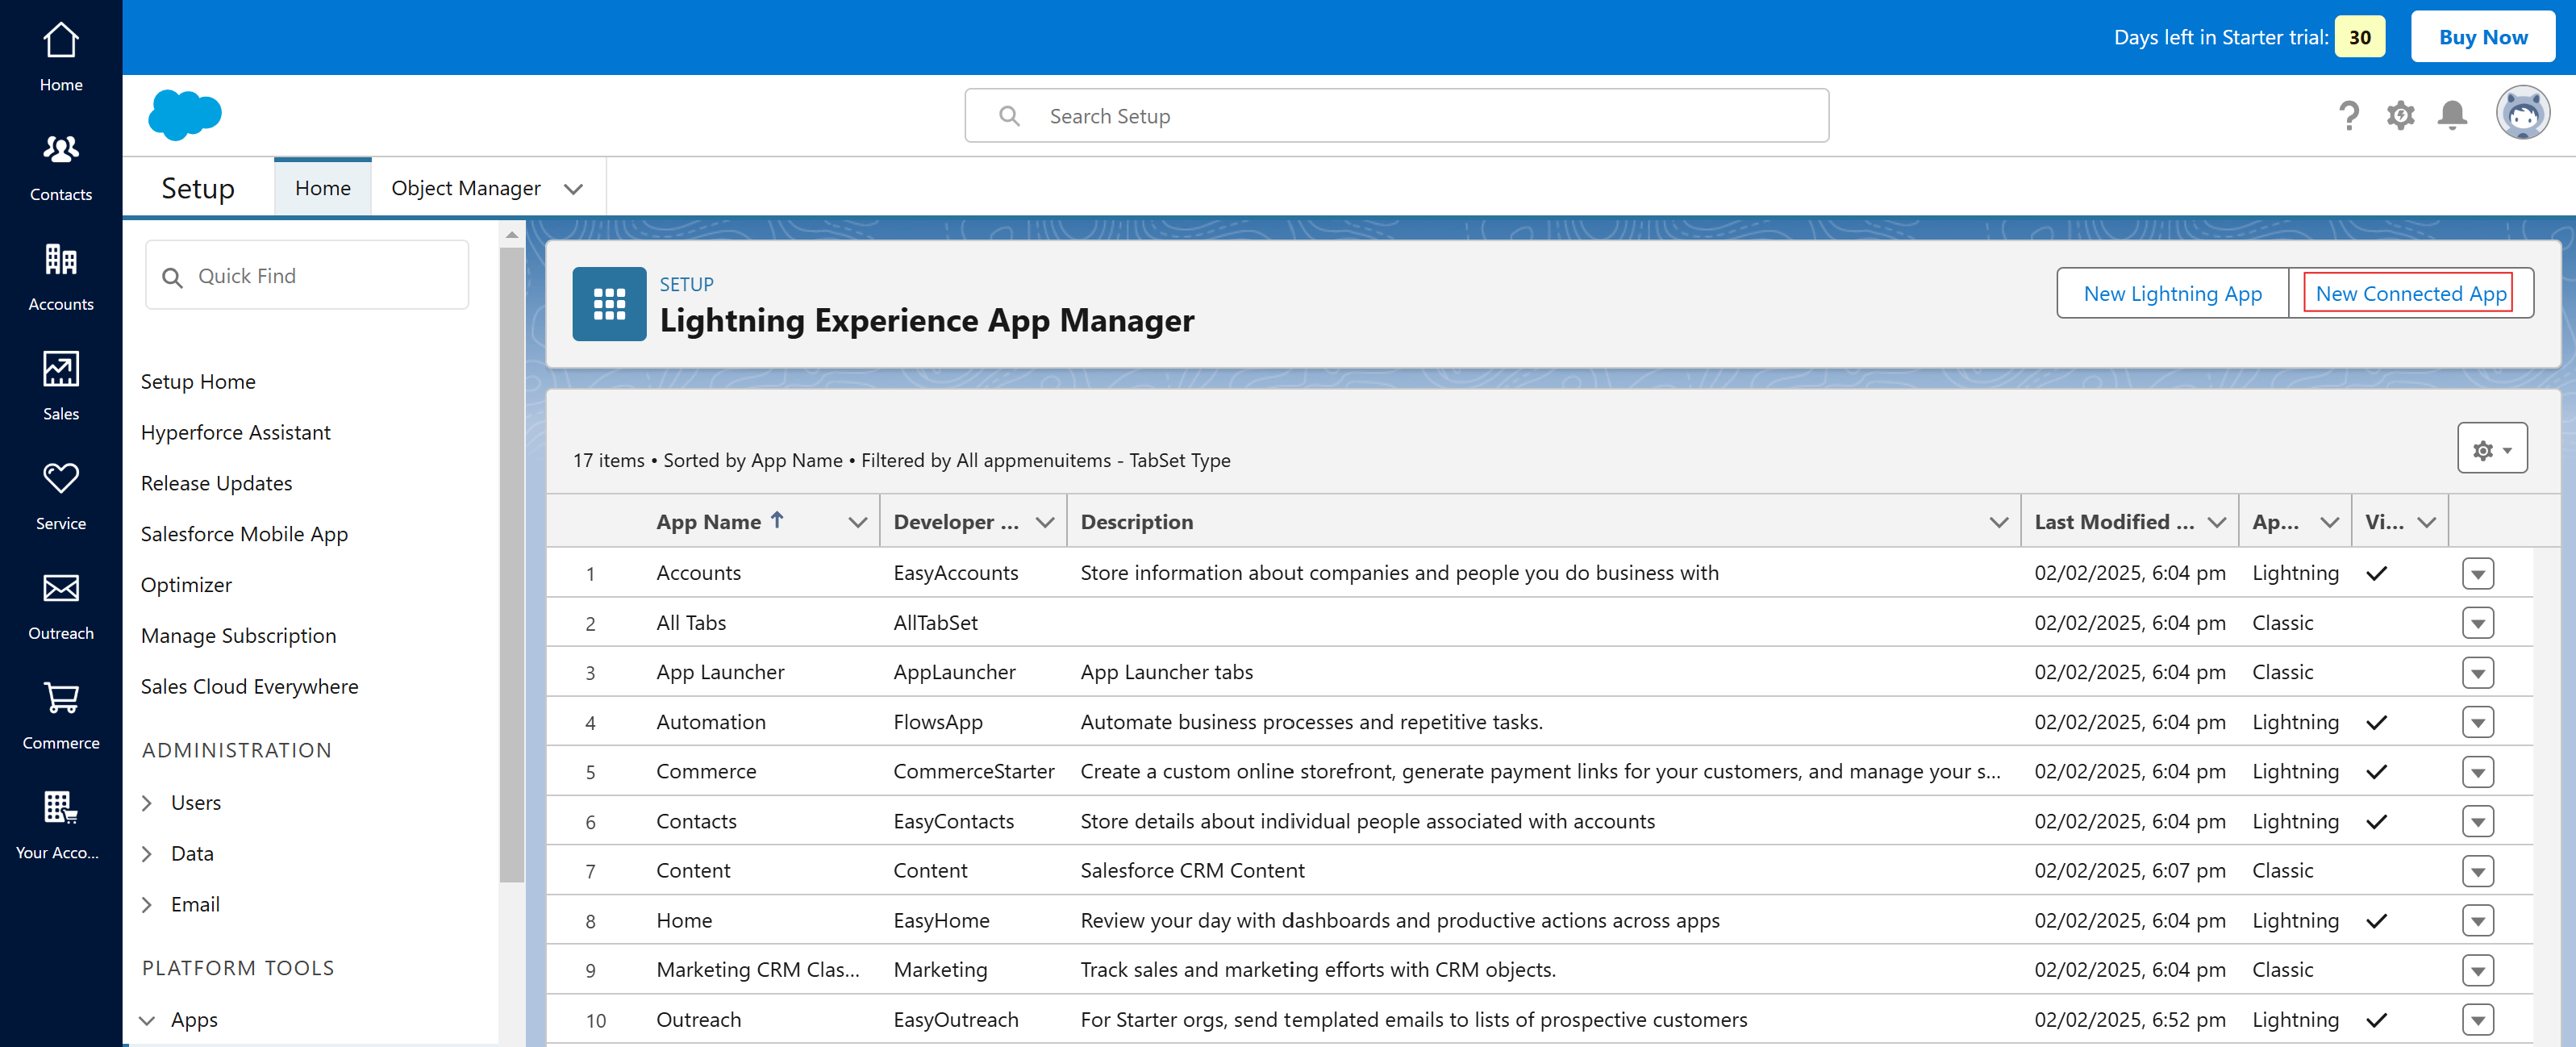
- Select Create a Connected App, then click Continue.
-
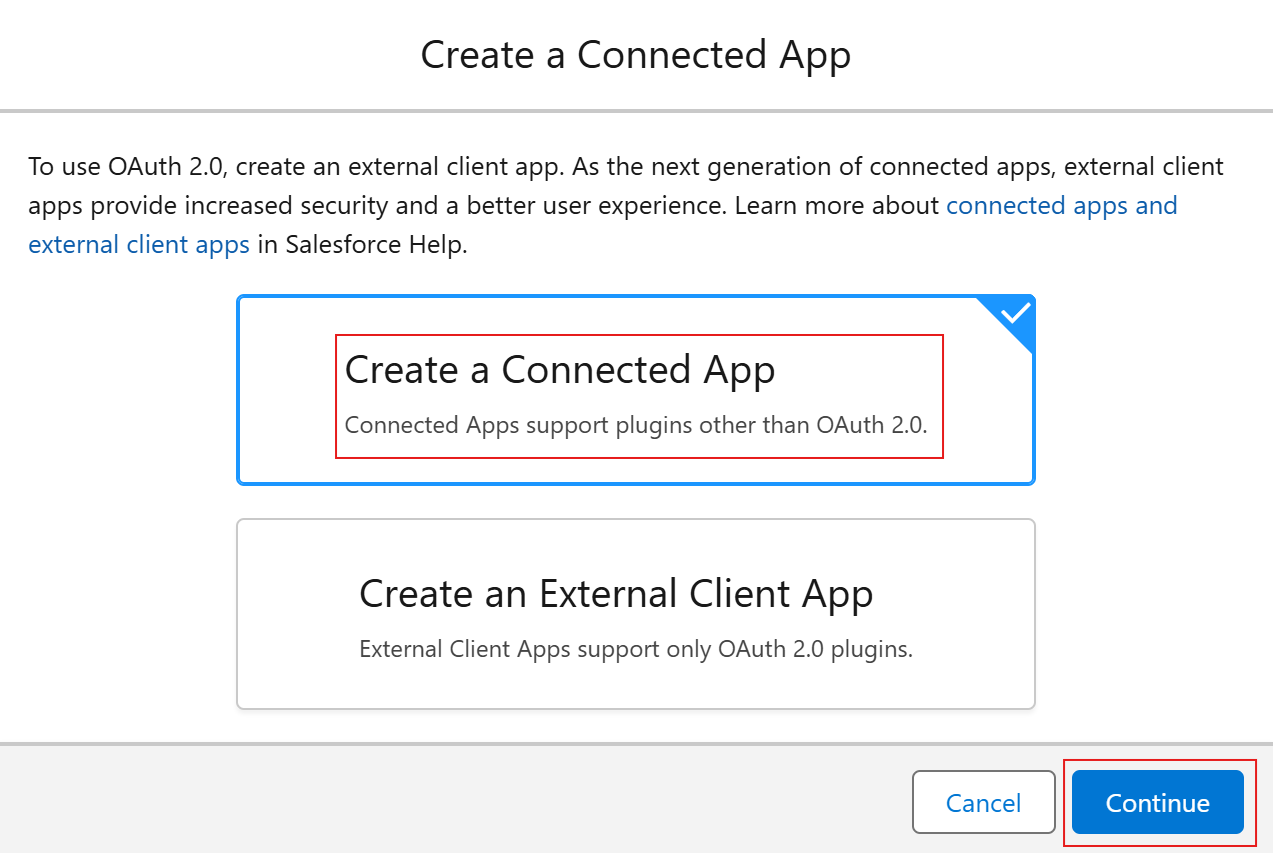
Fill in the form fields and click the Save button. This is where you will also paste the "Redirect/Callback URL" that you copied earlier from AOM. See the screenshot below for more details:
Basic Information
- Connected App Name: Enter any name you like (e.g. "My LMS APP").
- API Name: This will populate automatically based on the Connected App Name.
- Contact Email: Your email address.
- Contact Phone, Logo Image URL, Icon URL, Info URL, and Description: Not required, and can be left blank.
API (Enable OAuth Settings)
- Check Enable OAuth Settings.
- Callback URL: Paste the "Redirect/Callback URL" you copied earlier from the AOM Salesforce integration page.
- Selected OAuth Scopes: From the "Available OAuth Scopes" list, select and move the following into "Selected OAuth Scopes" using the Add button:
- Full access (full)
- Manage user data via APIs (api)
- Perform requests at any time (refresh_token, offline_access)
- Check Require Secret for Web Server Flow.
- Check Require Secret for Refresh Token Flow.
- Click Save.
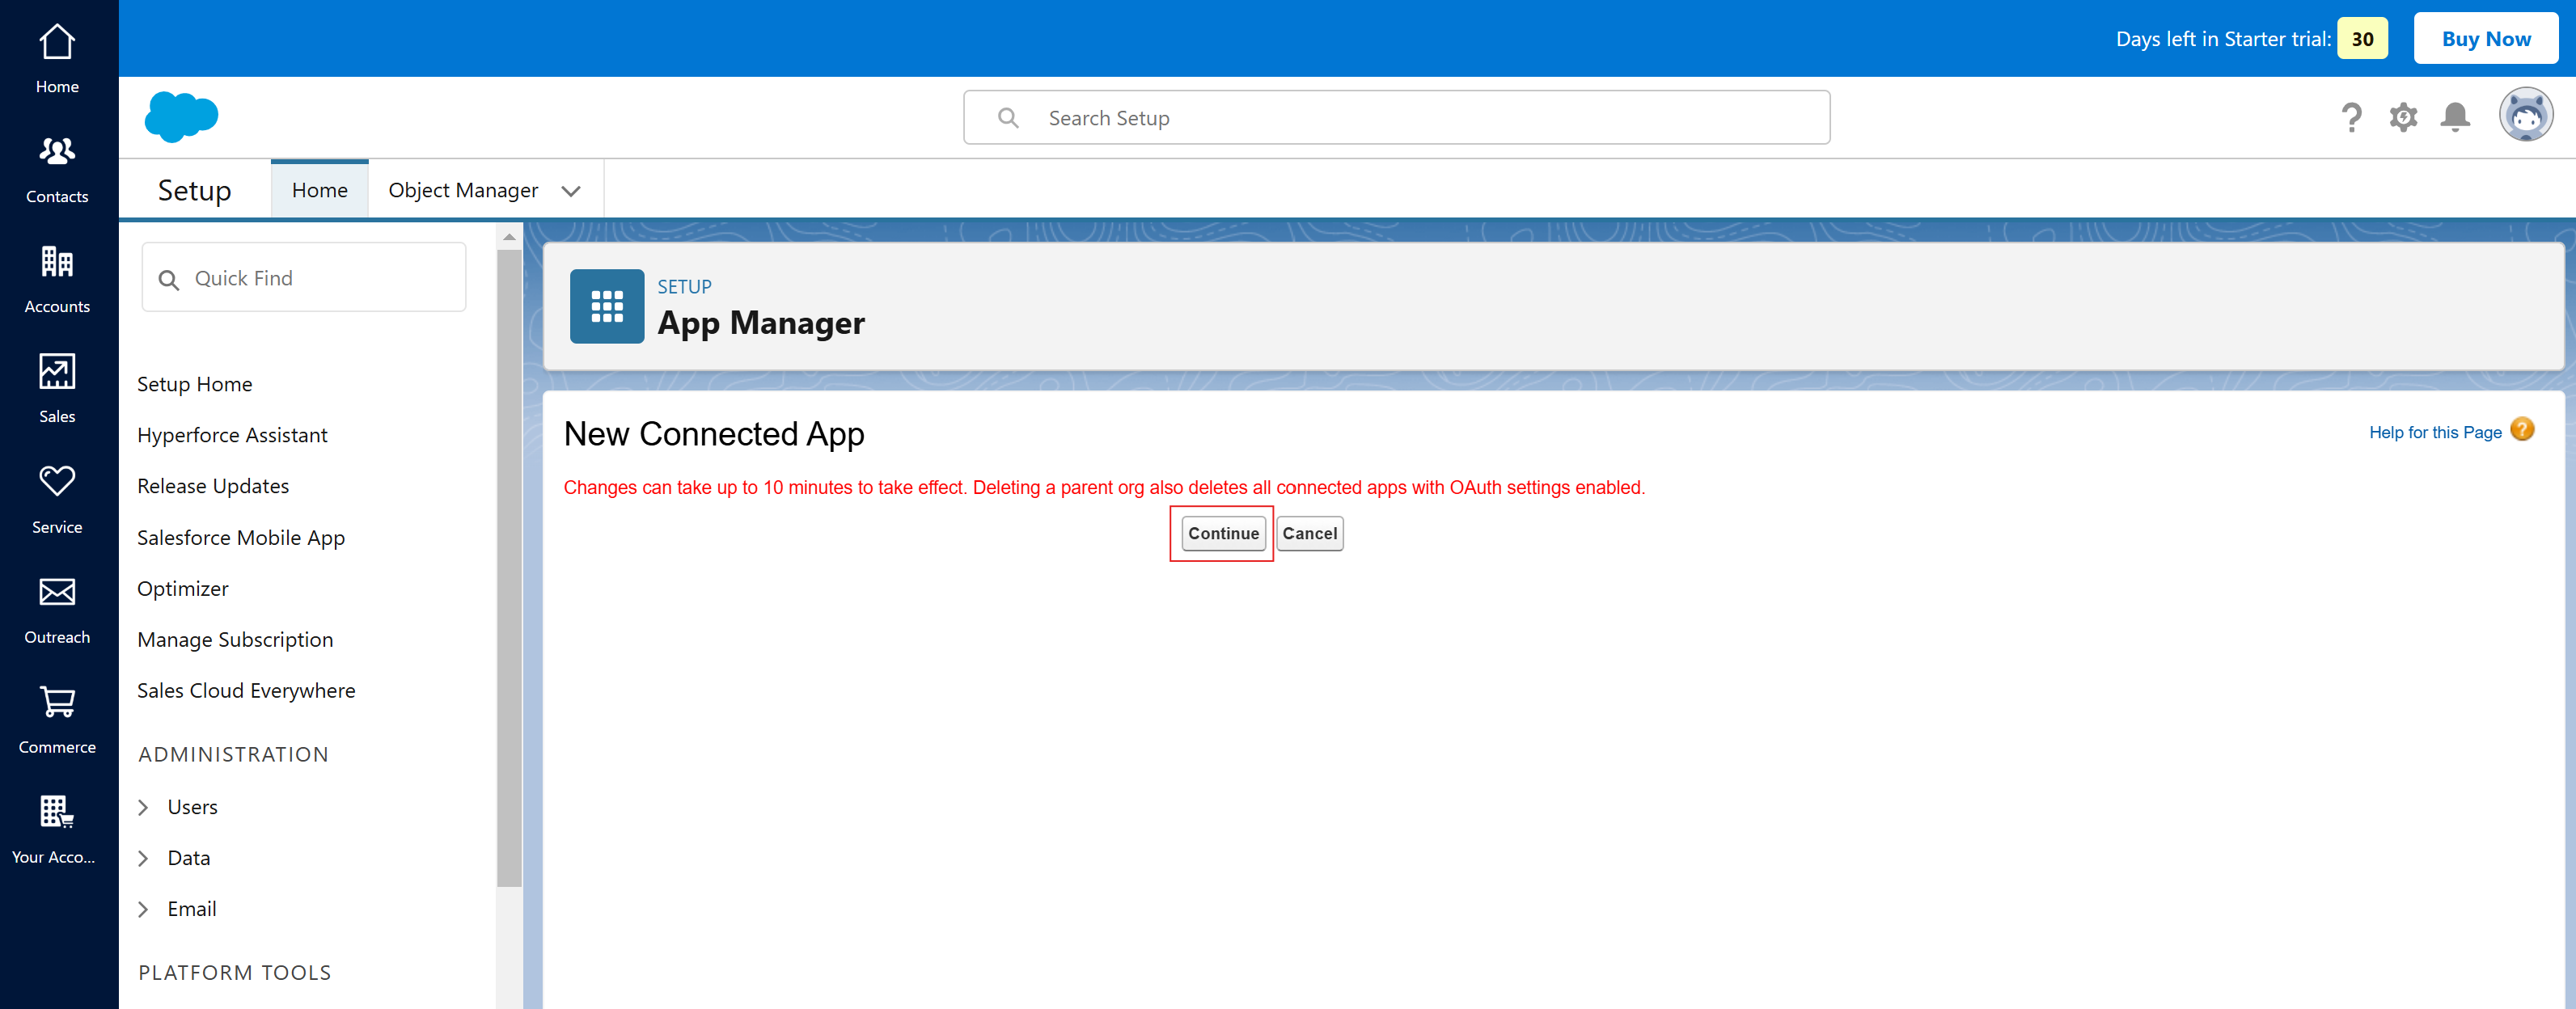
- After saving the form, you will see a prompt like the one below. Click the Continue button. As mentioned in the image below, Salesforce might take up to 10 minutes to reflect the changes.
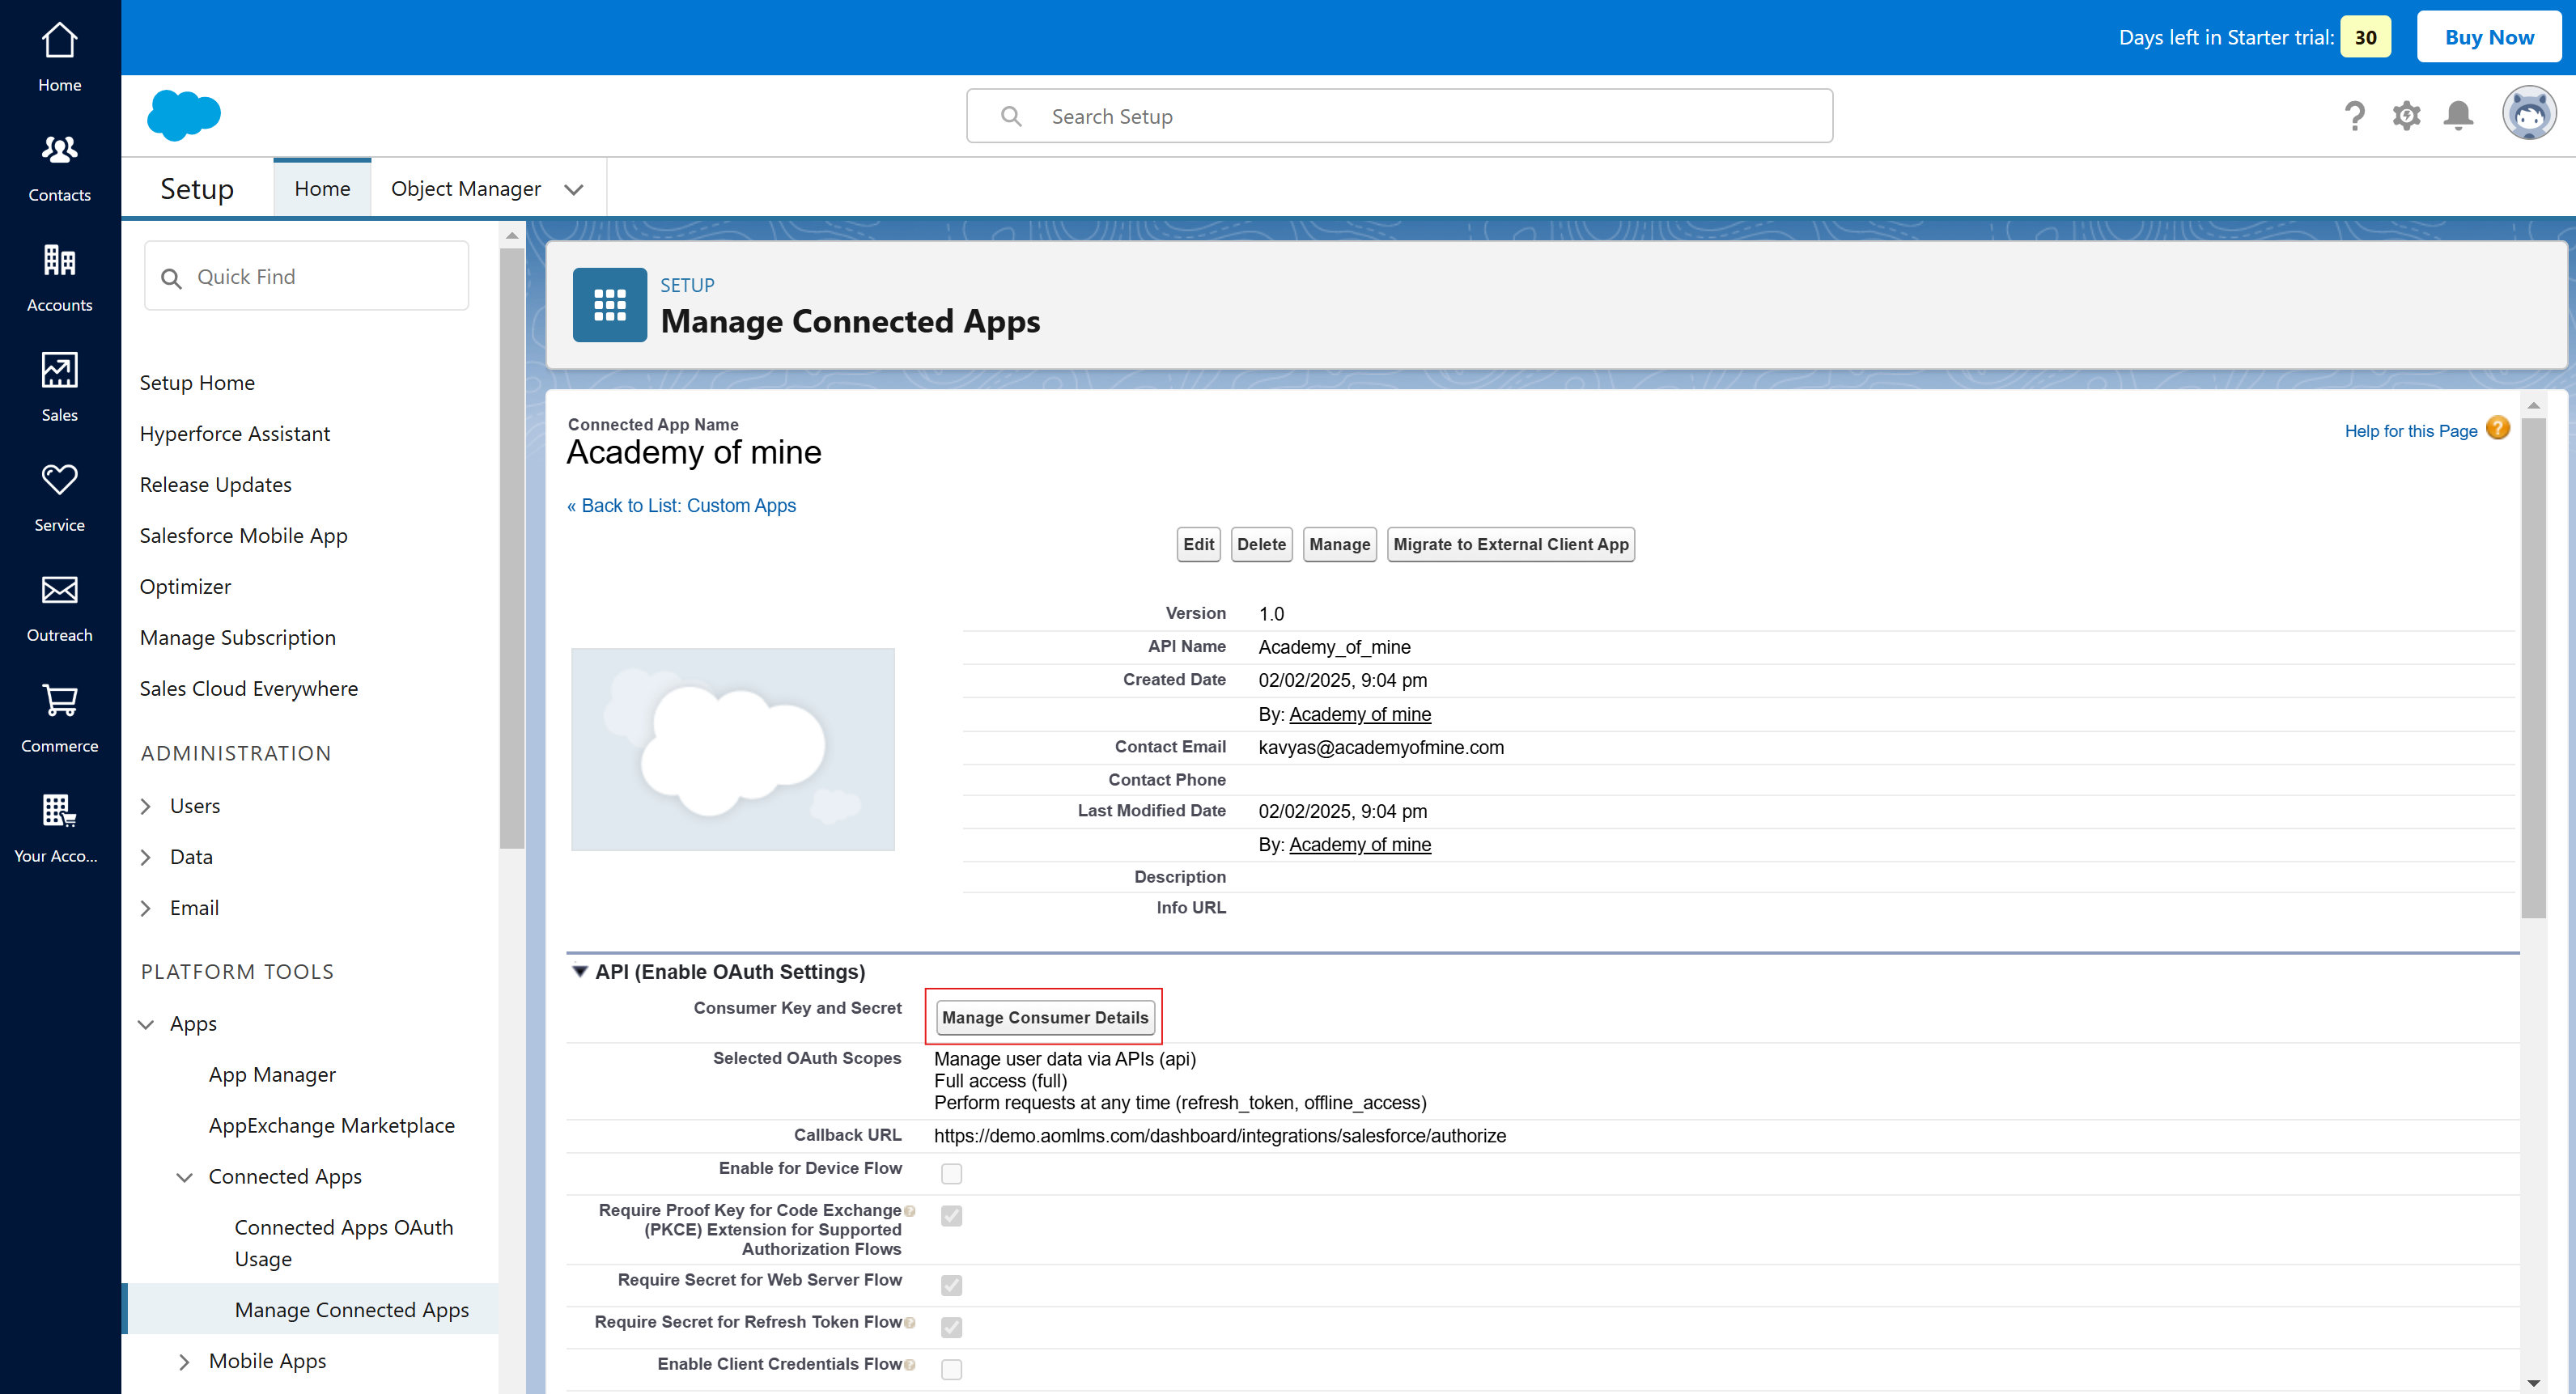
You have now successfully created an application in Salesforce. Next, you'll need to get the connection credentials for this newly created app. After clicking the Continue button in step 10, you will be redirected to the page below. Click Manage Consumer Details. You will receive an email with a verification code.
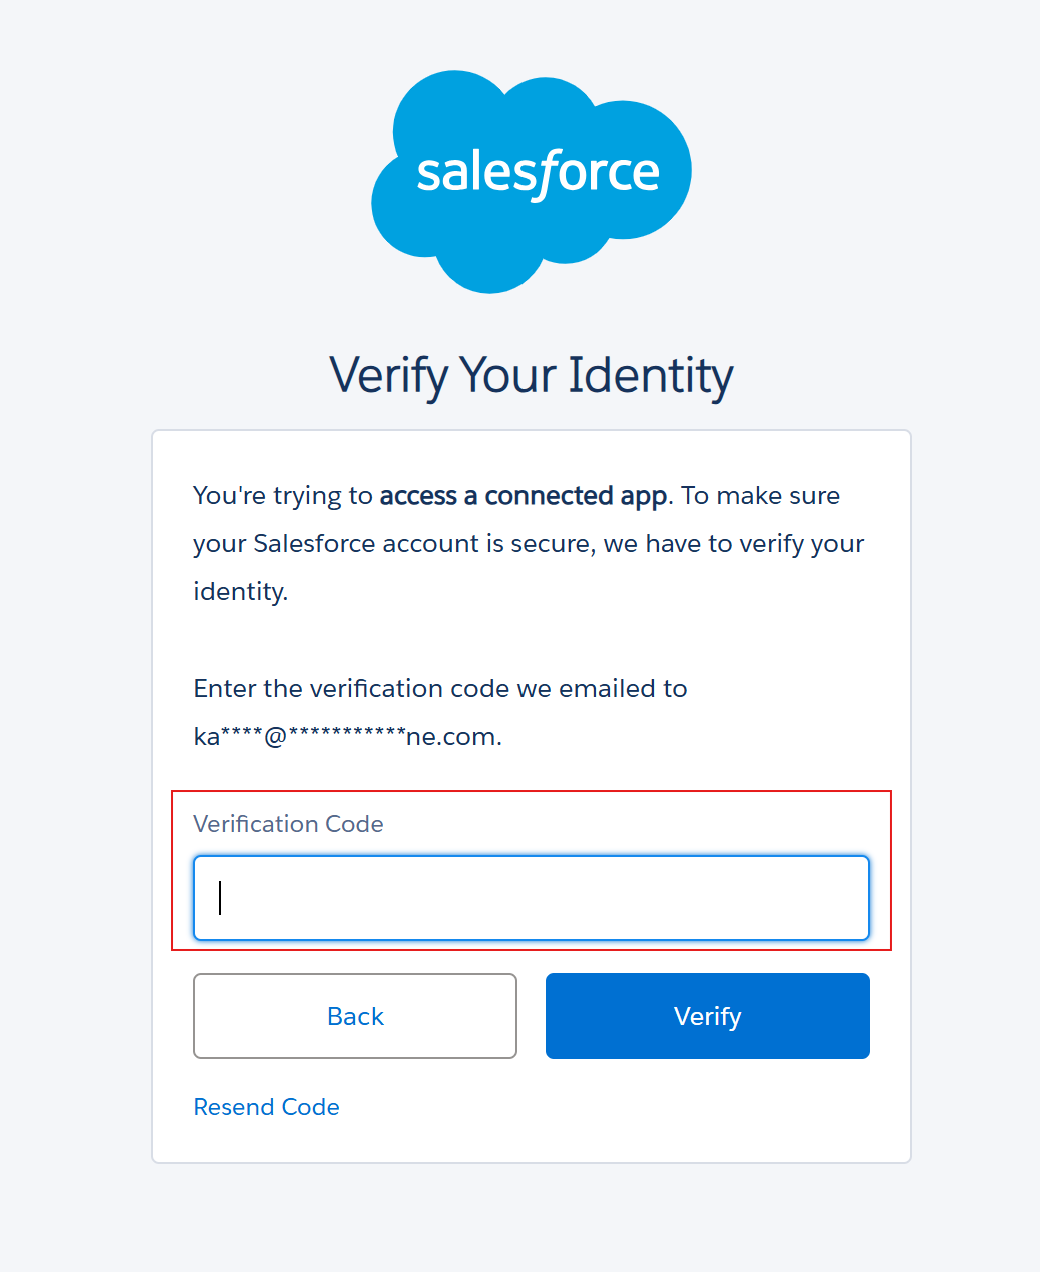
Enter the verification code.
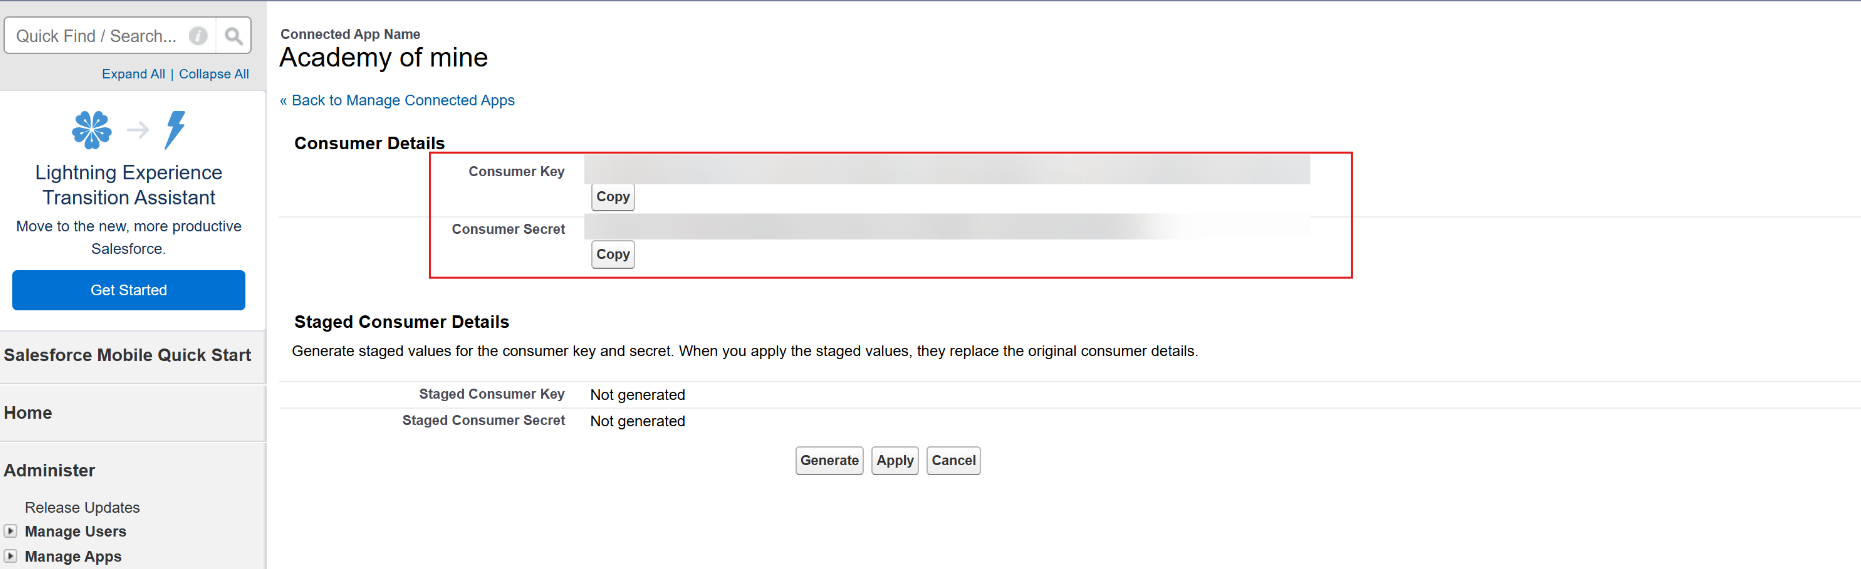
You will be redirected to the page below. Copy the Consumer Key and Consumer Secret and keep them handy.
Step 2: Connect Salesforce to AOM
- Now, go back to AOM and return to the Salesforce integration page by selecting Integrations > Manage in the Salesforce section.
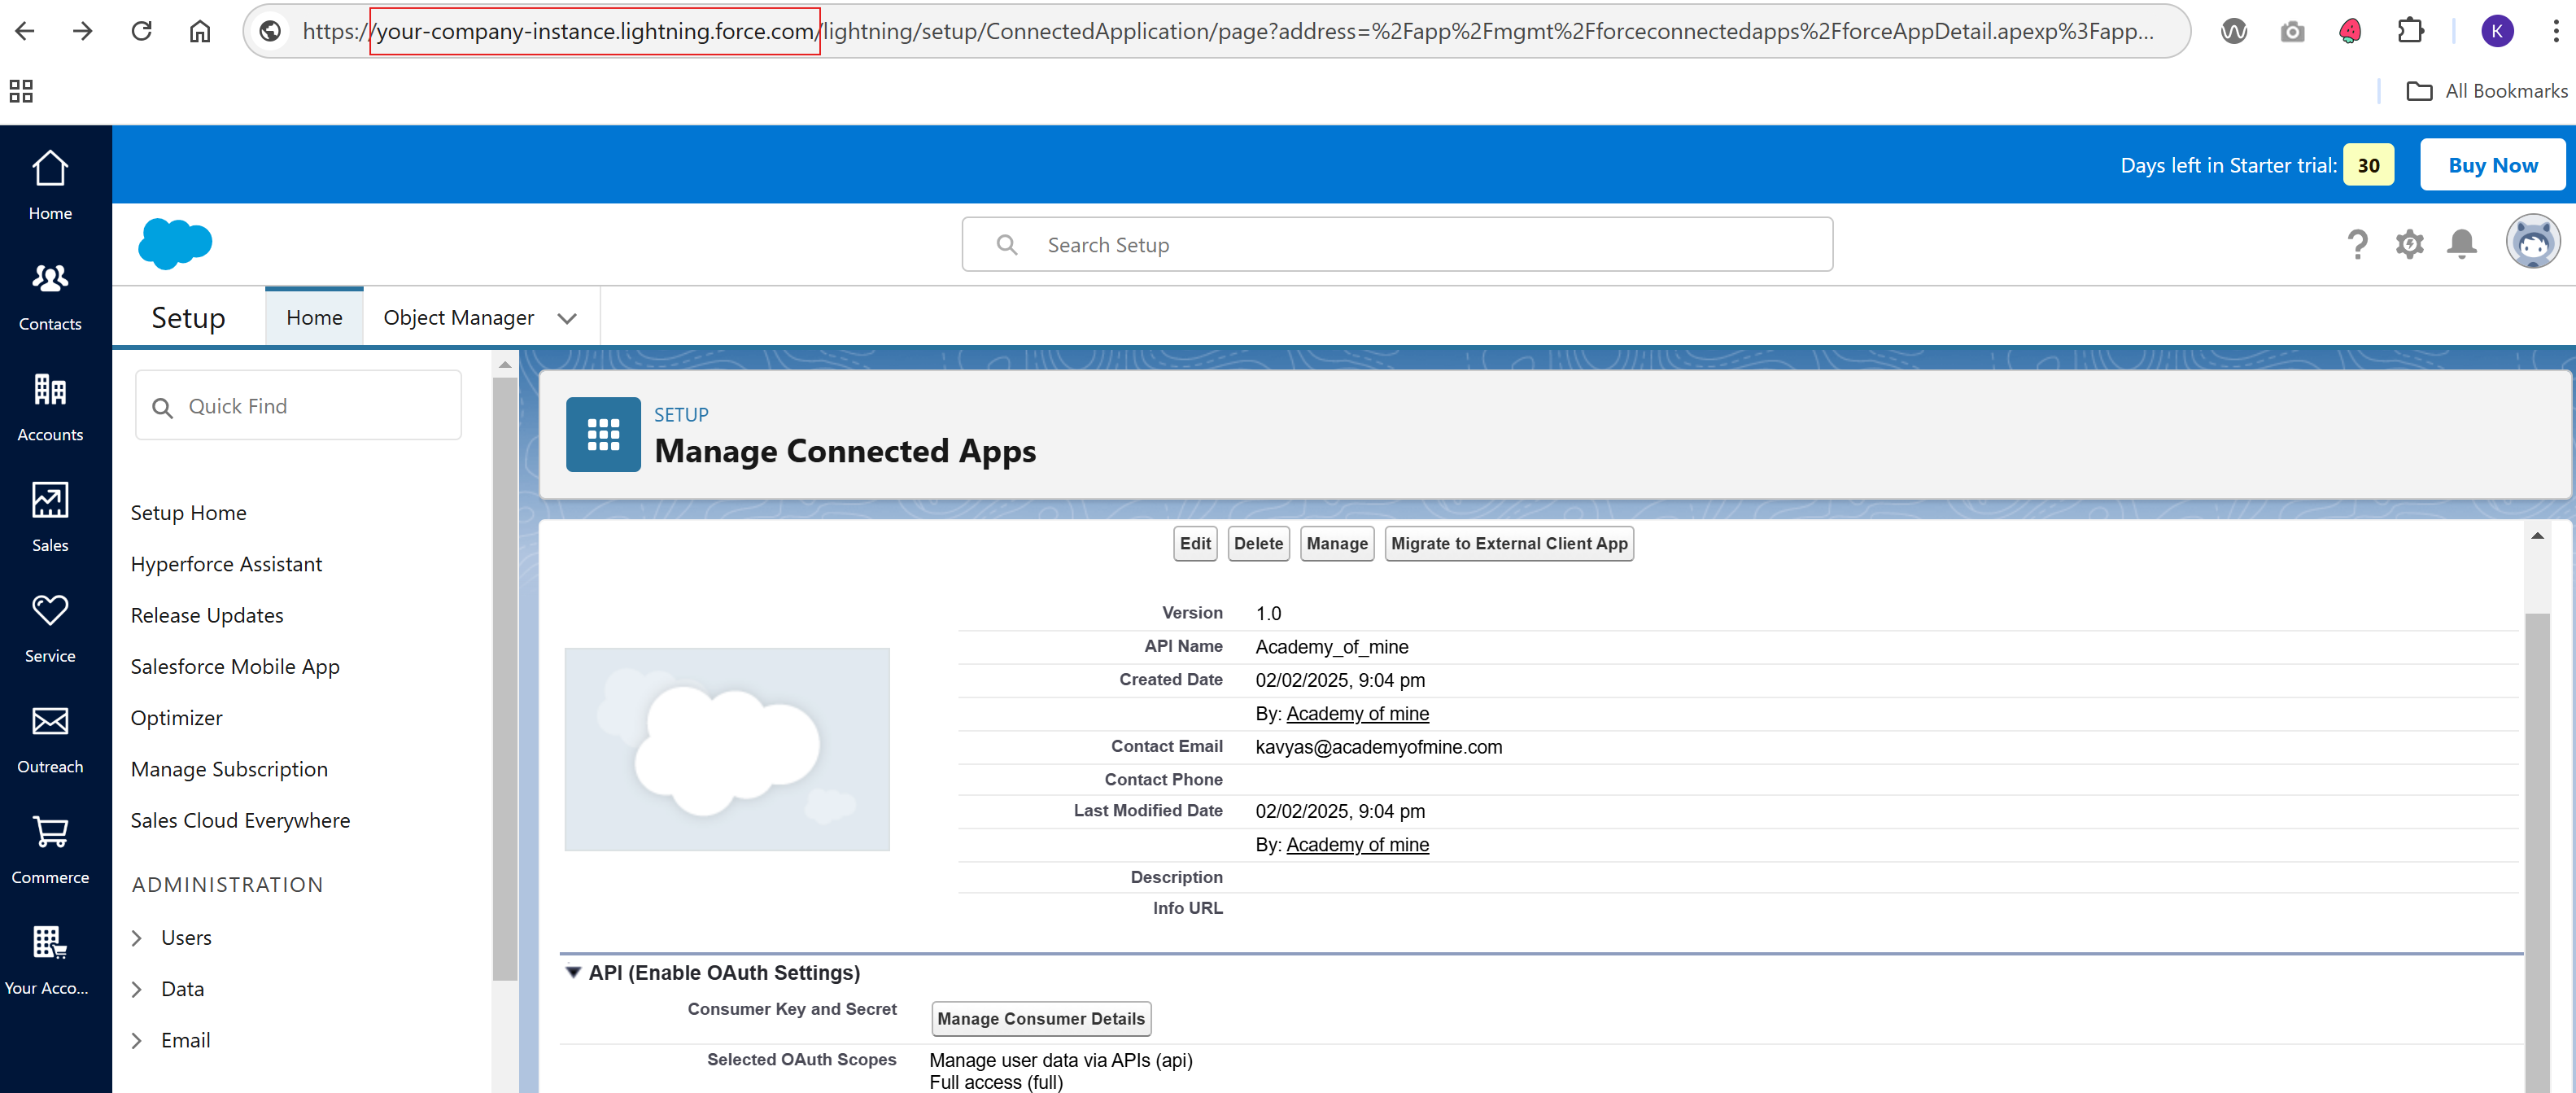
Inside the Salesforce integration settings page, you'll see a field labeled "Enter Salesforce Domain Name". This field requires your Salesforce instance name, which you can find in the URL of your Salesforce account.
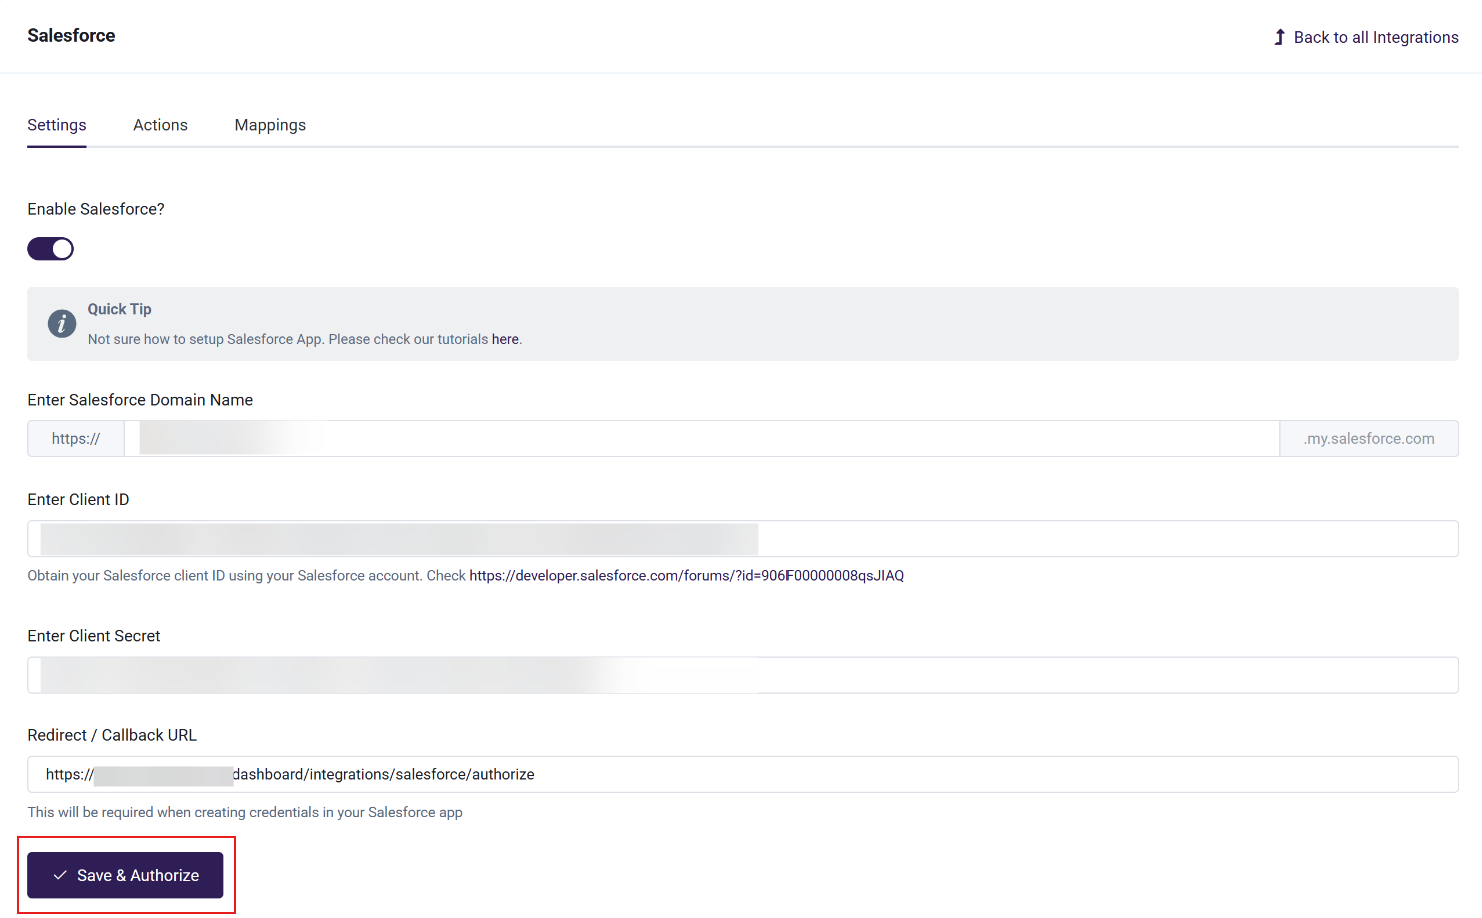
- Paste the Salesforce Domain Name, Client ID, and Client Secret (the Consumer Key and Consumer Secret from step 10). You will also need to toggle the Enable Salesforce button on.
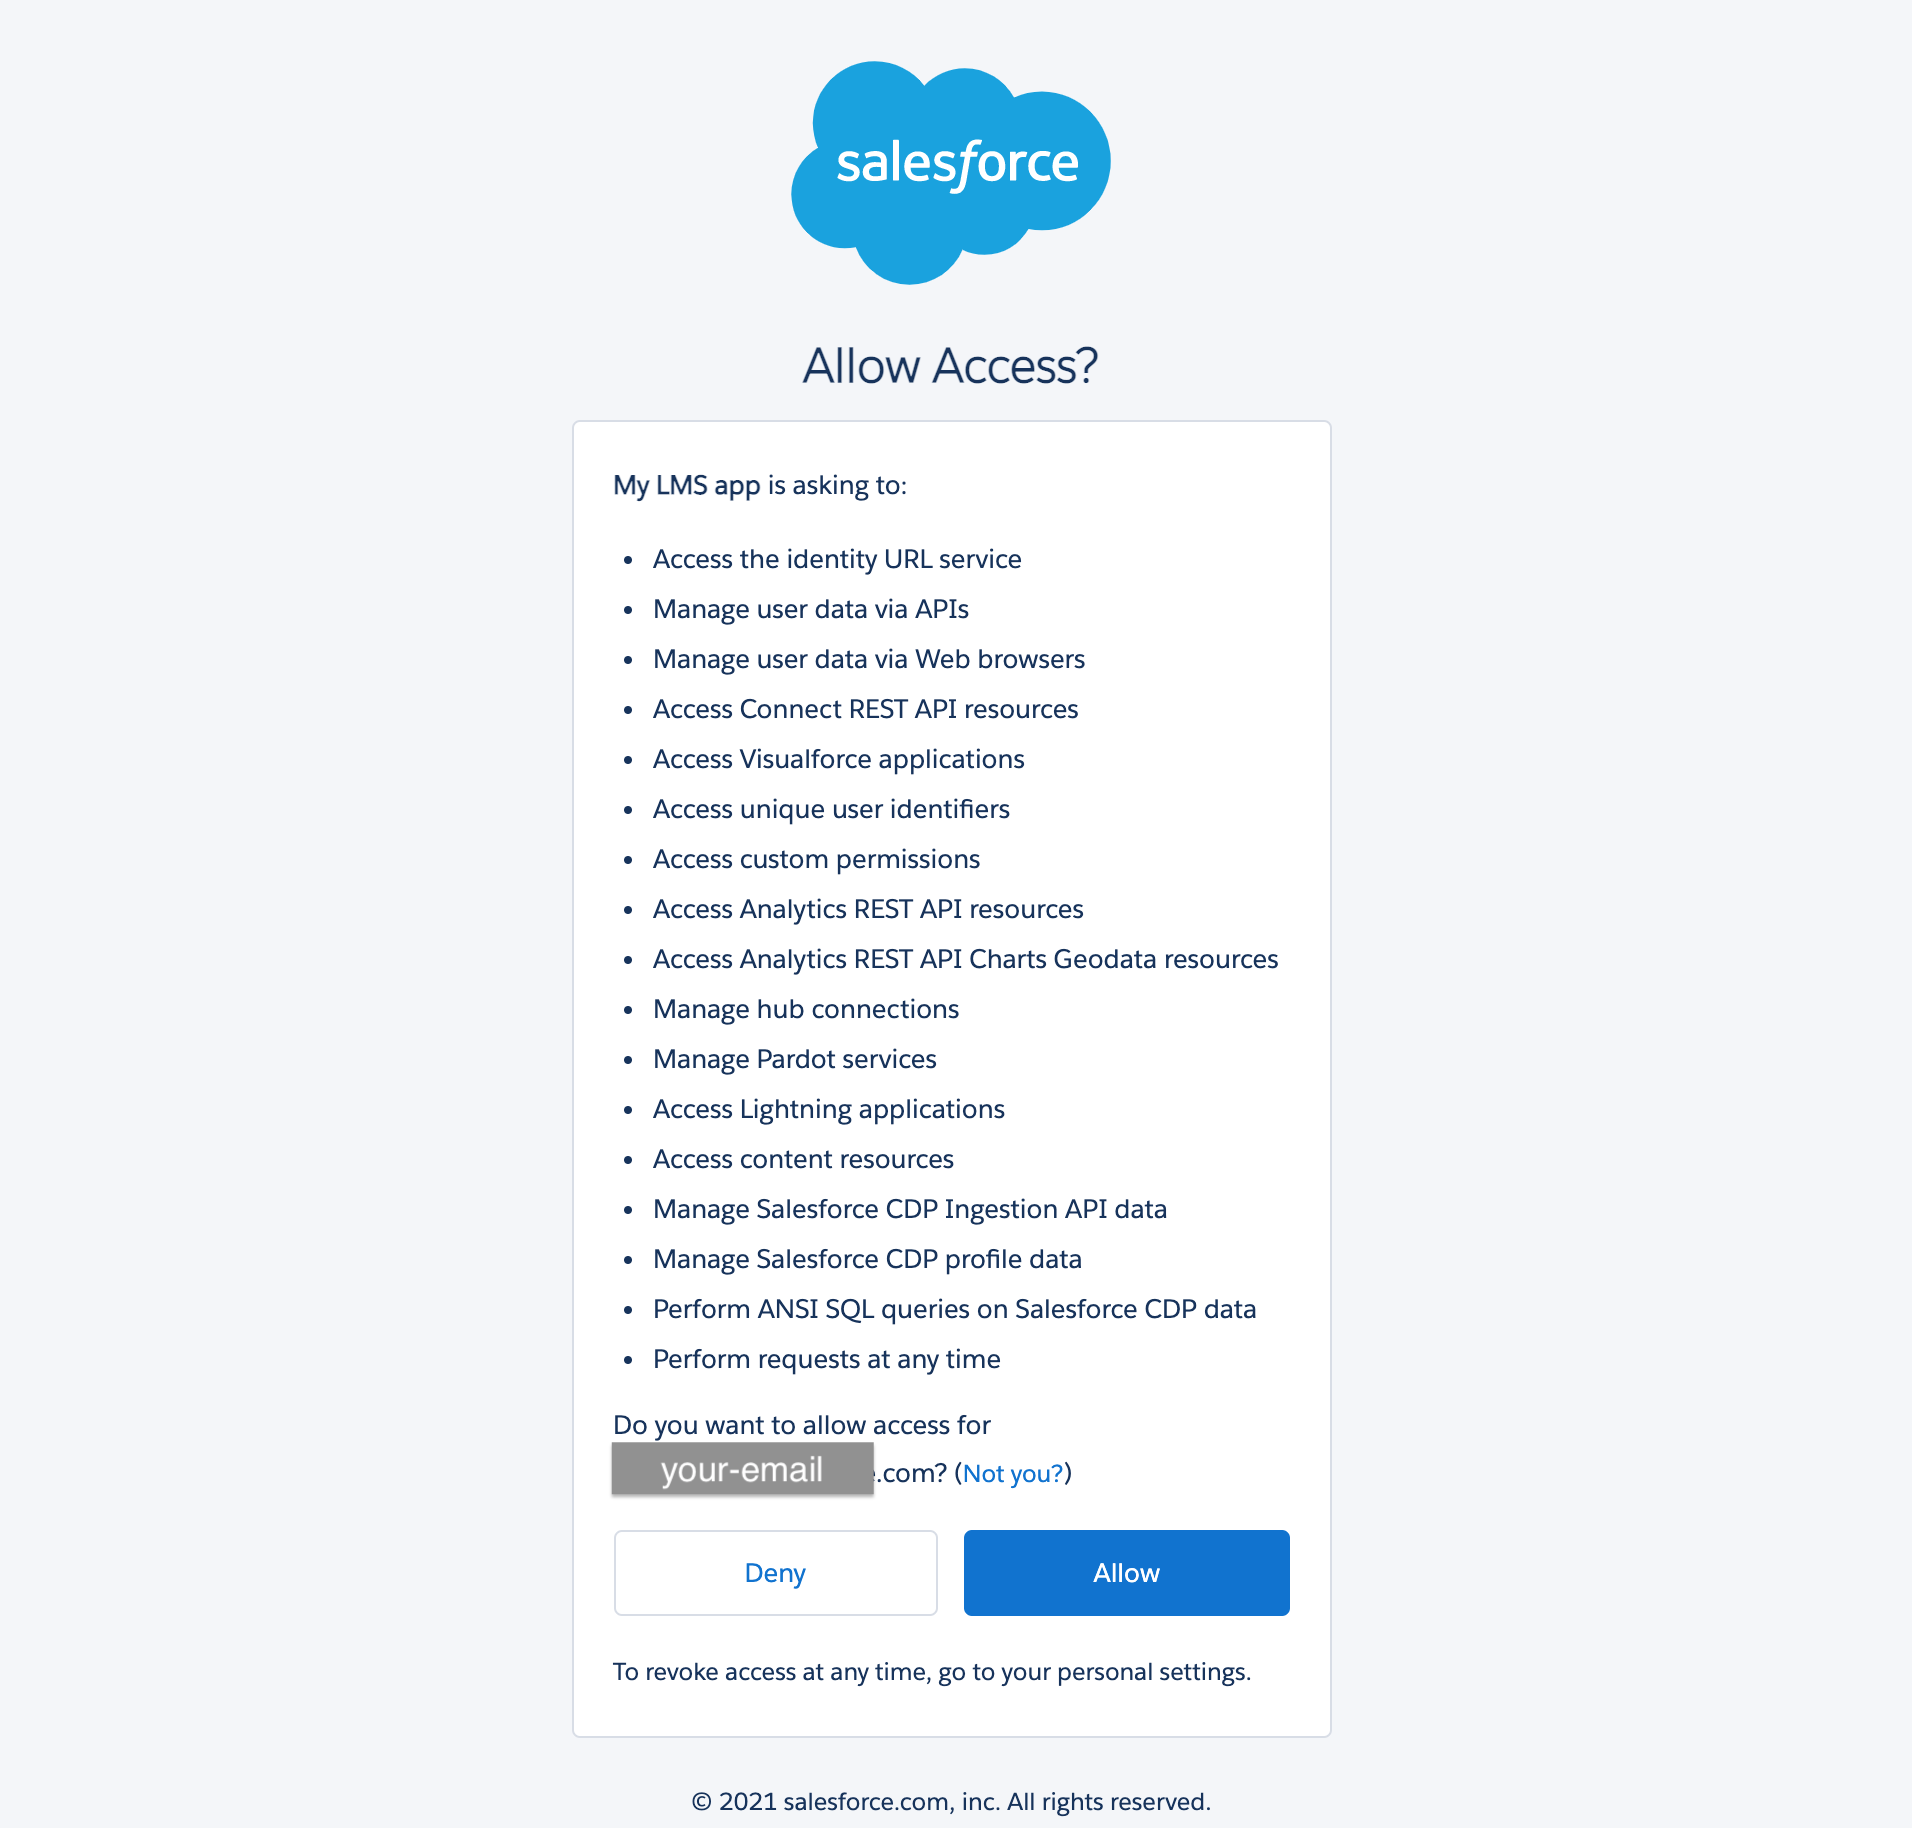
- You will be redirected to the Salesforce platform. If you're not already logged in, you'll see the login page. Log in and allow all the permissions the LMS requires to connect to Salesforce.
- After allowing access, you will be redirected back to the LMS and should see a success notification like the one below. If you don't see the success notification, something went wrong and you'll need to troubleshoot. Please reach out to the support team if needed.
Step 3: Configure Actions and Mappings in LMS
Let's move on to configuring the actions and mappings. Actions determine the different events that will trigger changes in Salesforce, and the mappings determine how Salesforce gets updated when an event is triggered.
Set Up Actions
First, you'll need to set up the actions inside the Actions tab according to your needs. This is where you will determine the different events that will trigger changes in Salesforce. Essentially, this is where you'll determine when Salesforce data should be updated, and which object we're updating in Salesforce (Contacts or Custom objects). Then, we'll add more detail on how each Salesforce object gets created or updated, but for now, focus on thinking through the different events that should trigger a change.
- Within the Salesforce integration settings in AOM, select the Actions tab.
- Click +Setup Action and choose the desired events and actions from the dropdown menus.
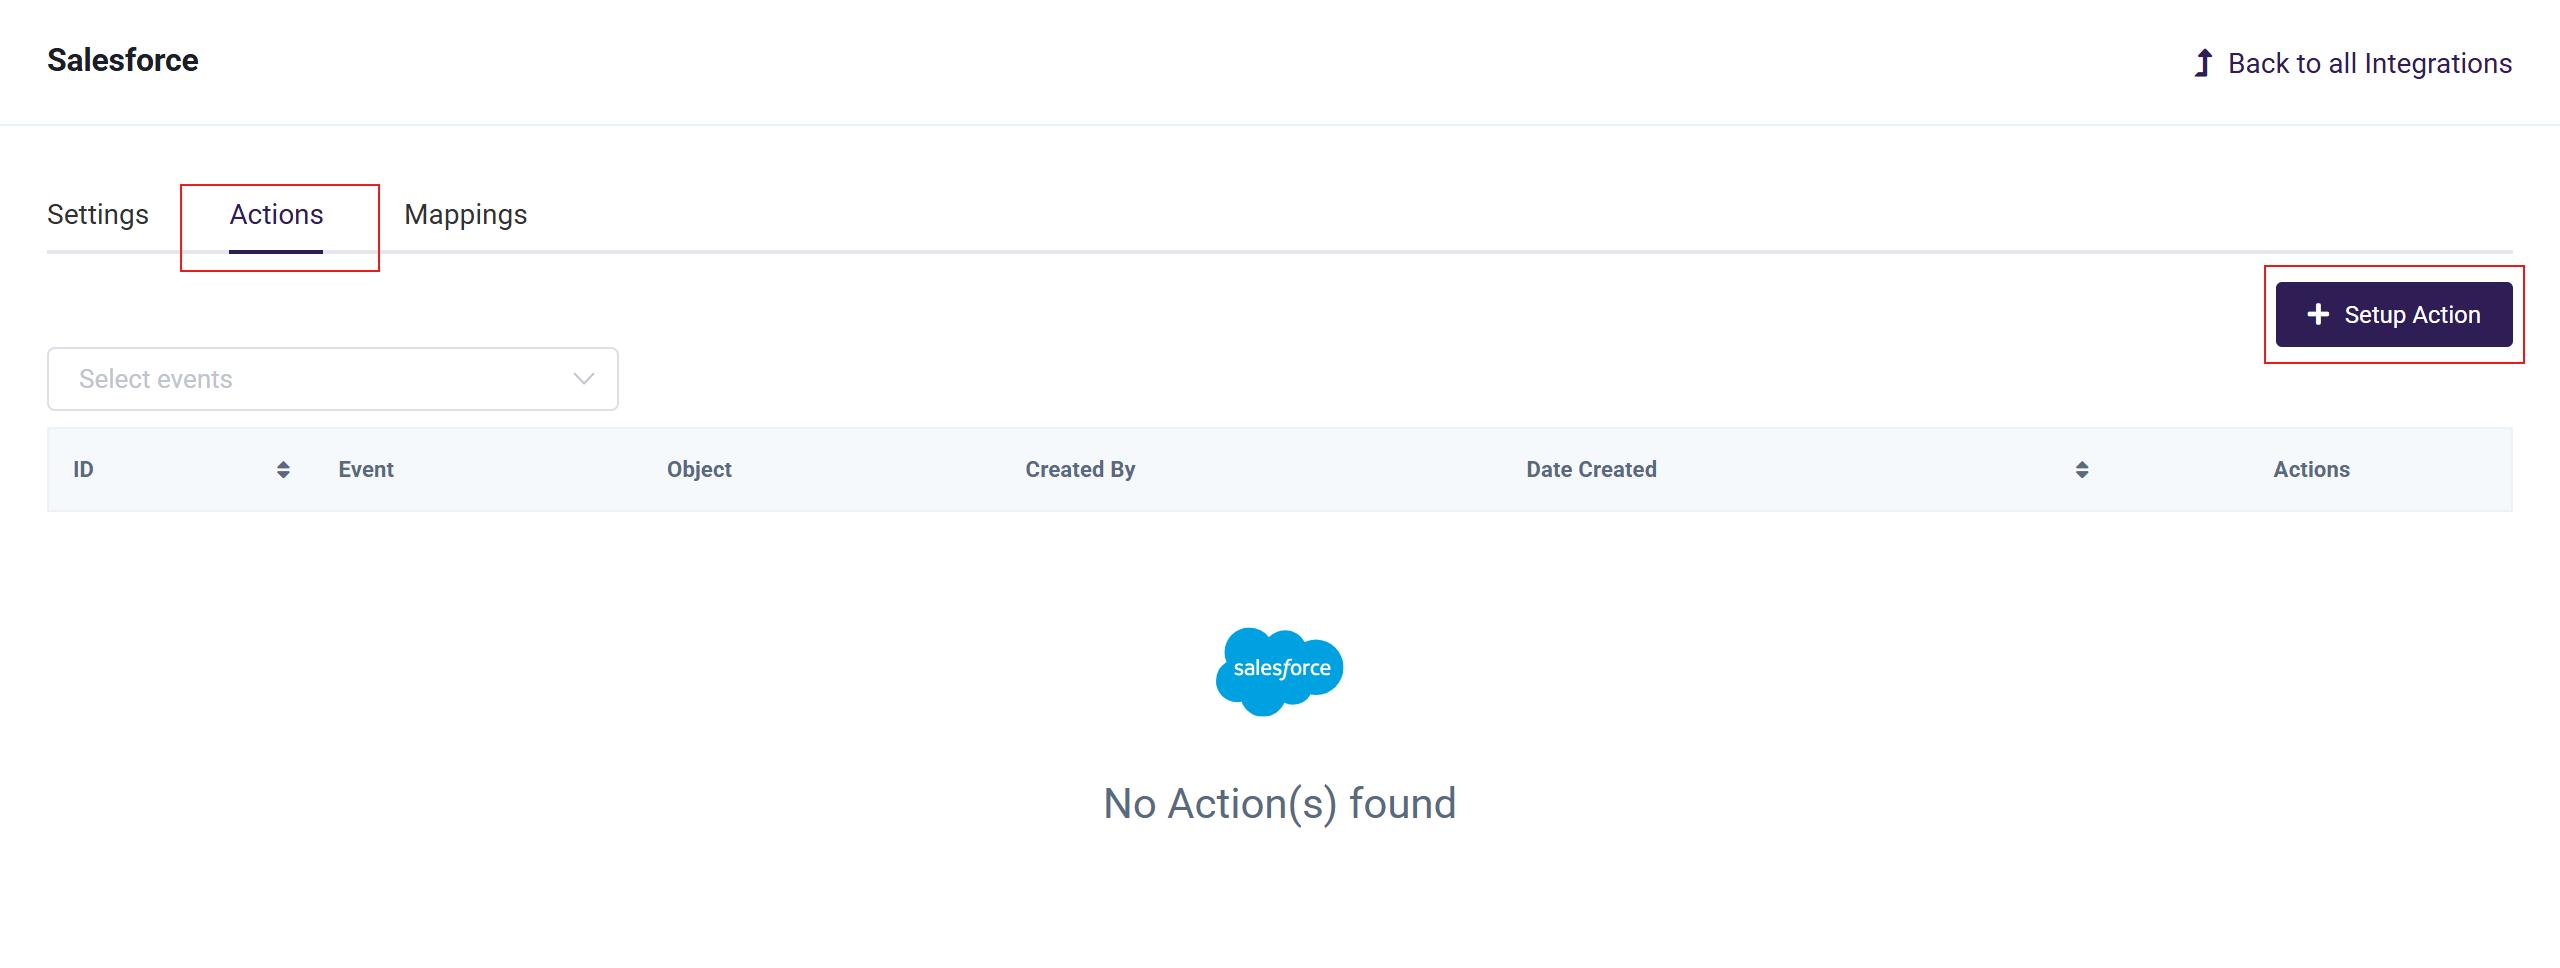
- Click Save once you've chosen the event in AOM and the corresponding Salesforce update. Click +Setup Action again to add another action.
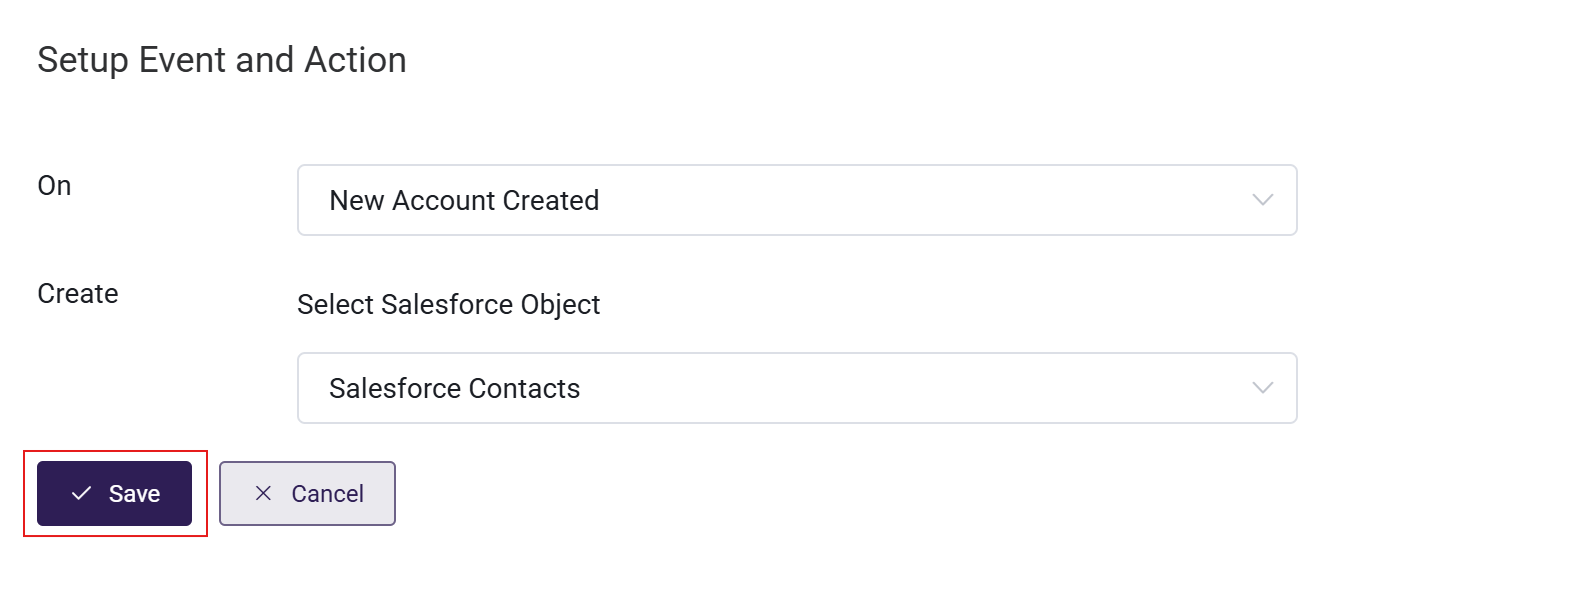
Set Up Mappings
To actually configure how Salesforce gets updated when an event is triggered, we'll need to configure the Mappings. The Actions set up above tell us when Salesforce data should get updated, as well as which object in Salesforce, but they don't tell us anything about the specifics of how to update the data. That's what we'll do here in the Mappings tab.
-
Click on the Mappings tab in the Salesforce Settings. Without mappings, user activity data won't be sent to Salesforce, so we'll need to set this up carefully. It's what tells Salesforce what to do with the incoming data.
-
There are two types of mappings:
- Contact Mappings: Used to create and update Salesforce contacts.
- Course & Registration Mappings: Used to update Salesforce Custom Objects for Courses and Course Registrations.
-
To add a Contact Mapping: Click the Add New button, add the AOM LMS properties you wish to sync with Salesforce Contacts, and link each one to the associated Salesforce Contact property you want to create or update. These mappings should be laid out for user property mappings.
Once done, click the Save Mapping button.
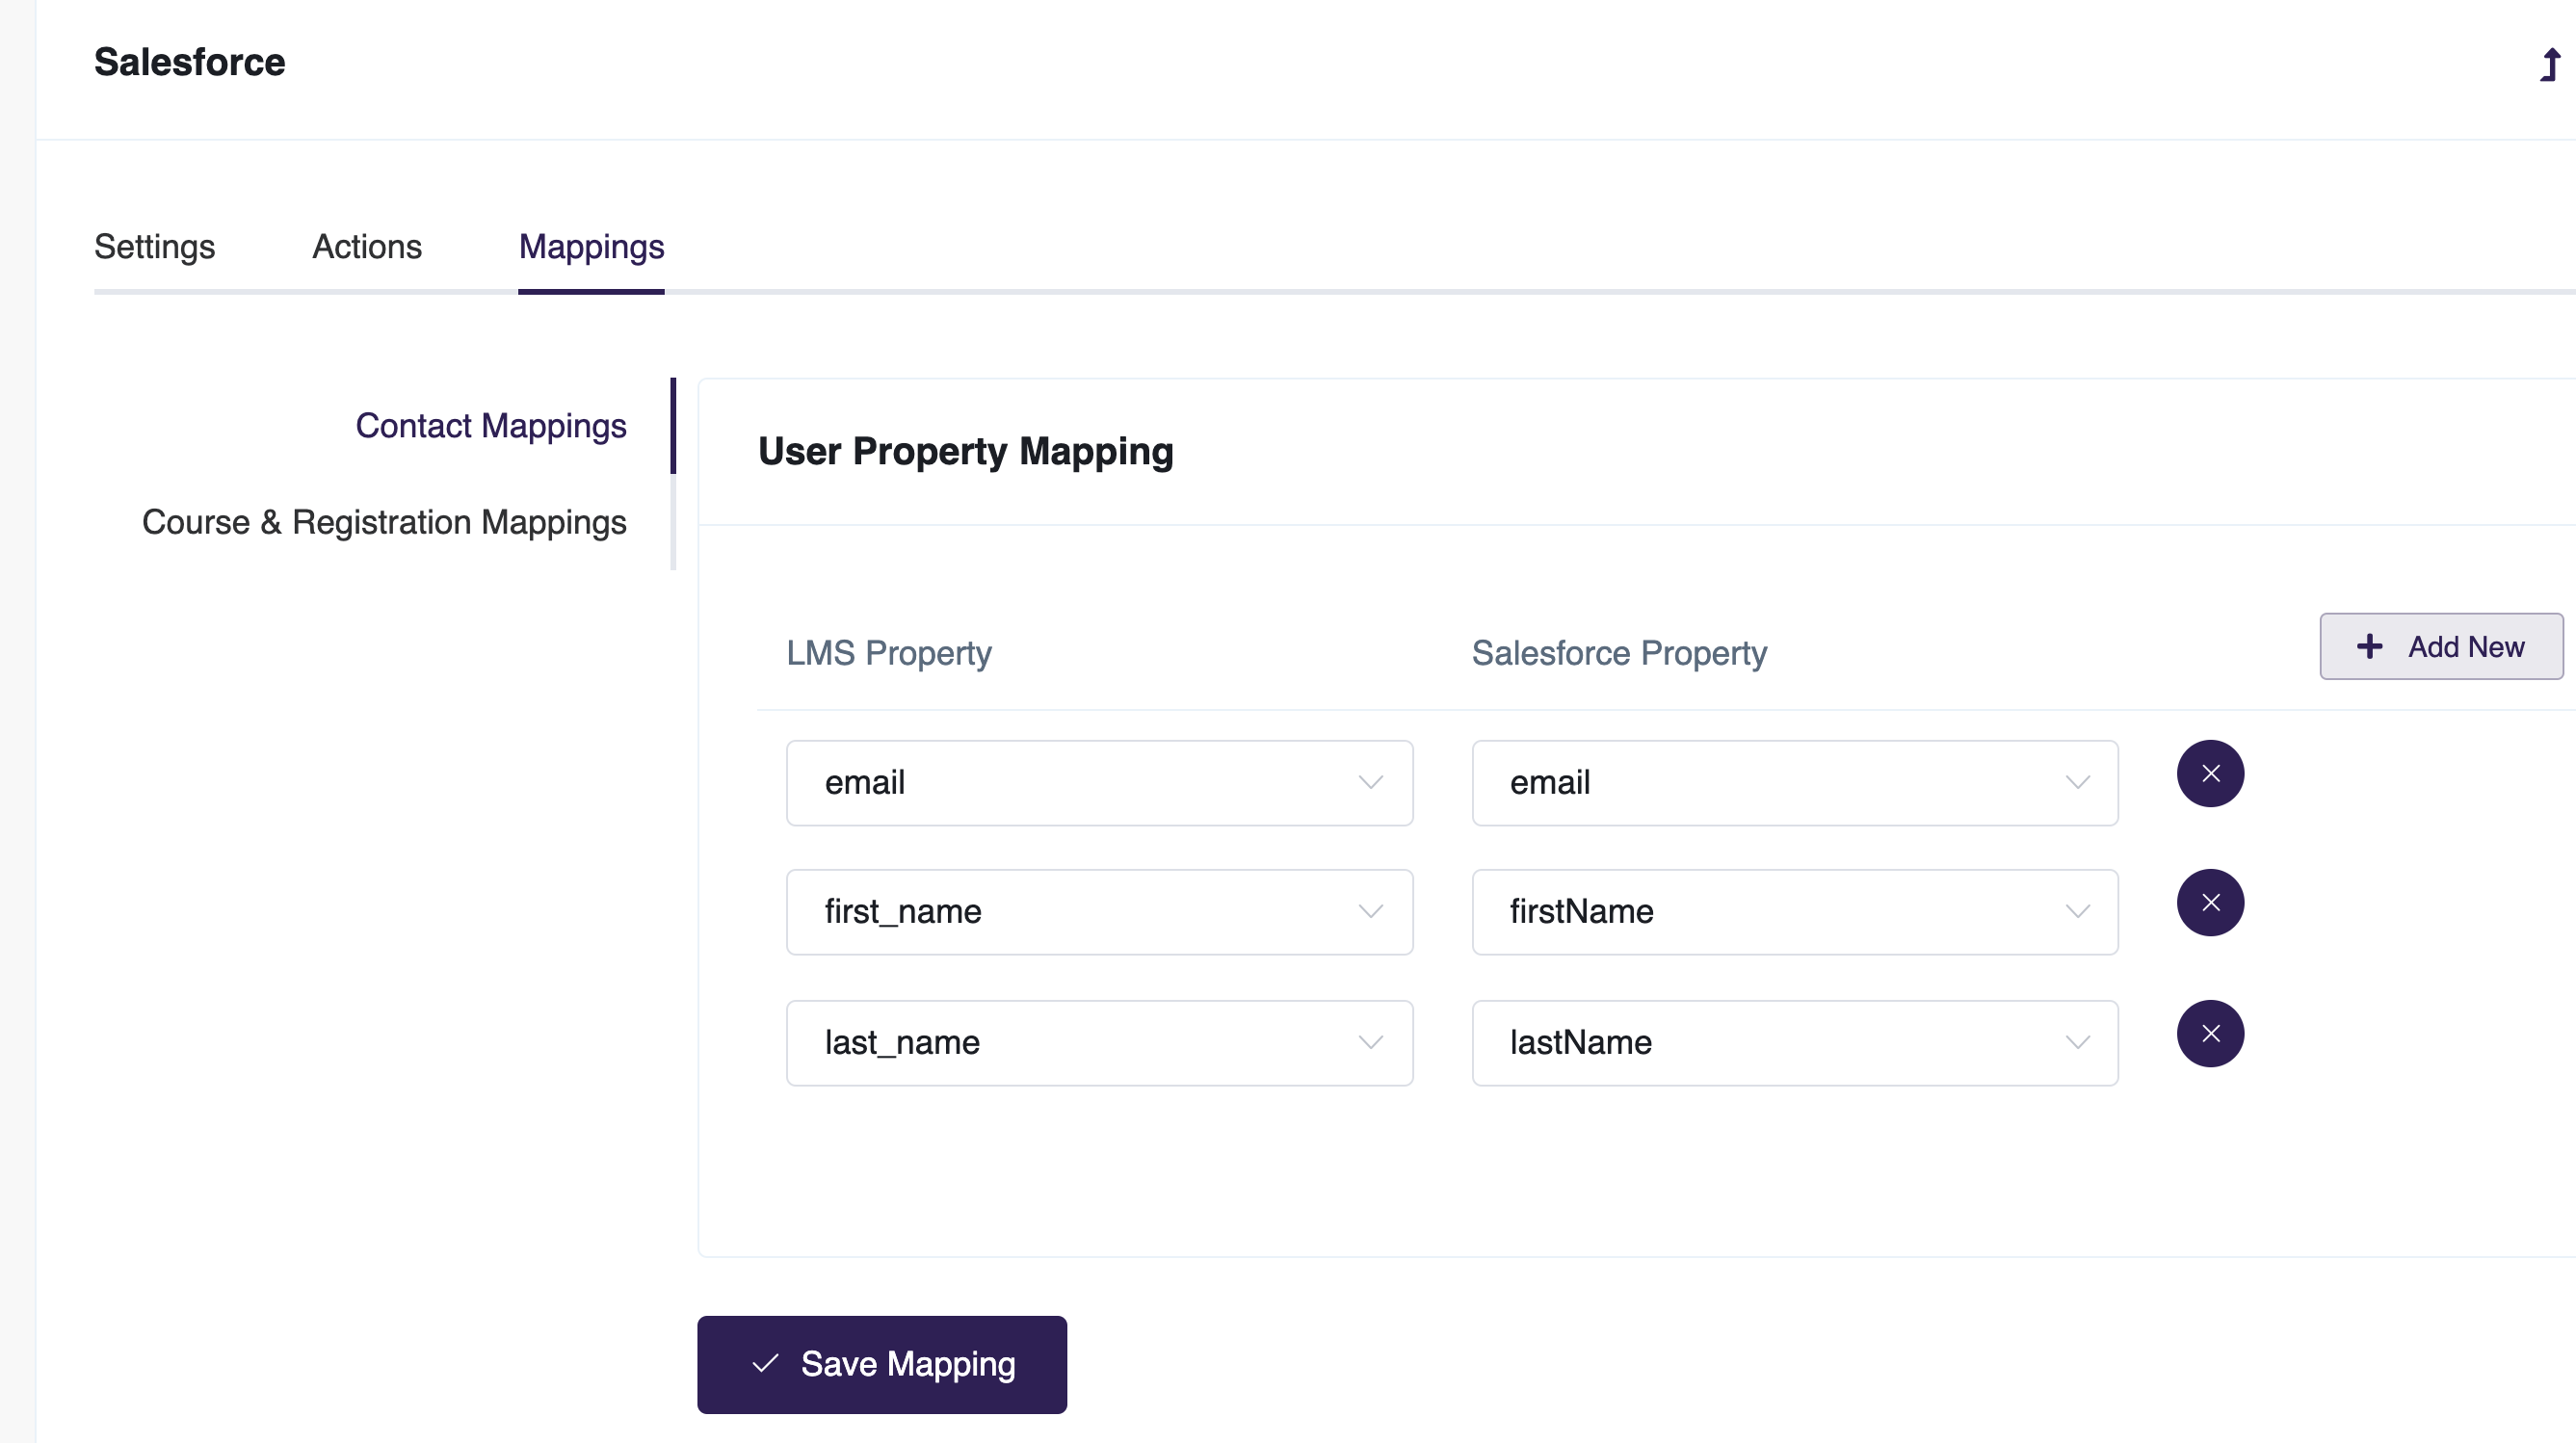
-
To add Course & Registration Mappings: To store your course and course registration data in Salesforce, you'll need to use this option. There are two sections, one for courses and another for course registrations, and for each you'll need to create a custom object in your Salesforce account. Please read through each of the sub-steps here to make sure you set this up properly.
-
Course Property Mapping: Create a new custom object and use the newly created object's name while mapping. For example, if you created a Course object in Salesforce, add the name and all the fields/properties you created in the Course object.
-
Course Registration Property Mapping: Create another custom object and use the newly created object's name while mapping. For example, if you created a Course Registration object in Salesforce, add the name and all the fields/properties you created in the Course Registration object.
-
NOTE:
i) See the steps to create new custom objects in Salesforce. First, create custom objects for both Course and Course Registration. Then, map both the Course Property and Course Registration Property mappings to the respective Salesforce properties/fields (see the images below).
ii) All custom objects created in Salesforce will have their names appended with a double underscore and "c". For example, if you create a Course object, its actual name will be "Course__c". This "Course__c" name is required when saving the mapping for the course, and the same applies to Course Registration.
iii) Custom field names are also appended with "__c", which stands for "custom" in Salesforce. For example, if you create a new field for course ID named "course_id", its actual name will be "course_id__c".
iv) Don't mark any field as Required.
-
Course Property Mappings
-
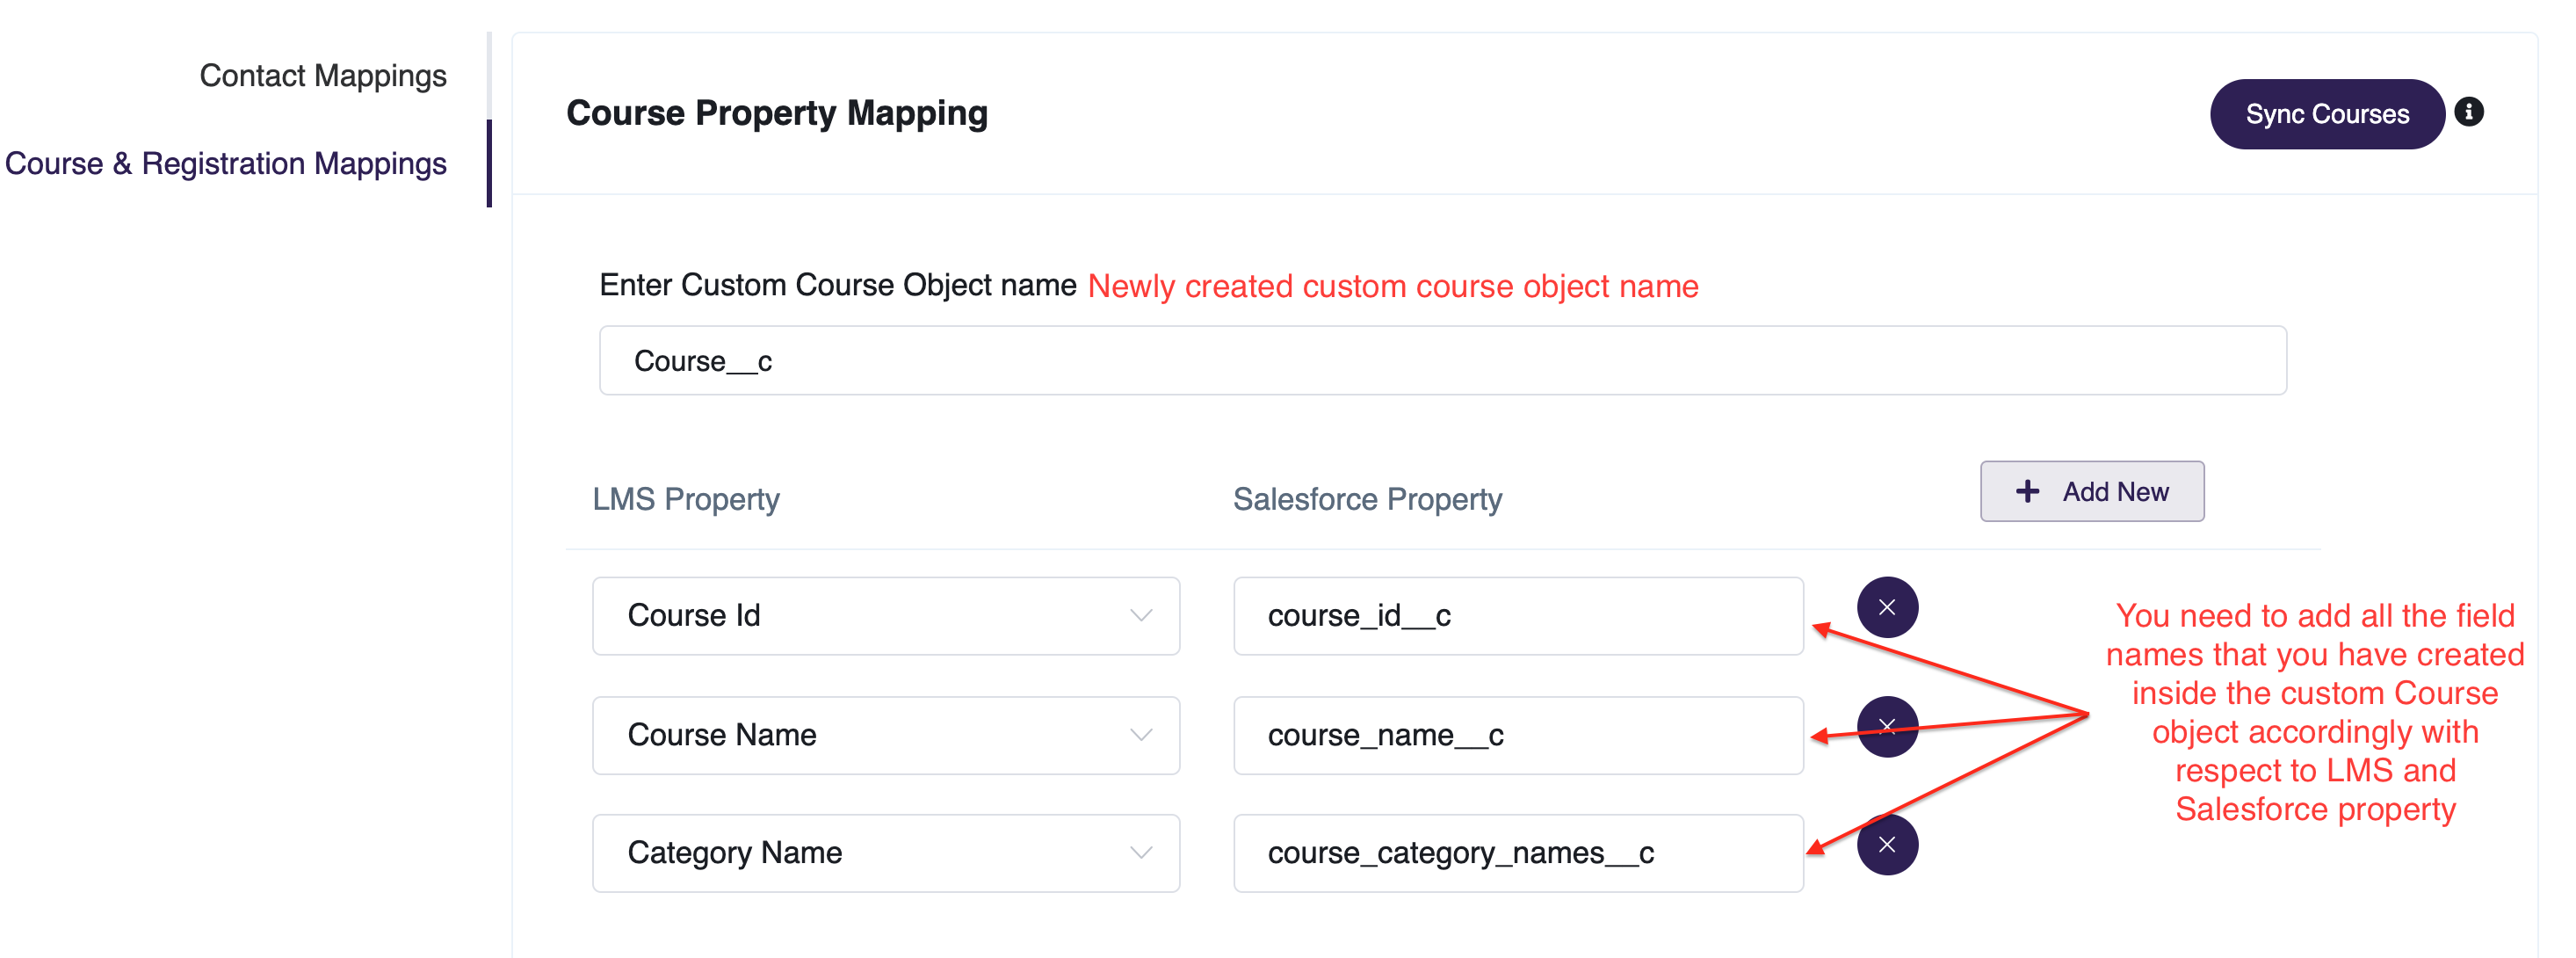
-
Course Registration Property Mappings
Note: For the Course Registration mapping, Course ID and User/Contact ID are mandatory. Otherwise, the integration will not work.
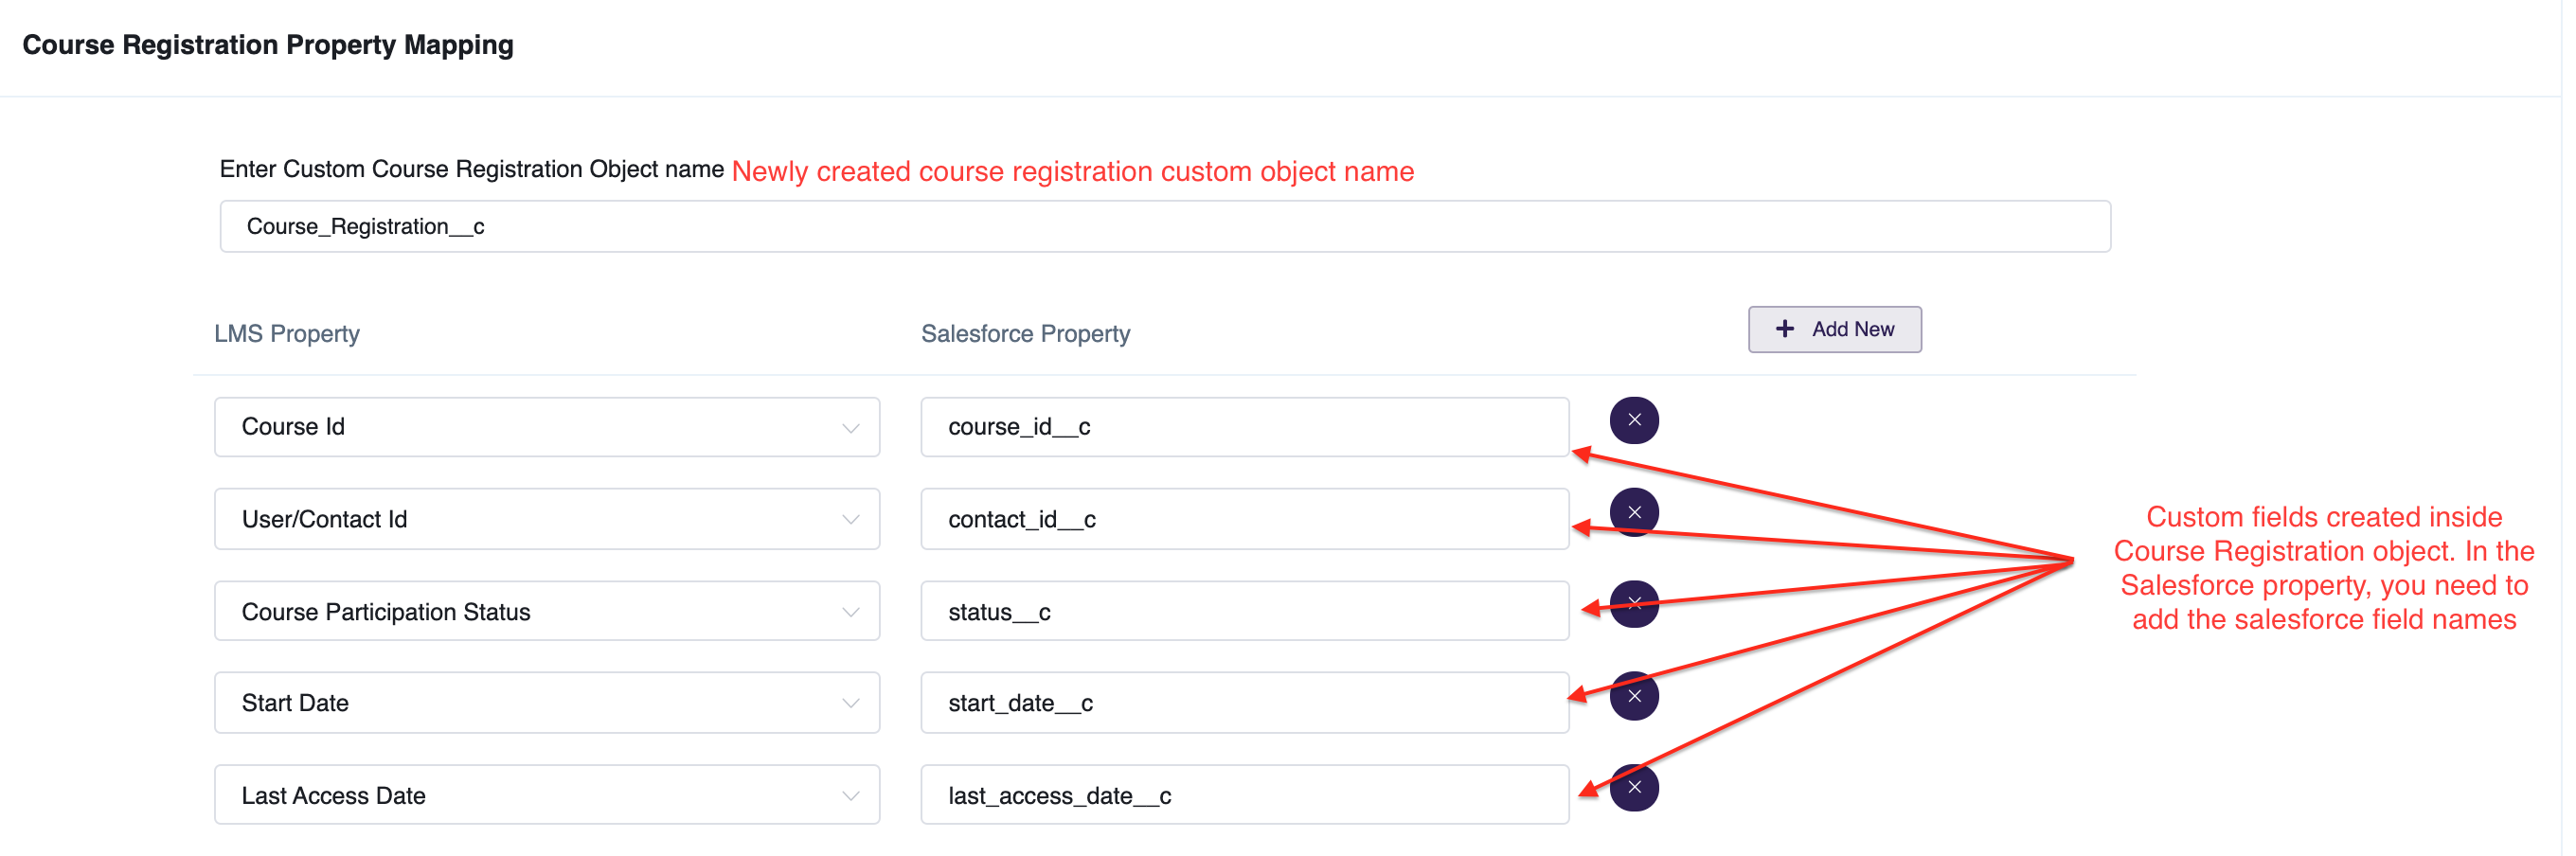
- Click the "Save Mapping" button to save your changes.
Now, every time one of the Actions is triggered, the related Salesforce object will get created or updated.
Step 4: Synchronizing Courses from AOM LMS to Salesforce
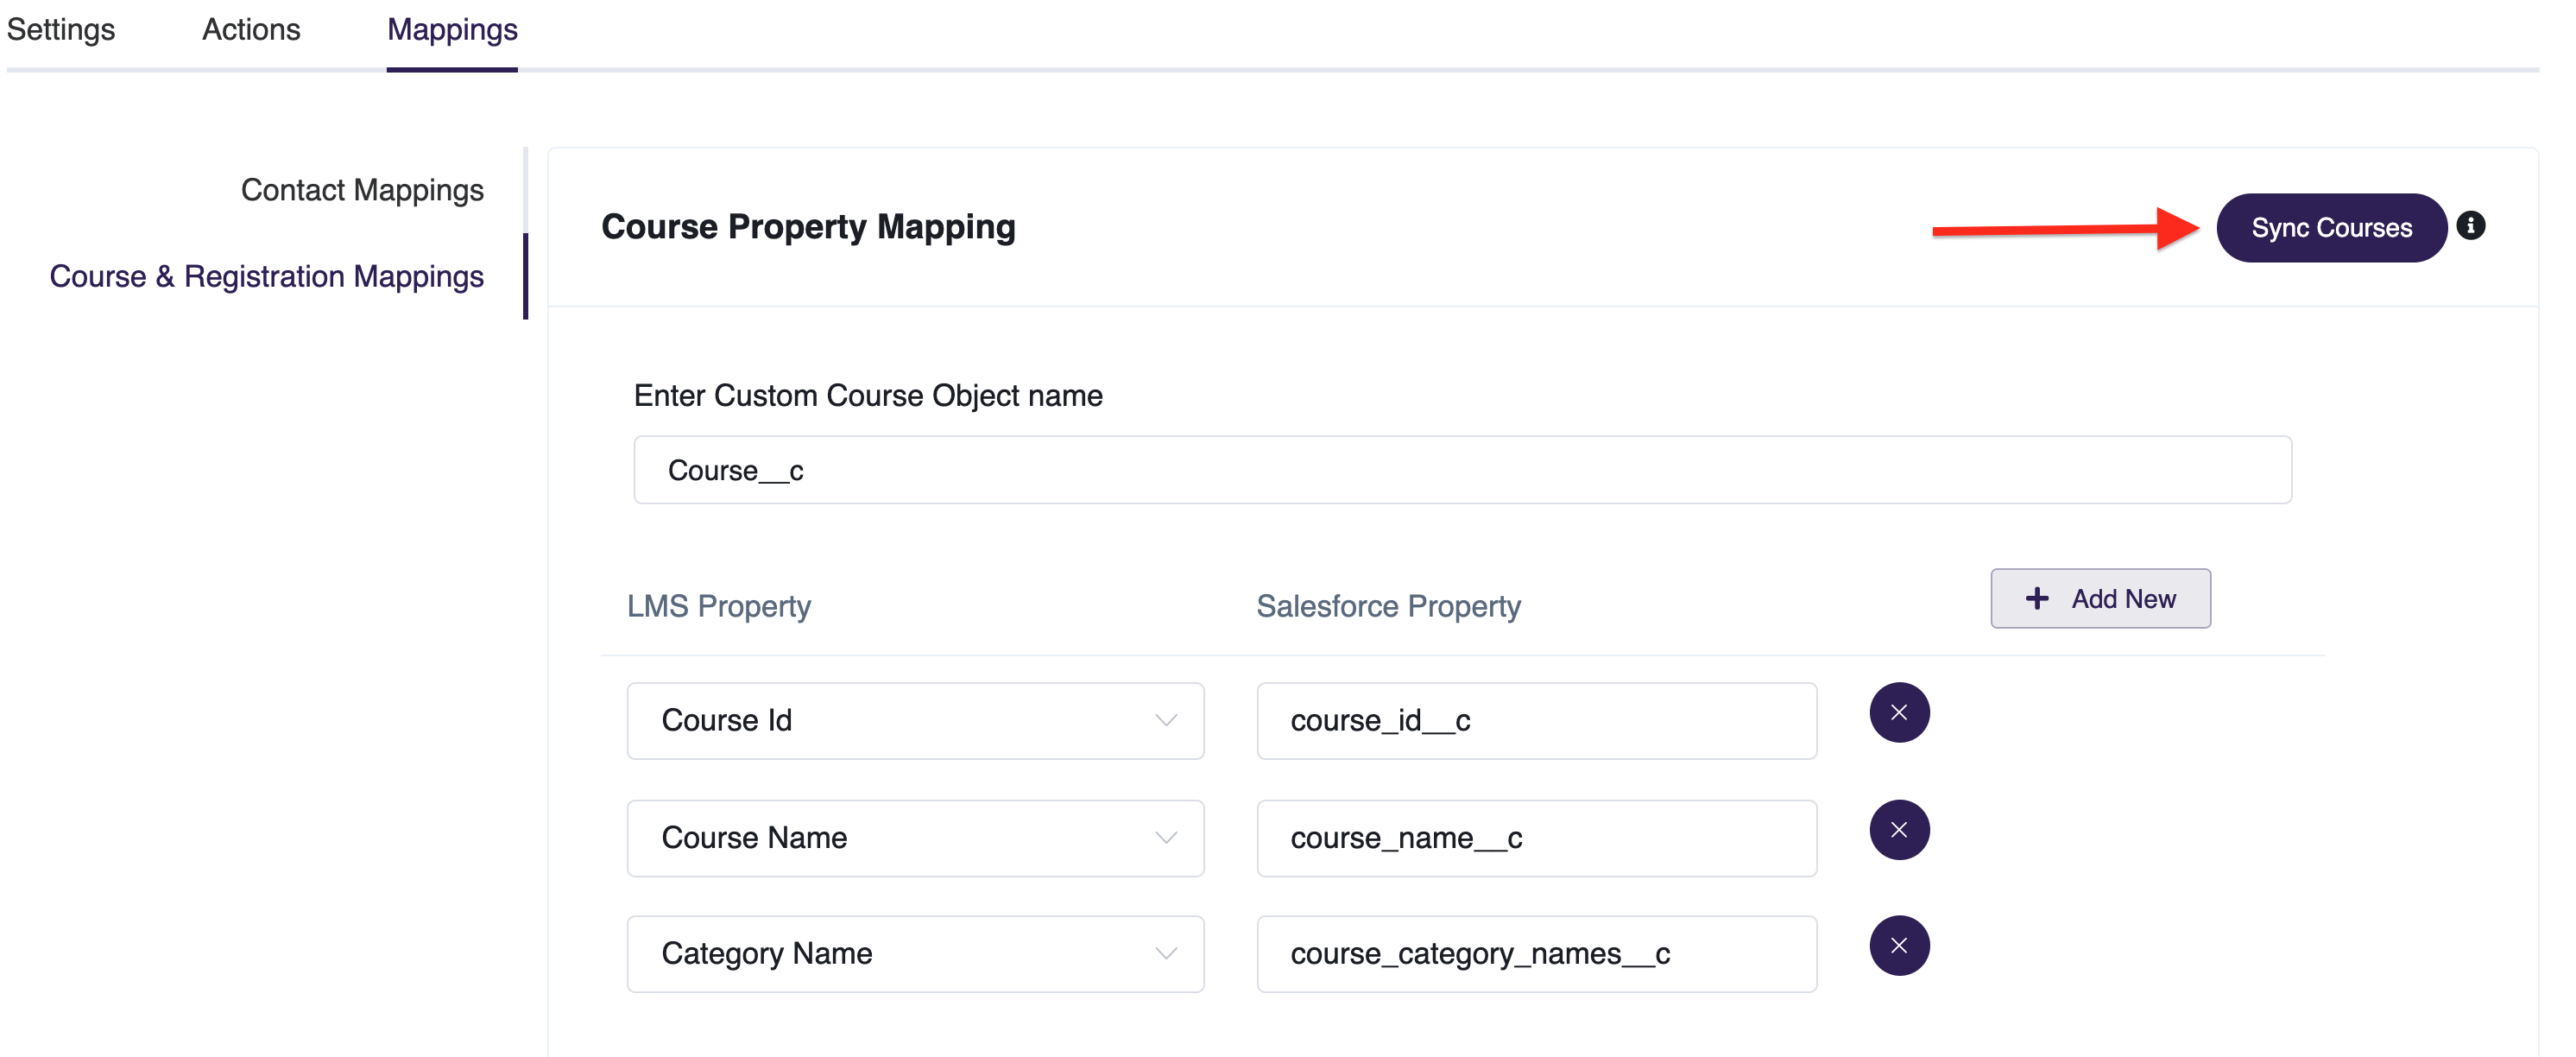
There are various actions you set up in the steps above, where certain events will cause Salesforce data to be created or updated. You might be wondering why there's no action for creating or updating course data. Course data is managed only by Admins, who can use the "Sync Courses" button to sync all course details to the Salesforce custom object. For this to work, you'll need to add a mapping in "Course Property Mapping" by completing the steps in the Step 3 section above related to Course & Registration Mappings.
- From the Salesforce integration settings, click the Mappings tab.
- Click Sync Courses, as shown in the image below.
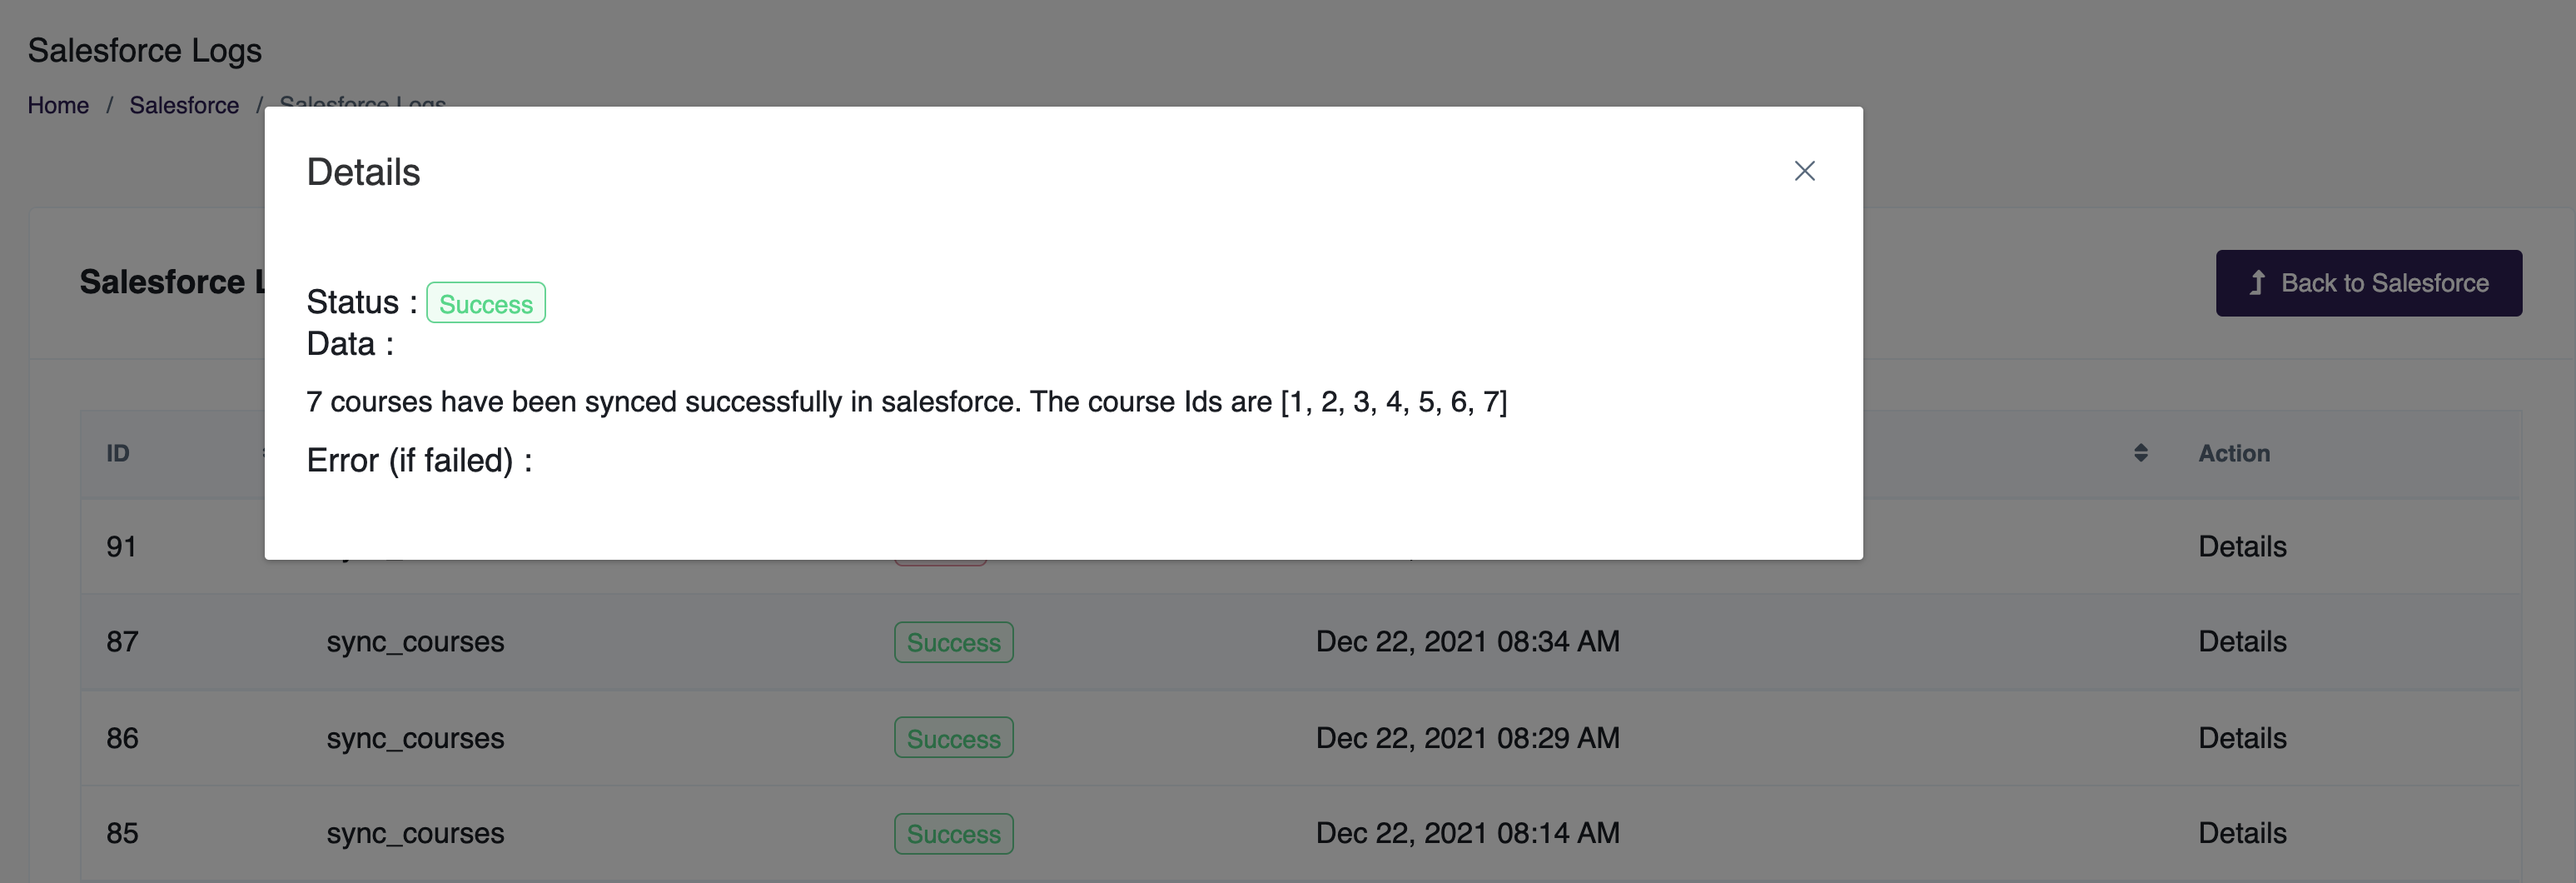
Note: This process runs in the background, so you just need to invoke it by clicking the Sync Courses button, and the LMS will take care of the syncing behind the scenes. If a sync is in progress, you'll see a loader inside the "Sync Courses" button. You can also use the "i" button to view the logs, which show success or error messages, including the count of courses that synced successfully.
Logs page for course sync:
Step 5: Create Custom Objects in Salesforce
You can track and store data unique to your organization using custom objects. You'll need to use "Object Manager" to create custom objects, so make sure you have the correct permissions to create and edit them.
Let's create a custom object for Course. Follow the instructions below to create a new object with its fields.
- Within Salesforce, type "Object manager" into the Quick Find box and select it from the options.
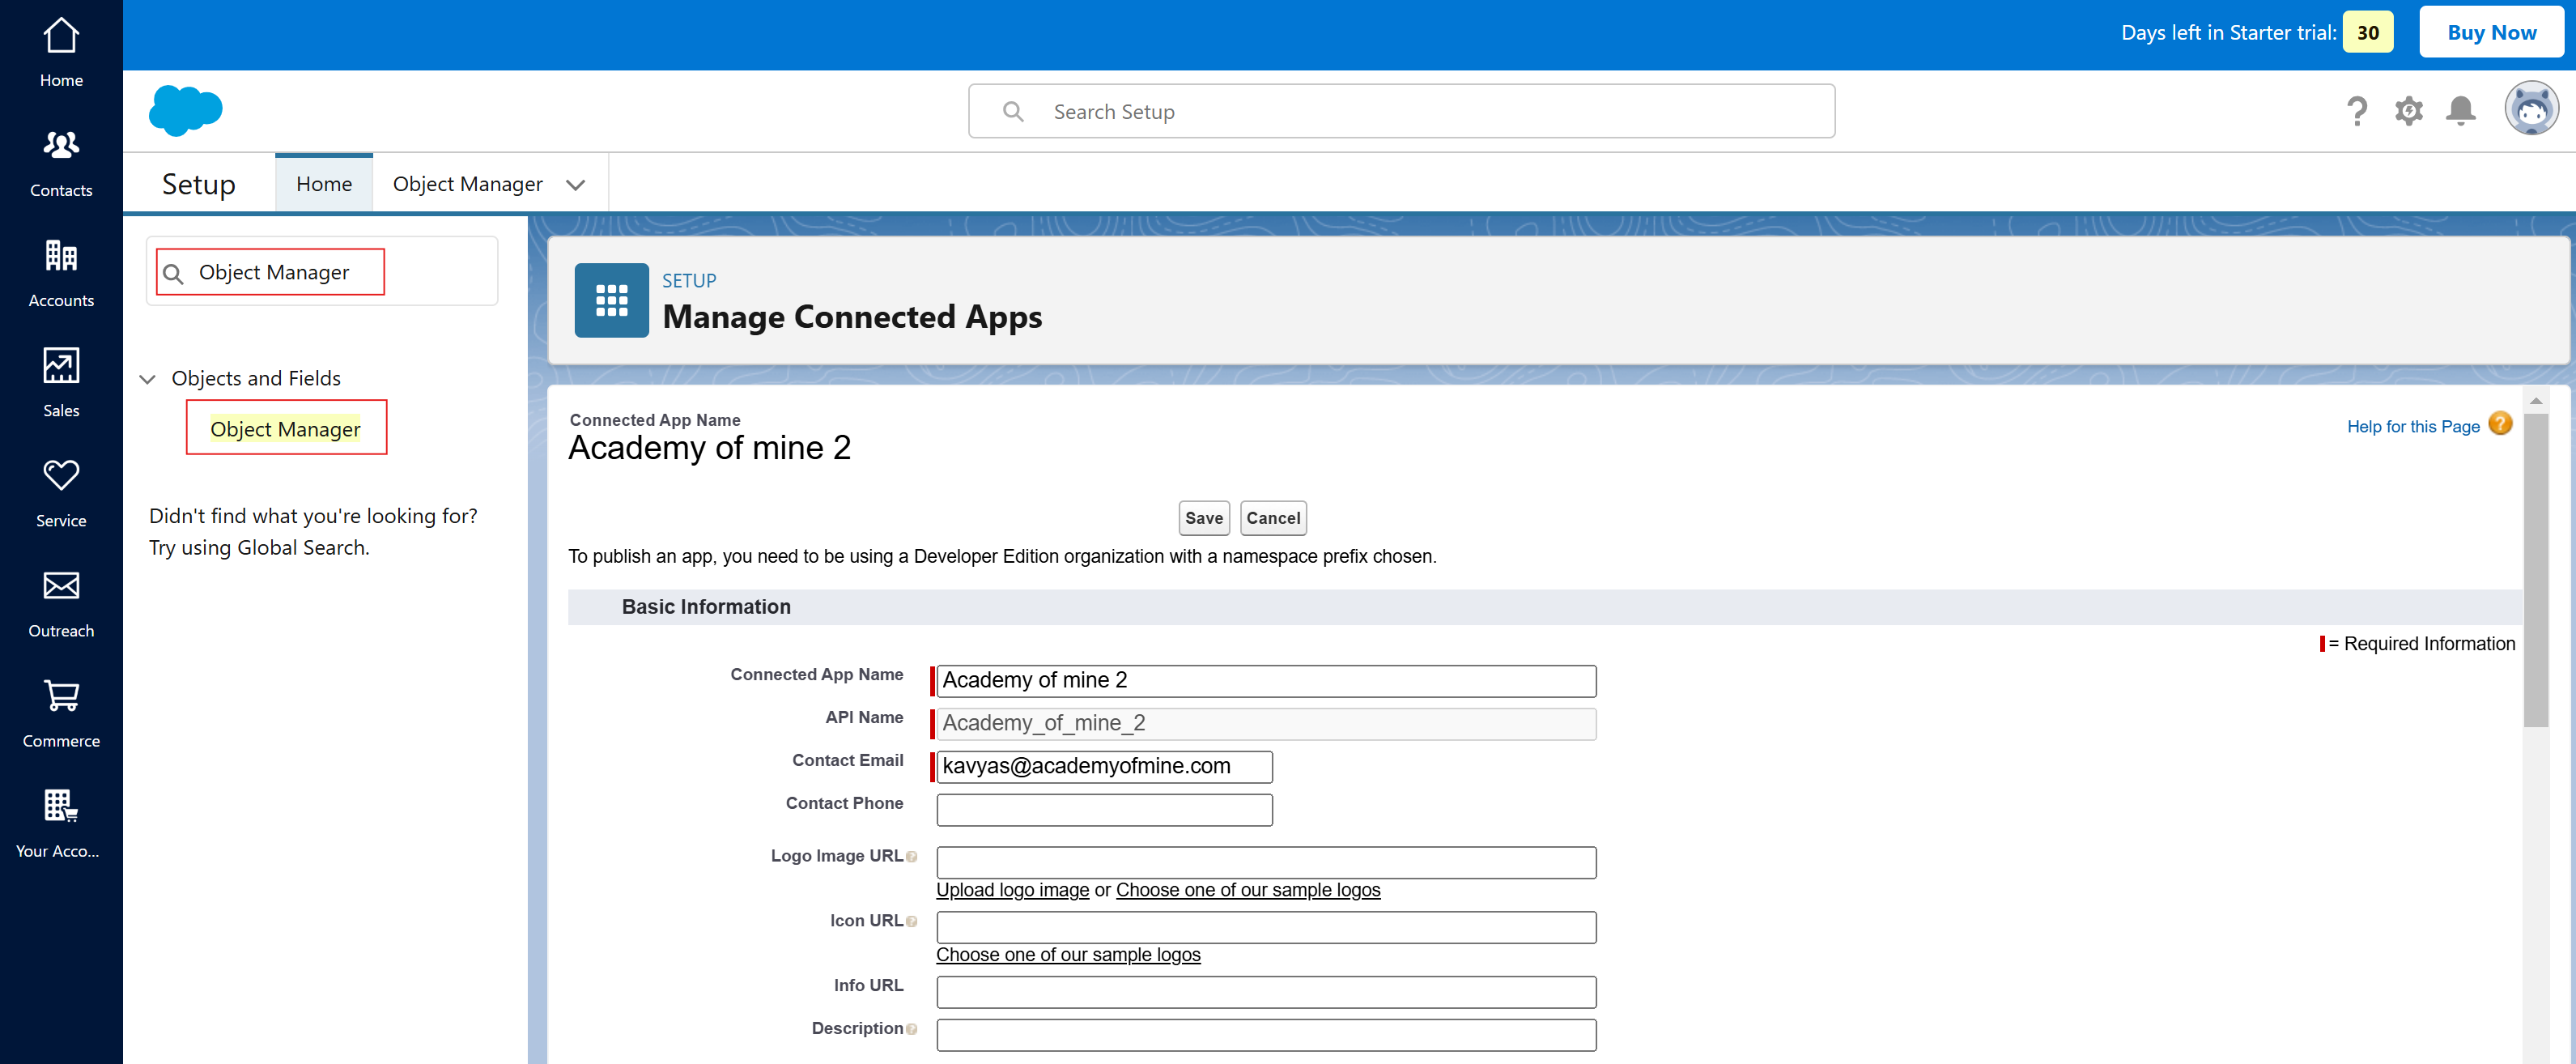
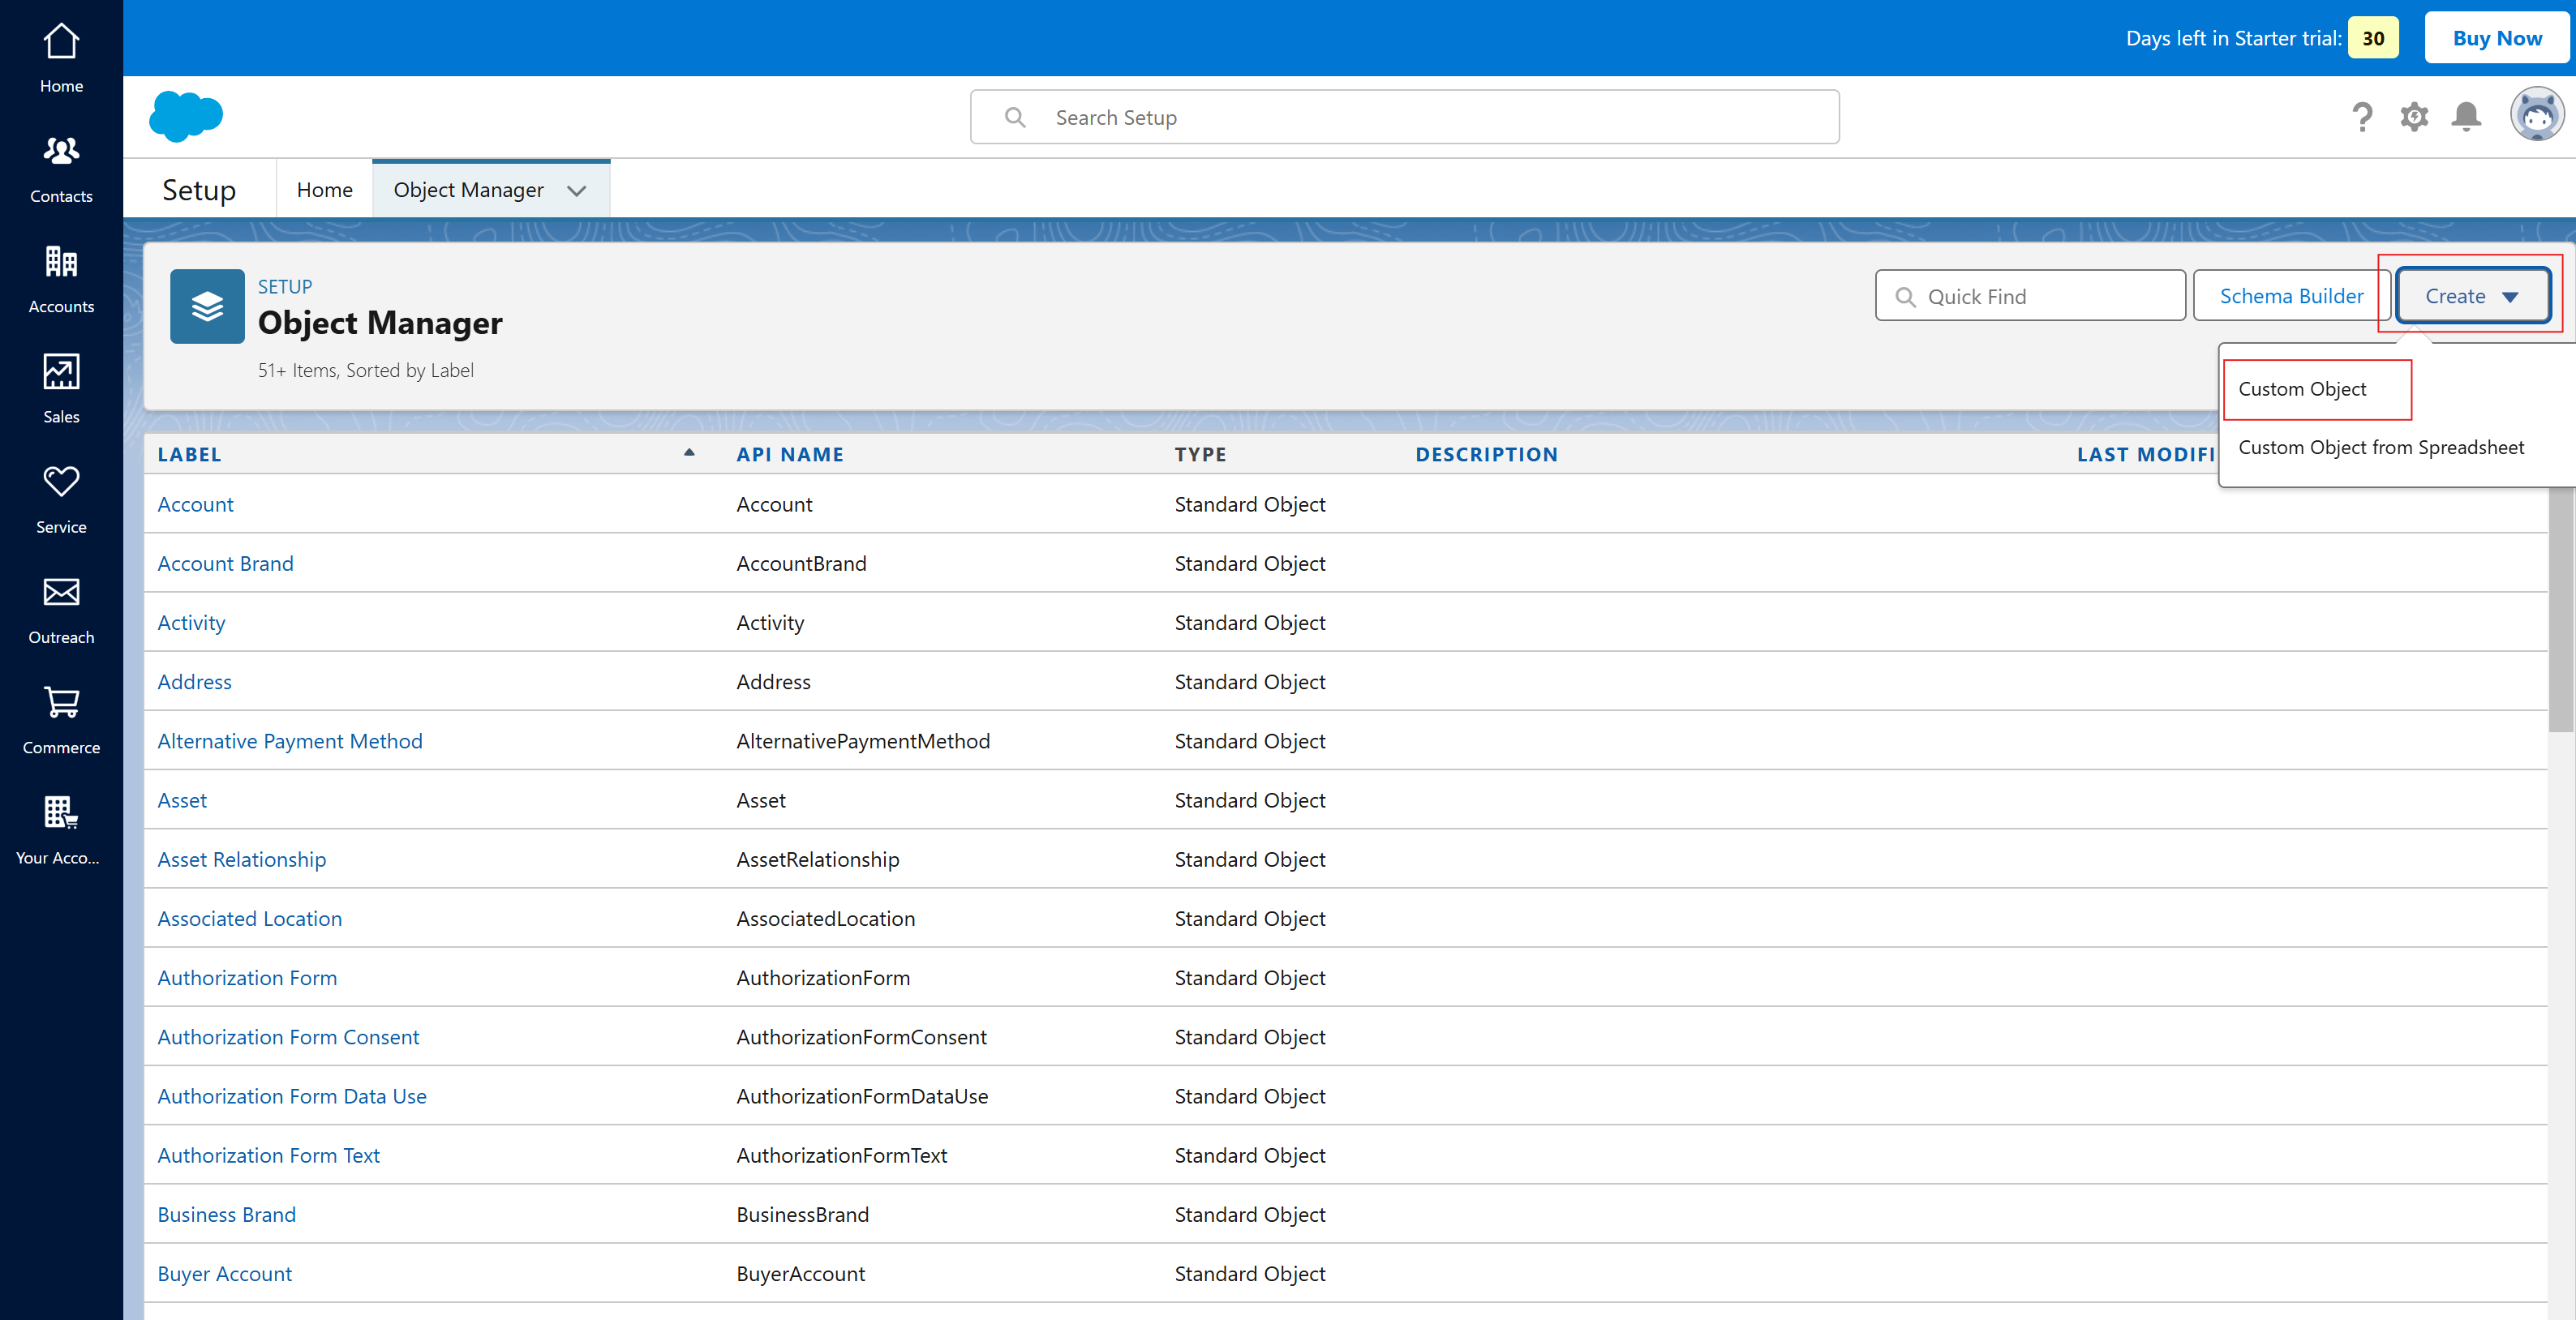
- You'll be redirected to the Object Manager page. From the right side of the screen, click the "Create" button and select "Custom Object".
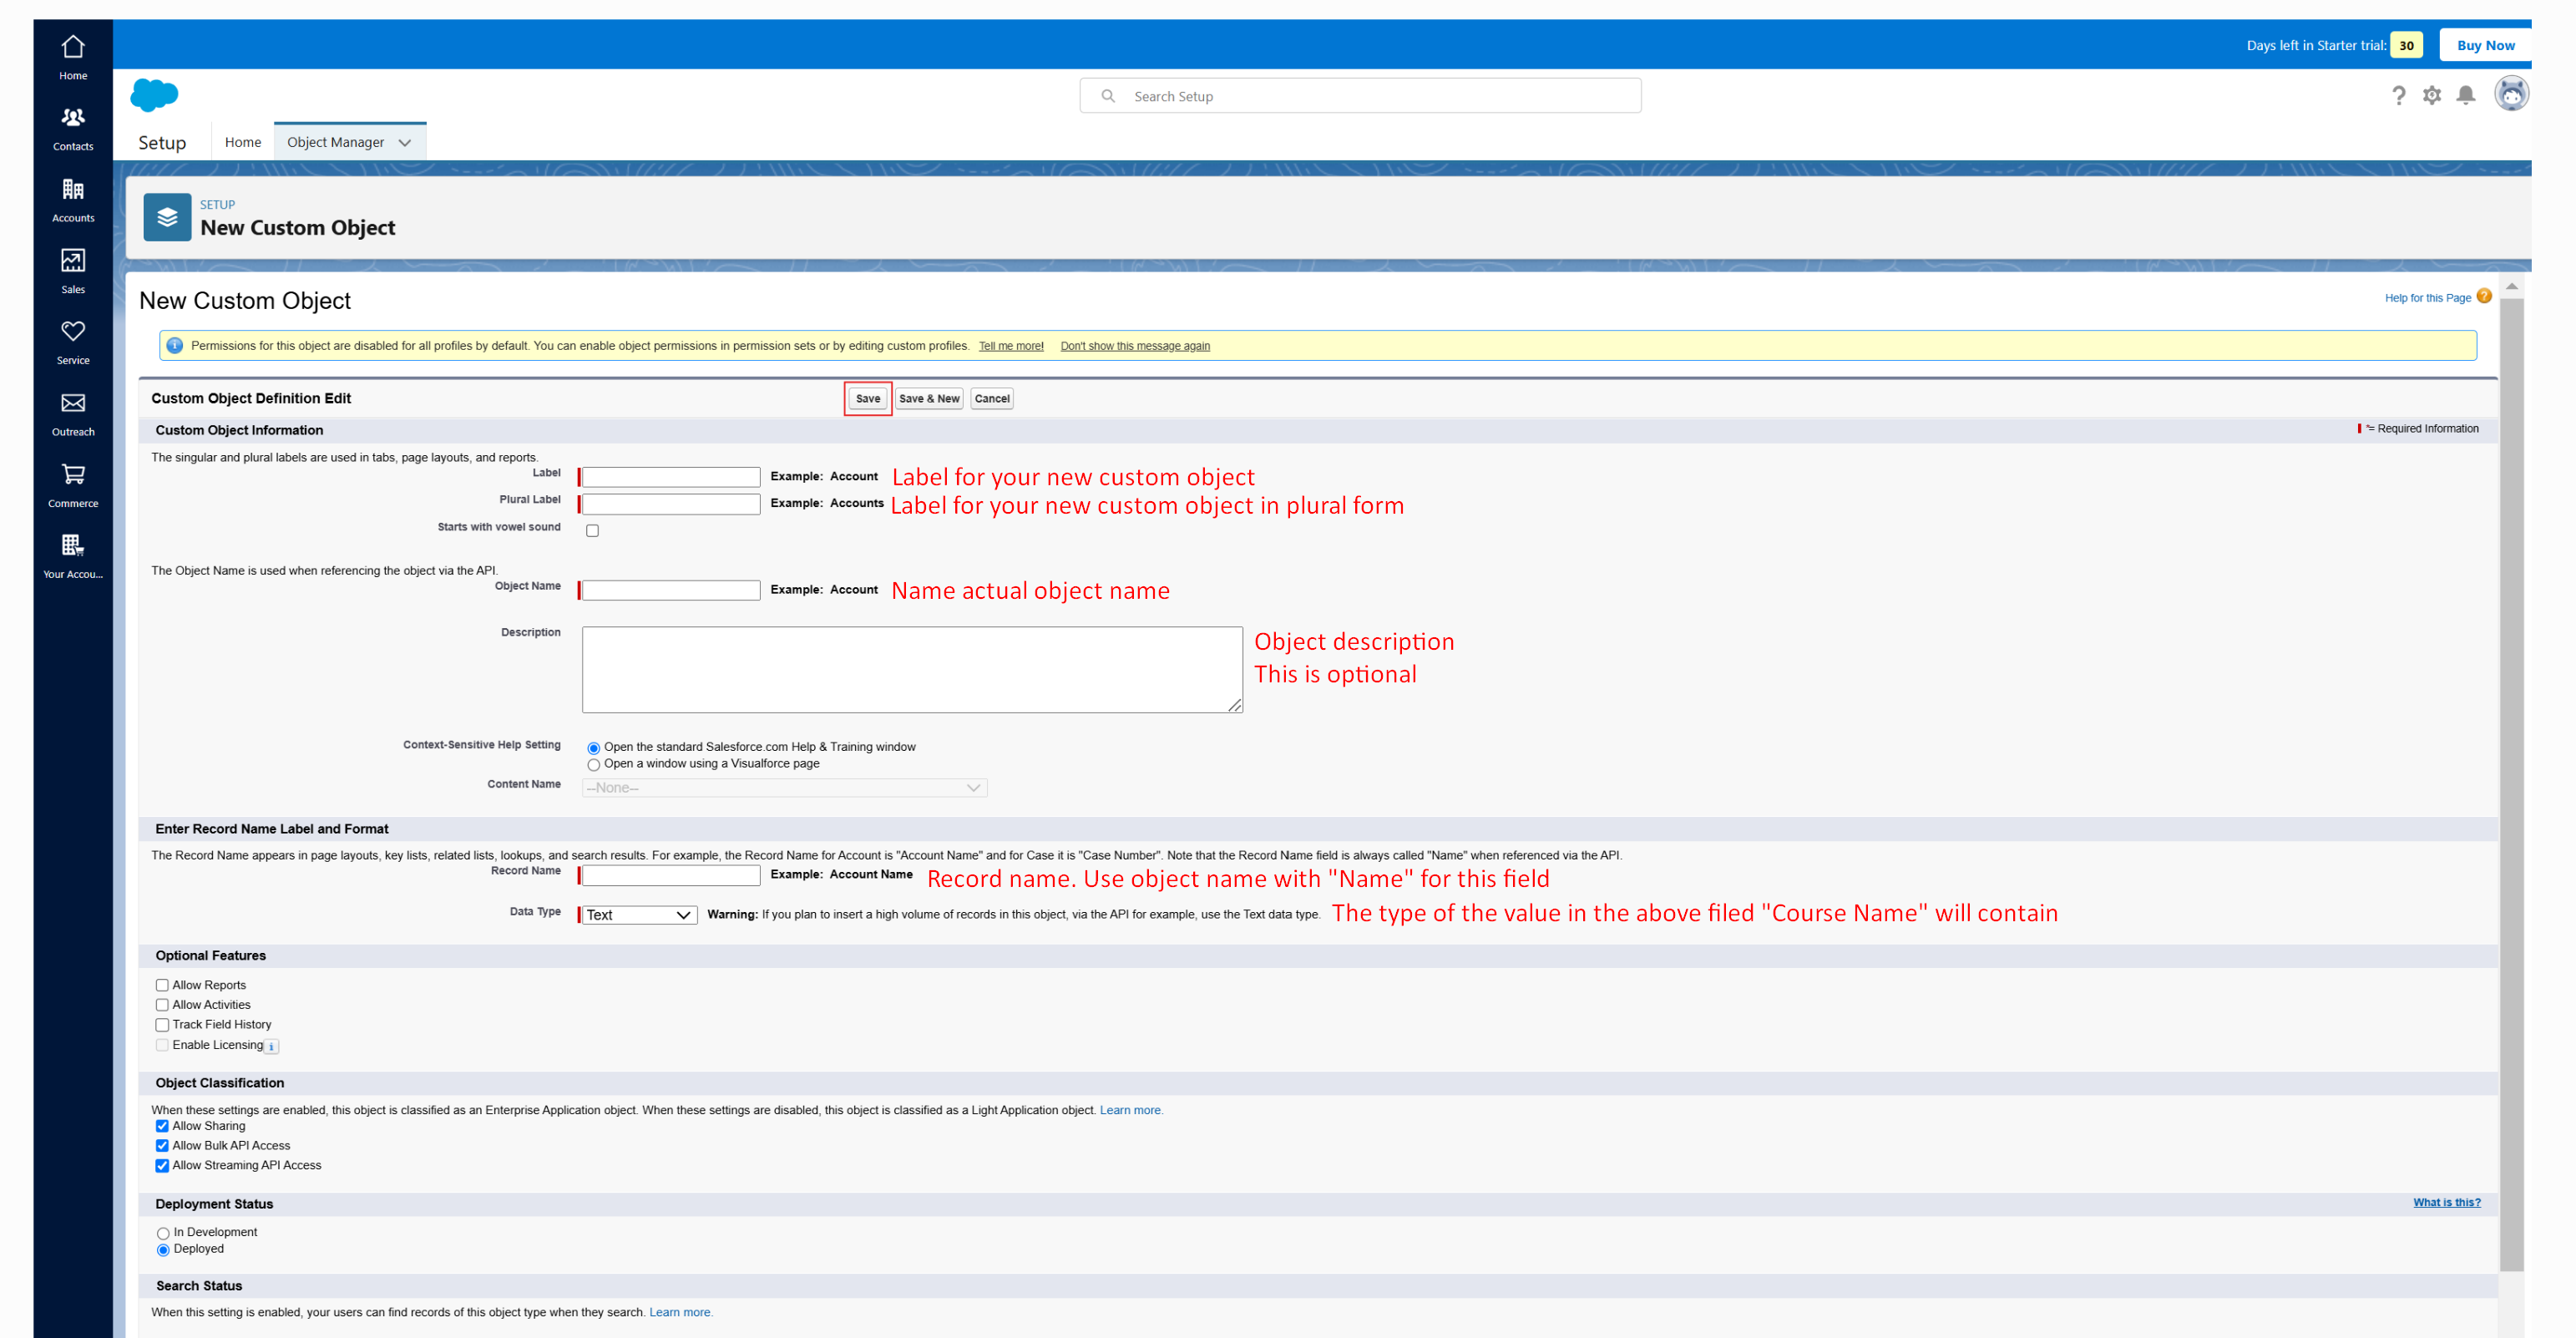
- You'll see a form where you need to fill in some values related to your object. After filling in all the details, click the Save button. The Record Name for the course object should be "Course Name", and this field will be used when mapping the course name in the LMS.
Note: For the course registration object, the Record Name should be "Course Registration ID", and its data type should be "Auto Number" with the display format set to "0".
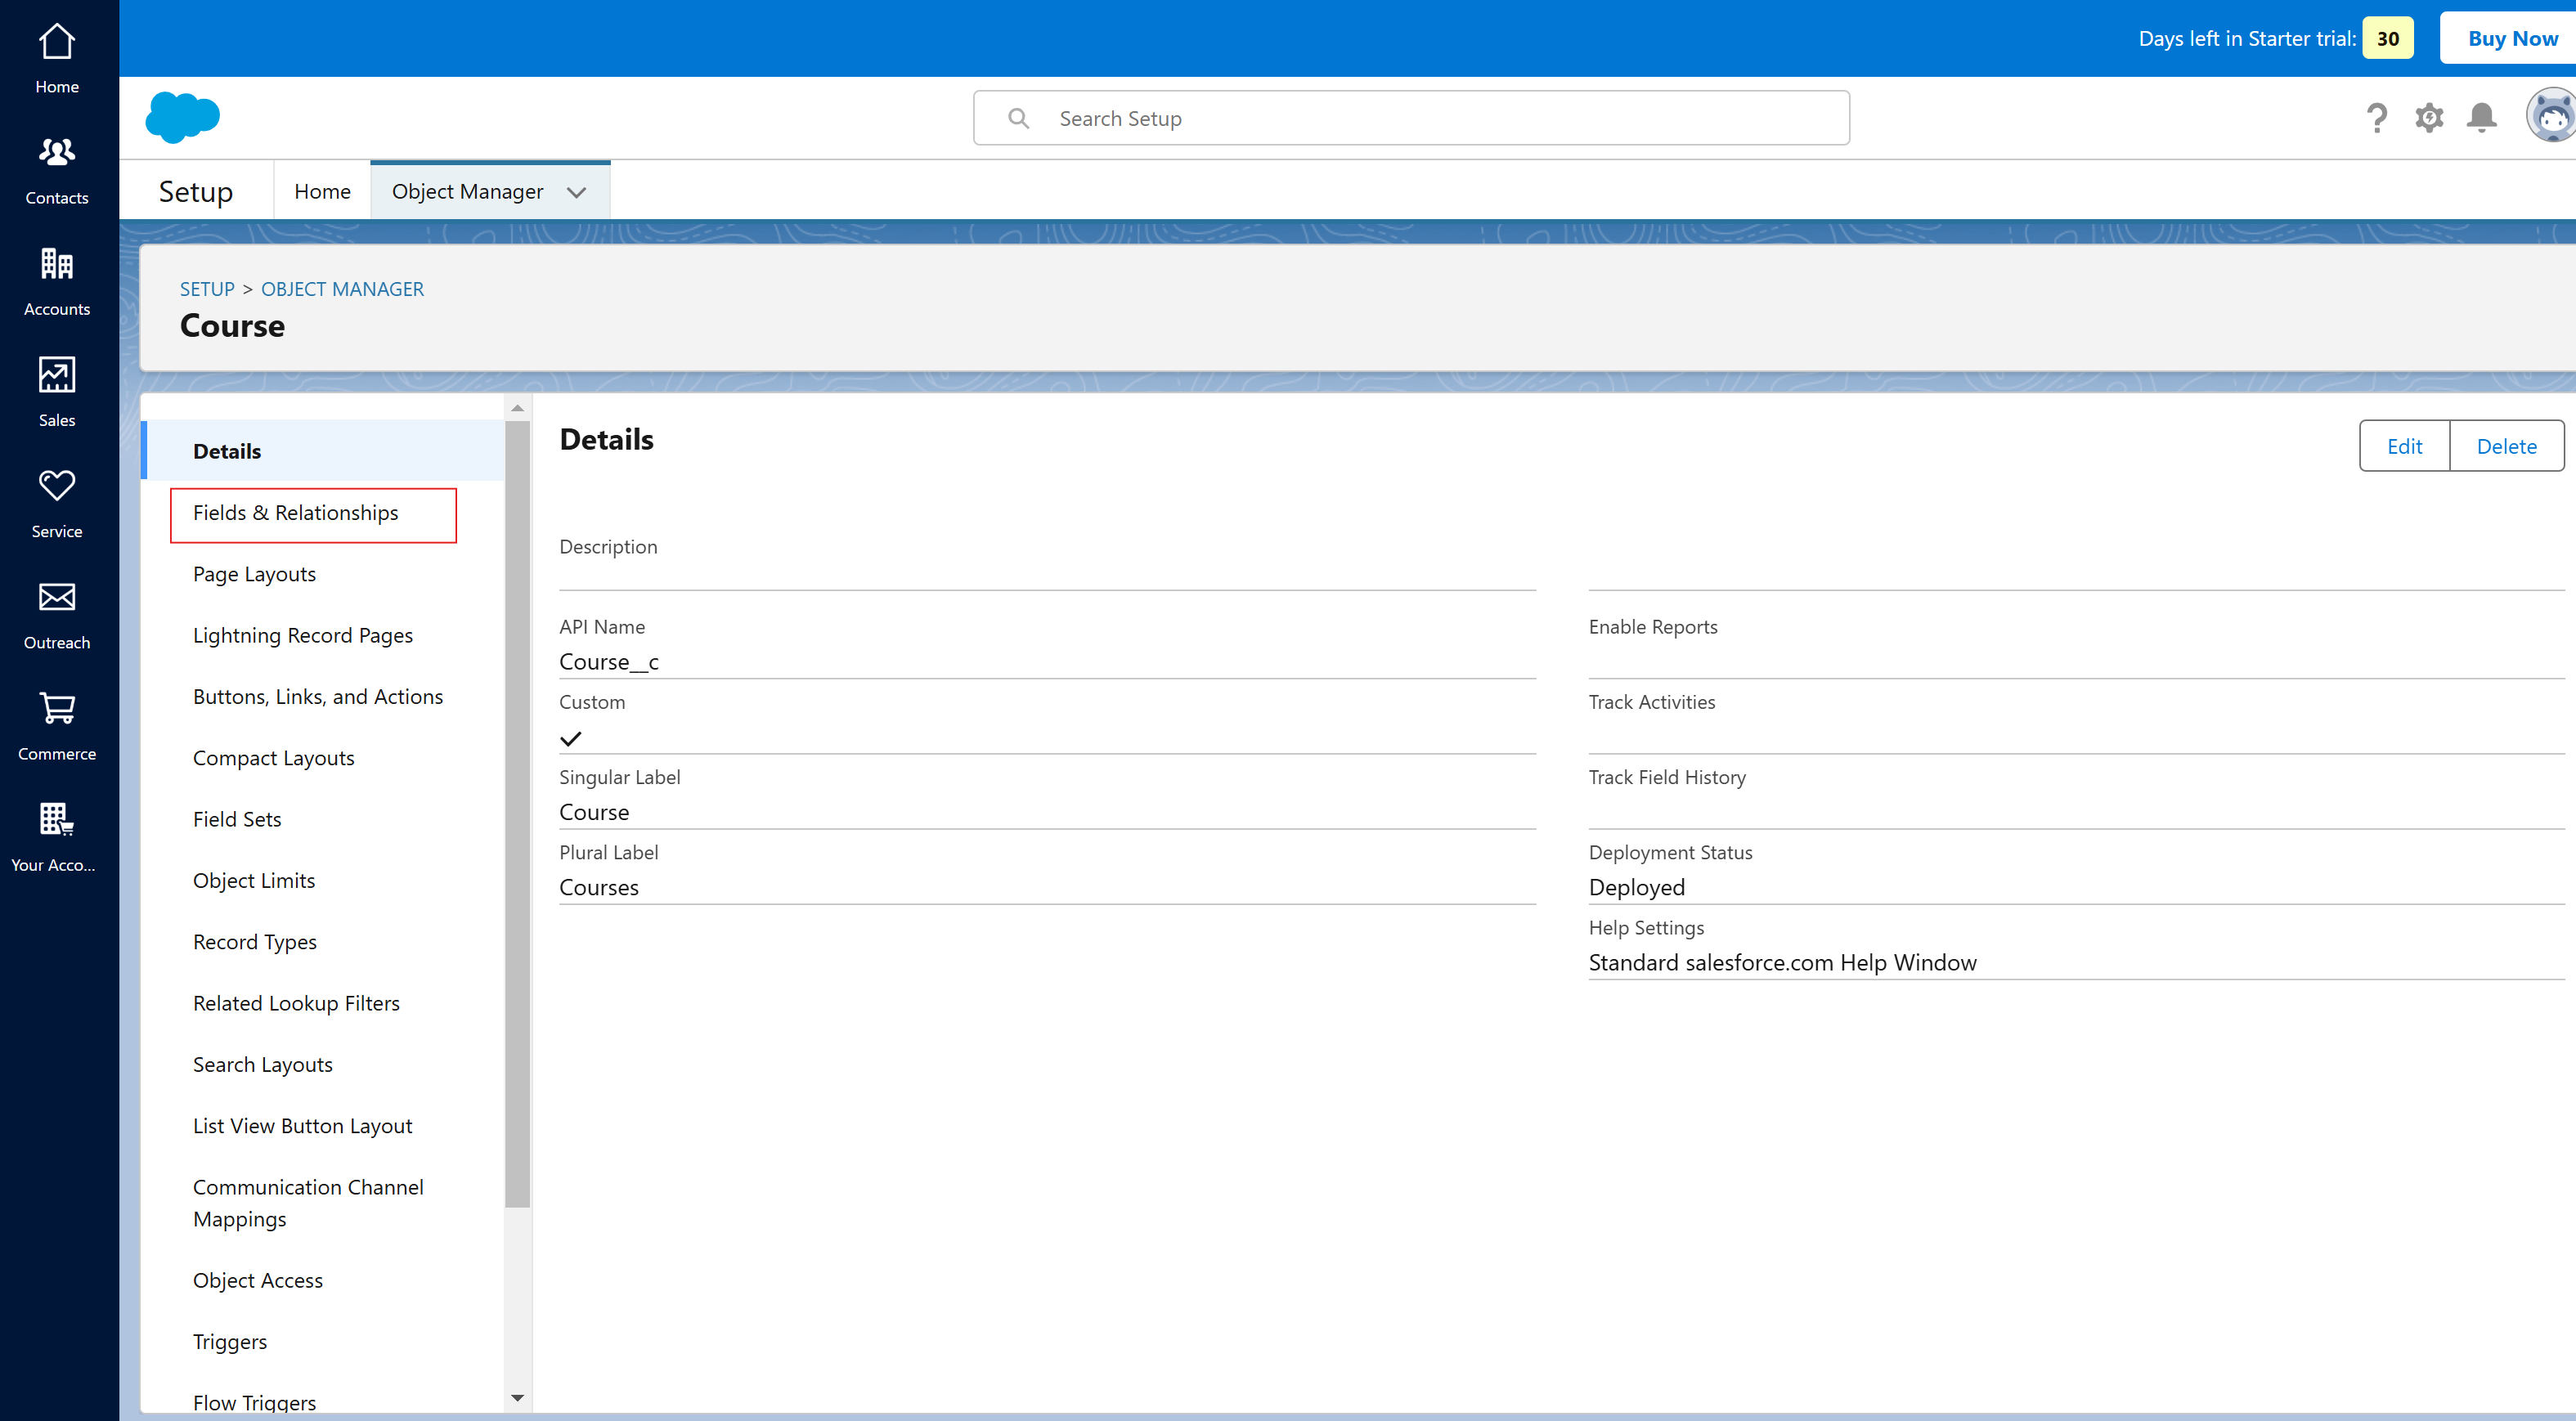
- You've now successfully created a new custom object. You'll be redirected to the page below, where you need to click "Fields & Relationships" to add custom fields to store your data in this object.
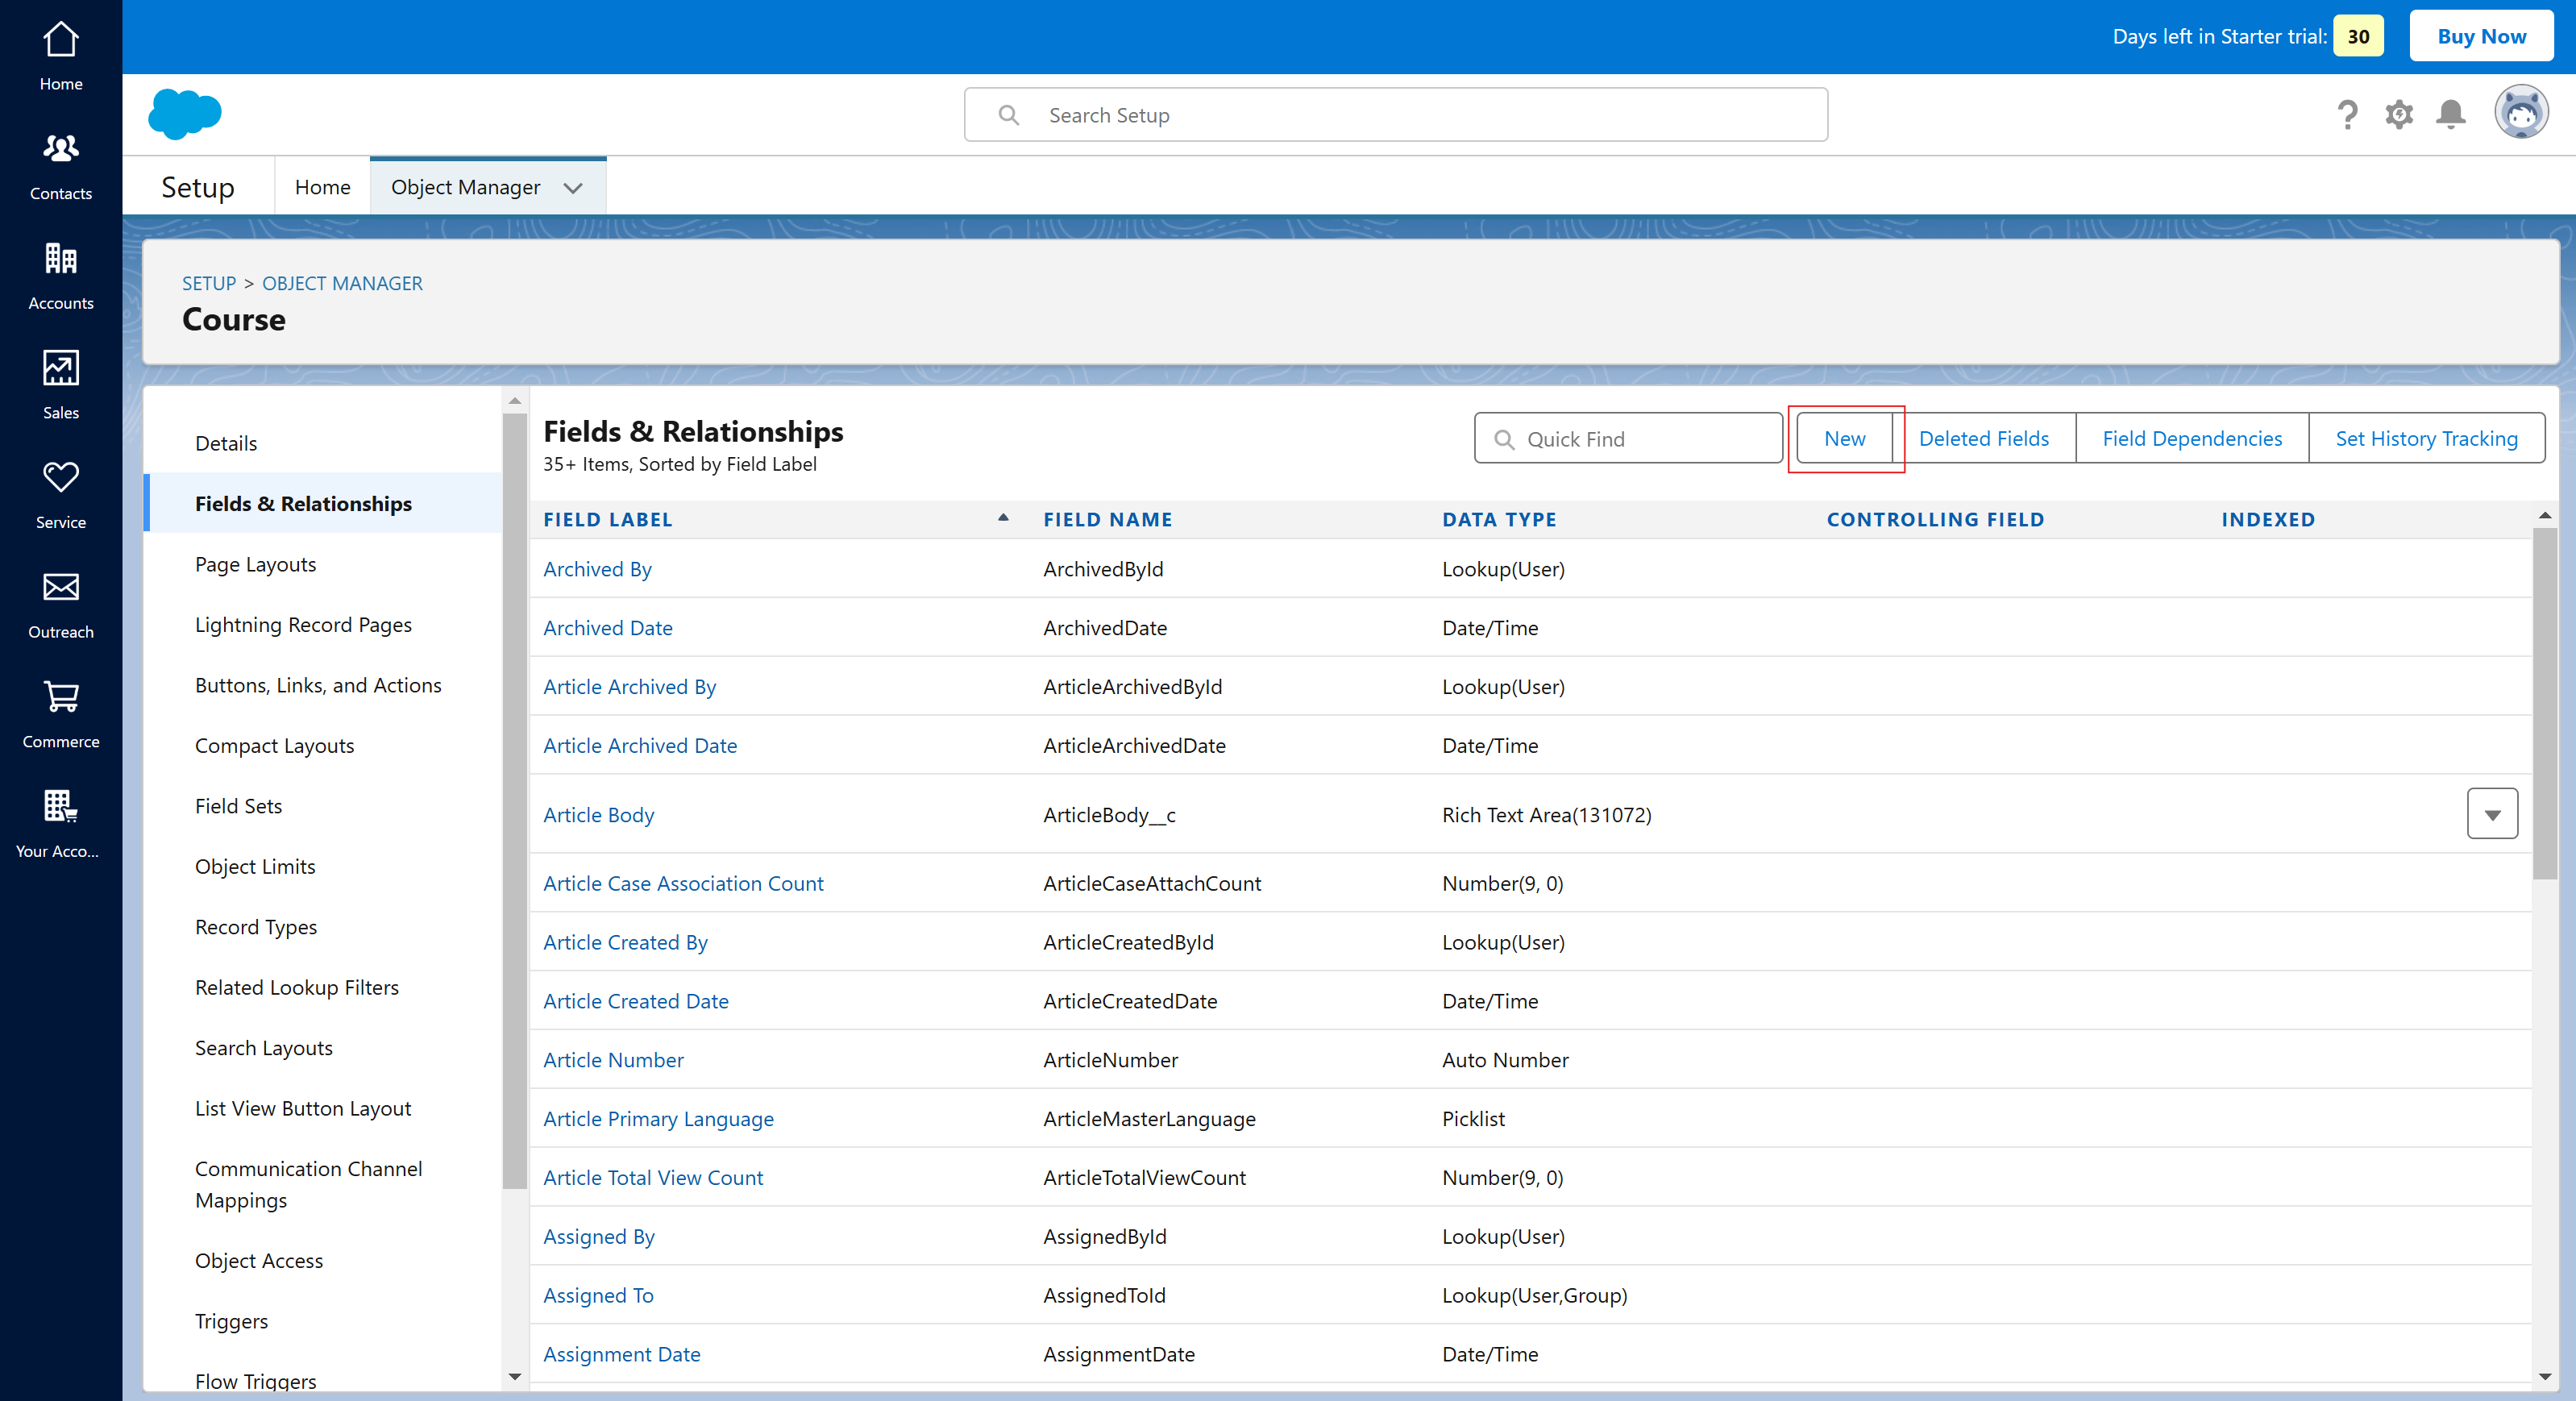
- You'll be redirected to the Fields and Relationships page. From the right side of the screen, click the "New" button to create new fields. Salesforce provides default fields automatically after you create a custom object, but since your business requires storing extra data, you'll need to create new fields.
-
Next, you'll see the "New Custom Field" page, with a form to submit across 4 steps that ask for details about the new custom field:
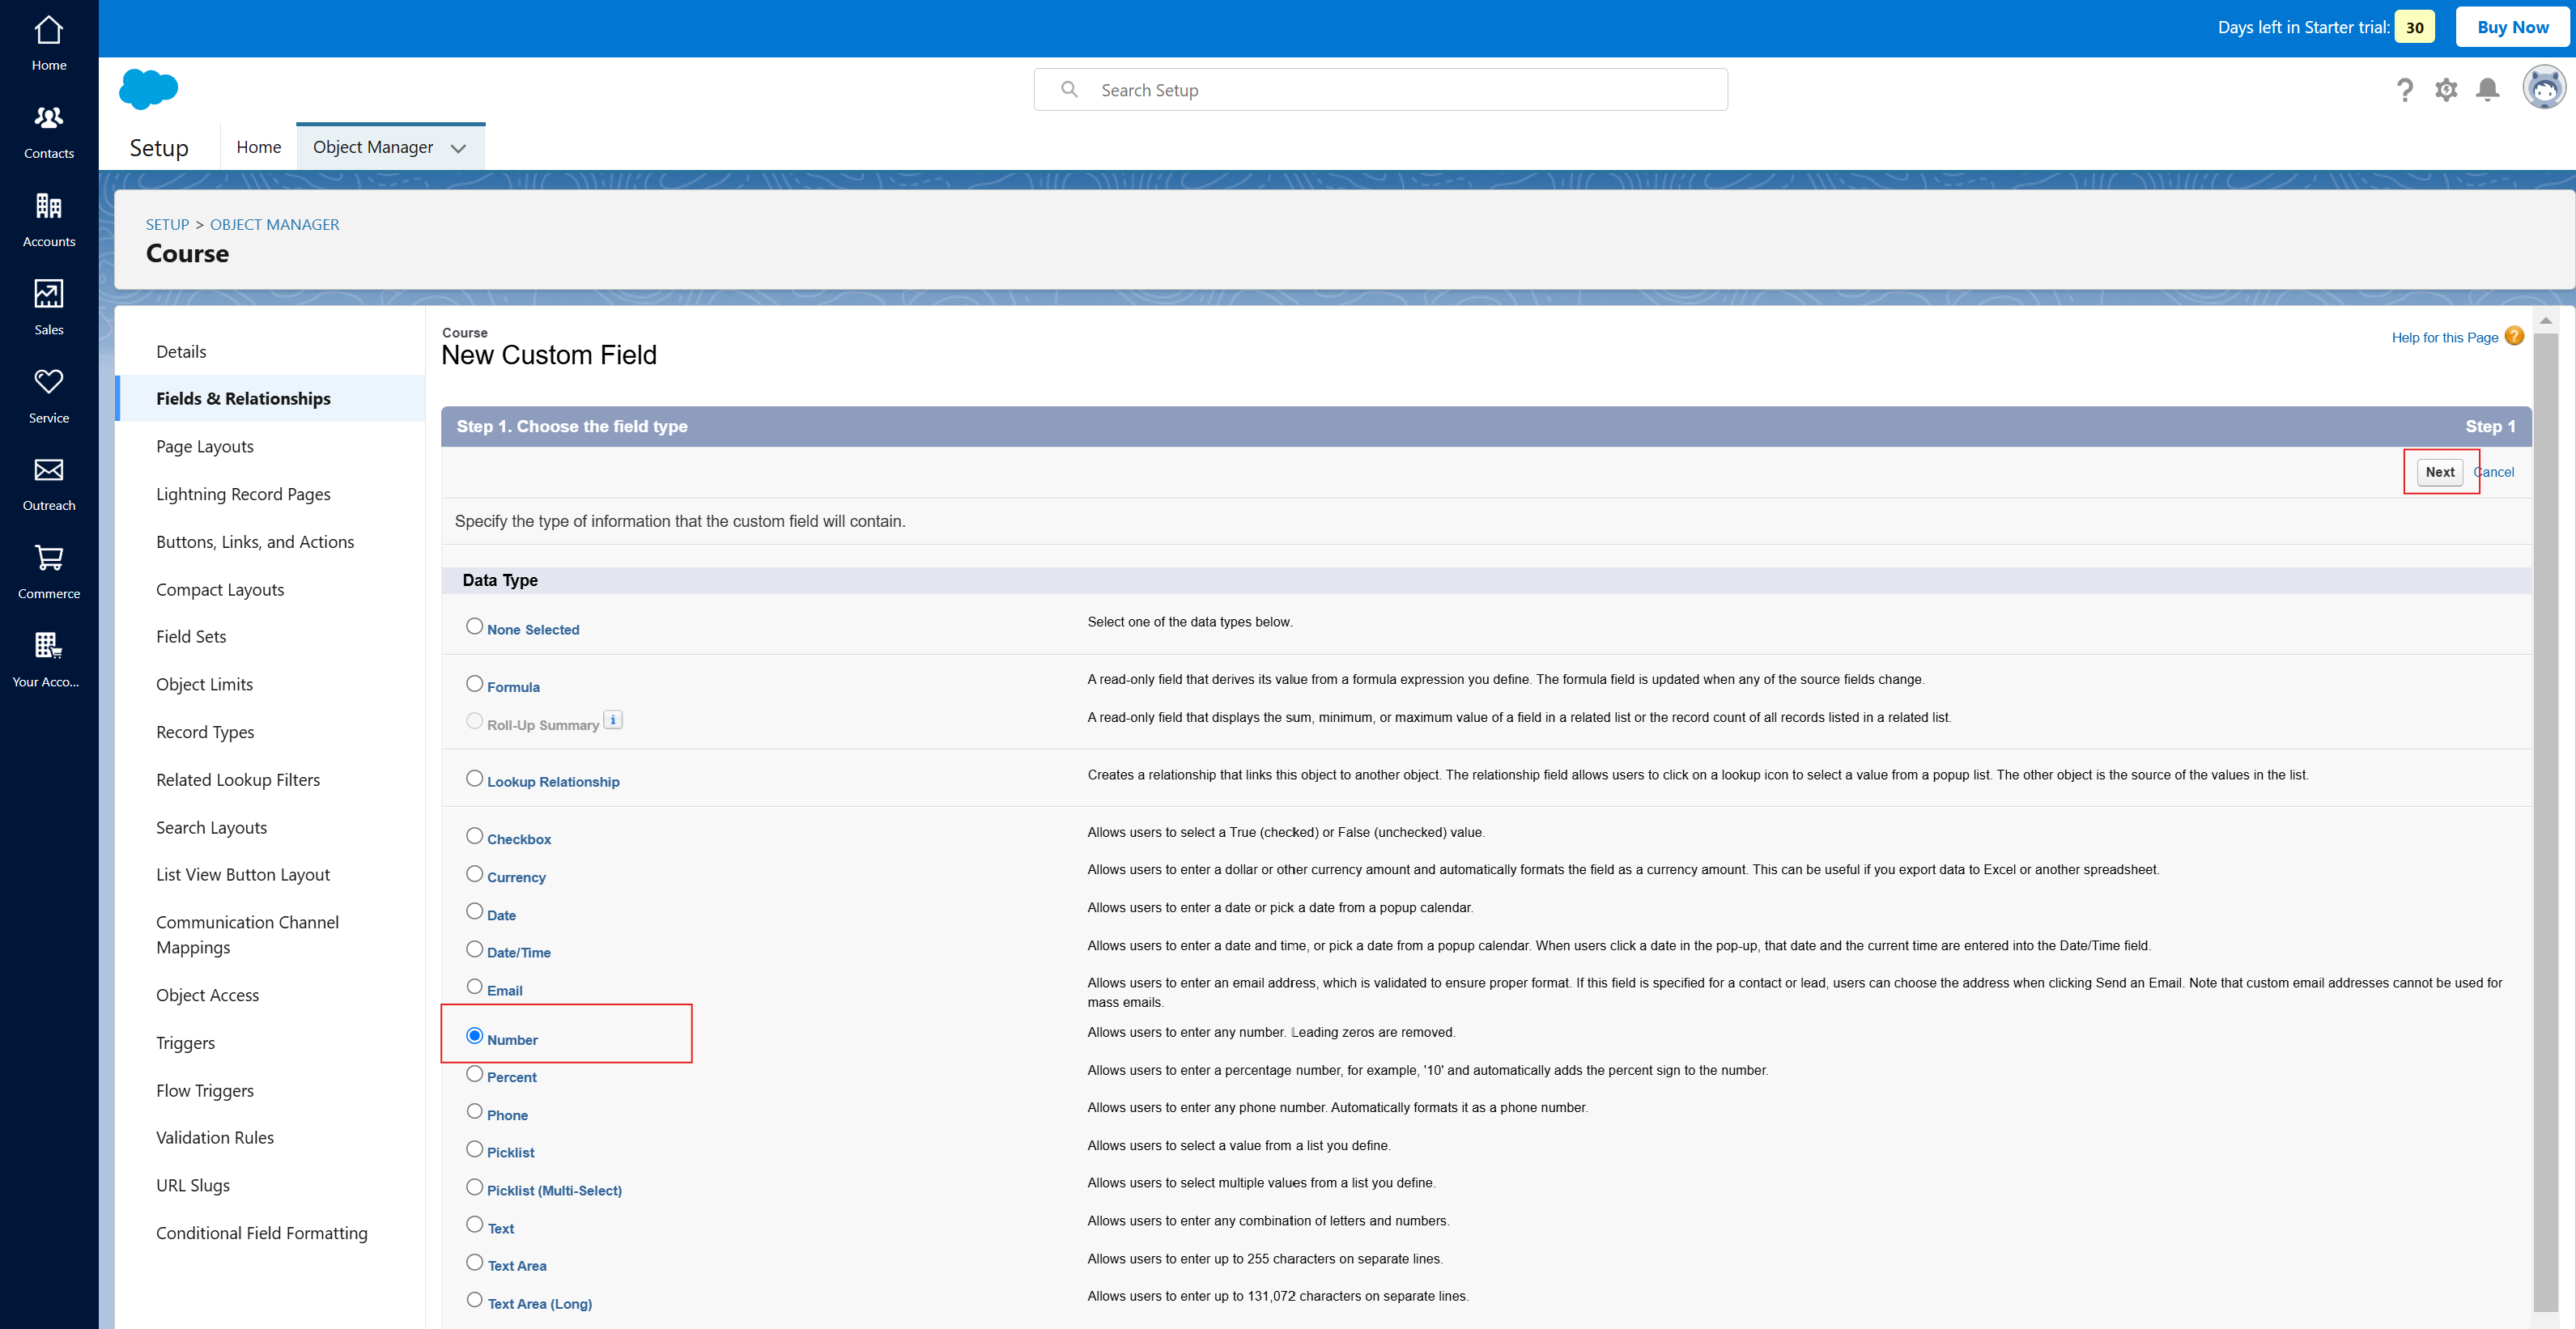
Page 1: Specify the type of information the custom field will contain. (If the field is Course ID, select Number.)
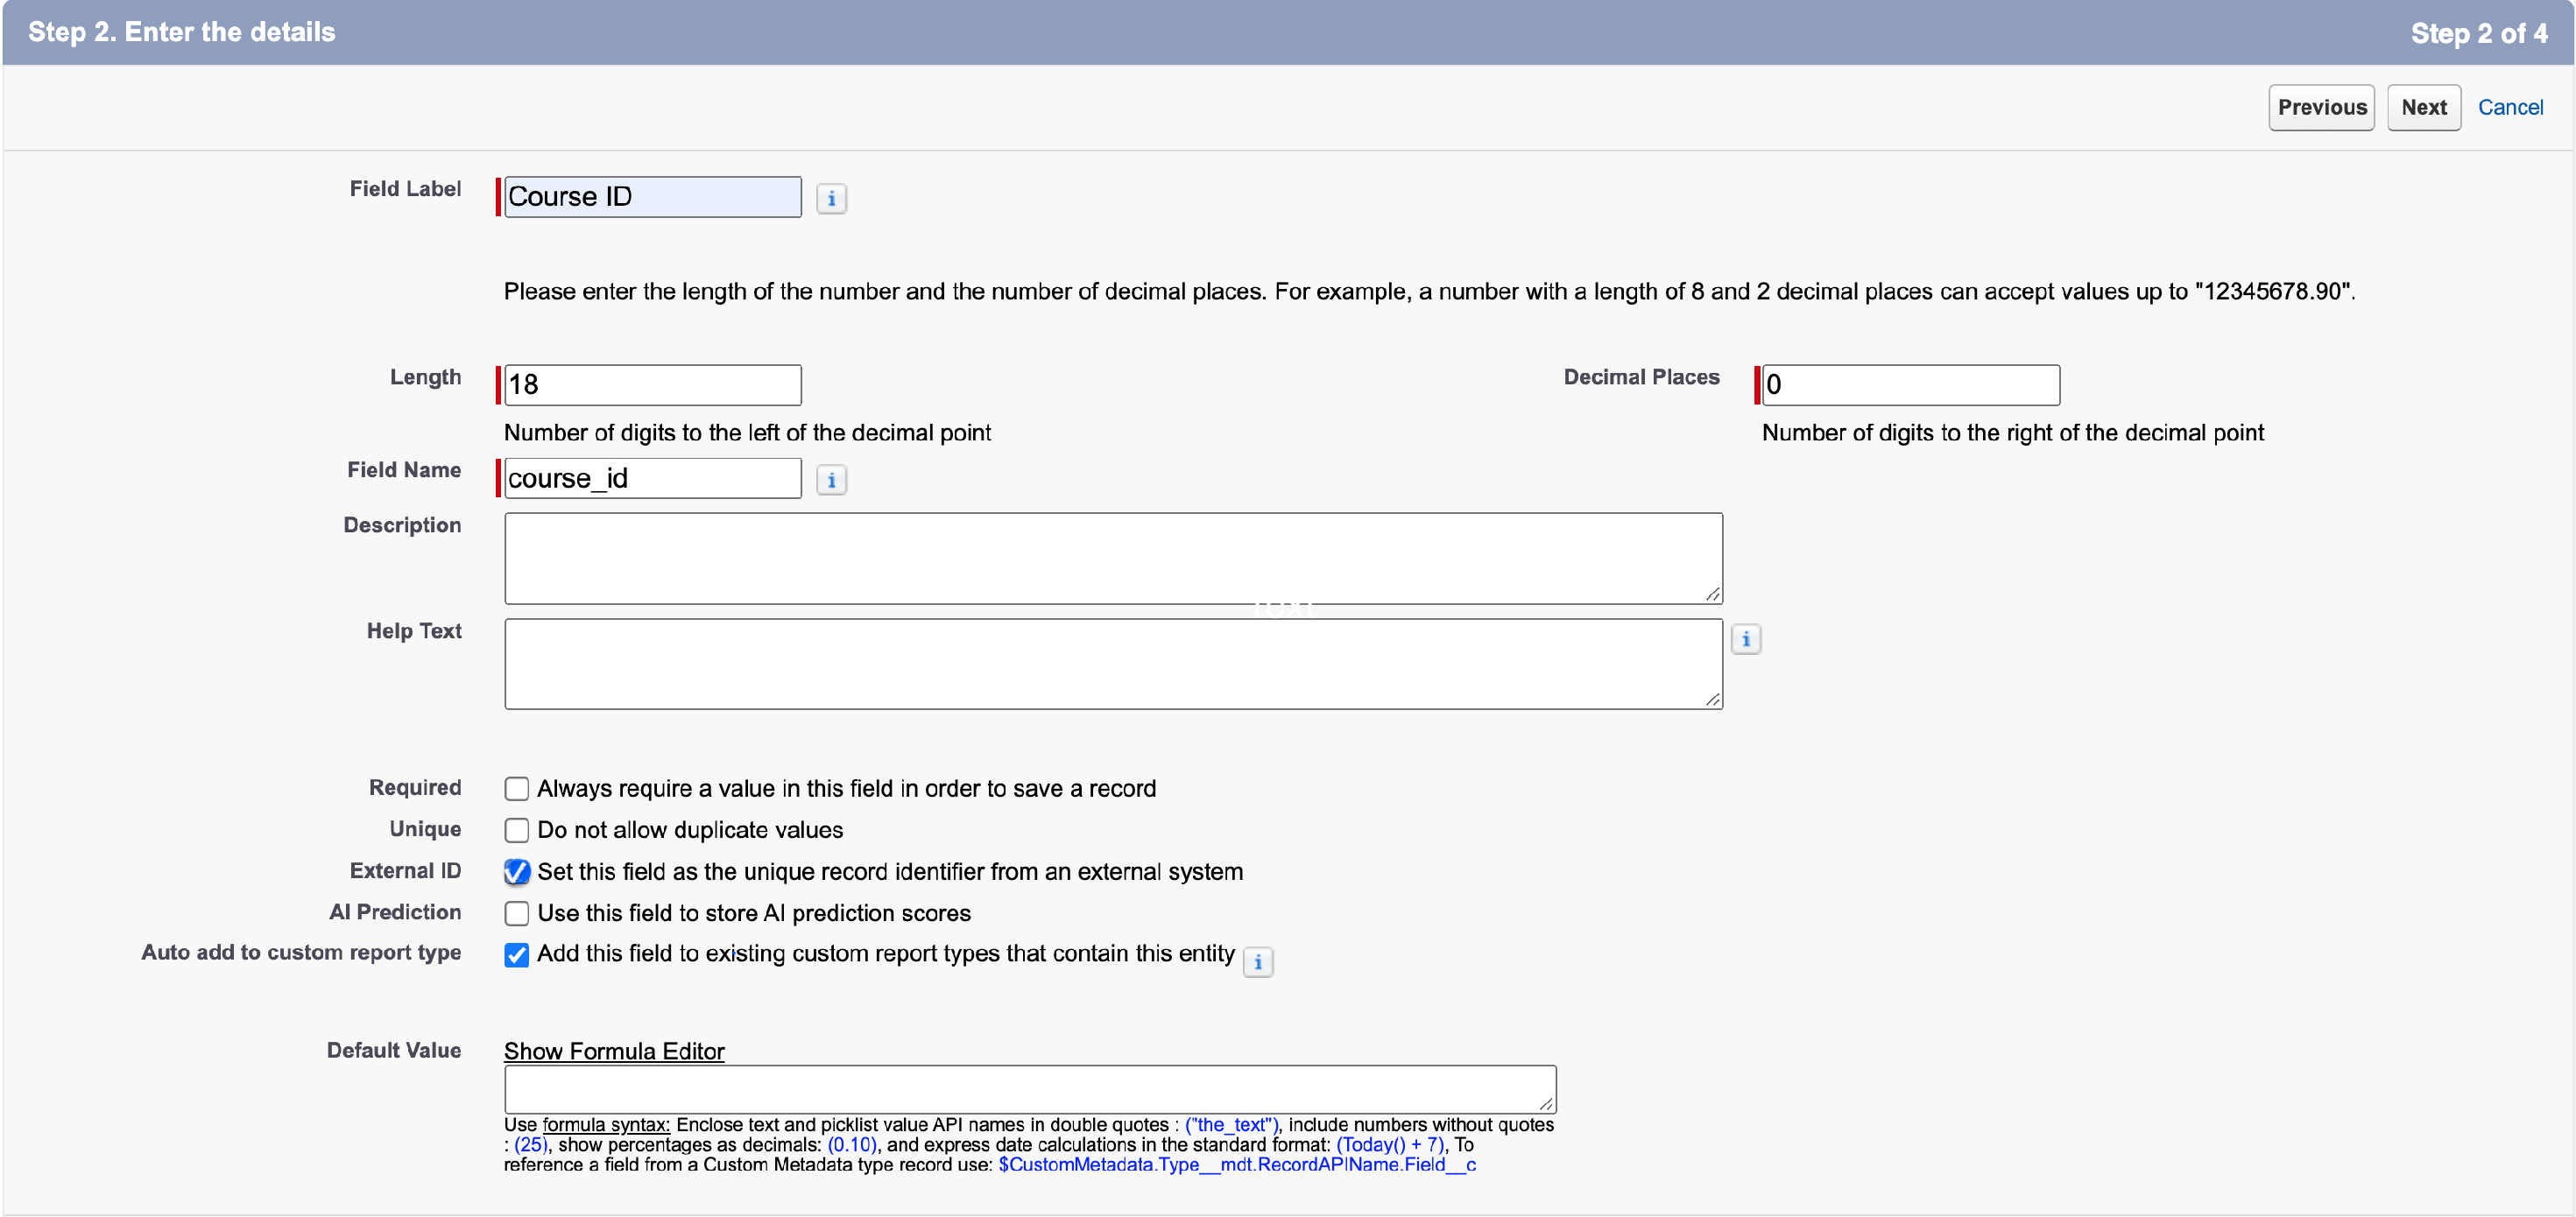
Page 2: Enter details like label, description, etc.
Page 3: No action needed, just click Next.
Page 4: No action needed, just click Next/Save.
Page 1 Image:
Page 2 Image: Make sure you check the External ID field for the Course ID field. This isn't needed for other fields.
- After completing all 4 steps, you'll be redirected to the "Fields & Relationships" page, where you'll see the newly created field.
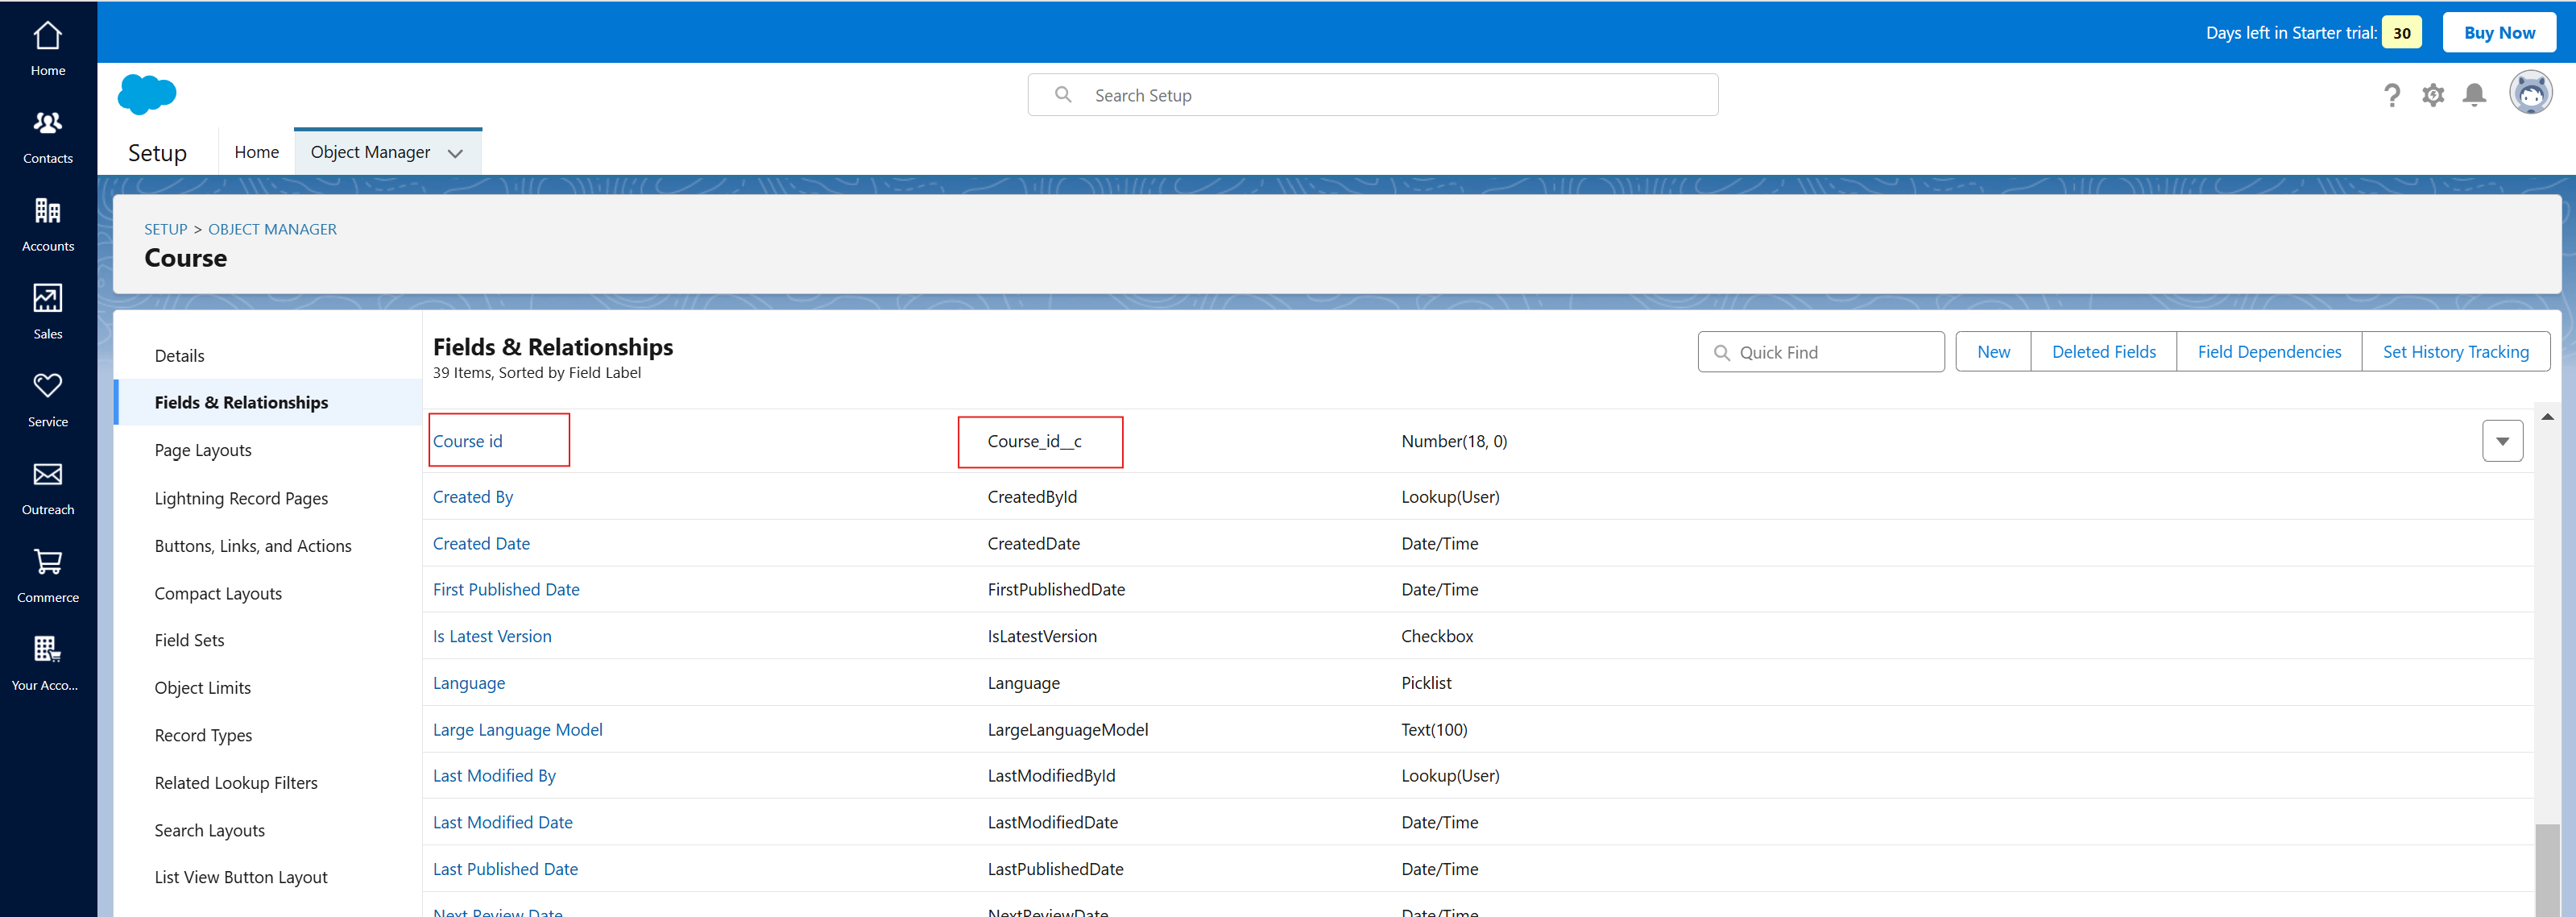
- Following the same process, you can create multiple custom fields (such as course category) and map them in the LMS using the Mappings tab inside the Salesforce integration.
You can follow this Salesforce article on how to create custom objects for more information.
Step 6: Create Tabs in Salesforce to See Custom Object Data
To see all the data stored inside your new custom objects, like course and course registration data, you'll need to create tabs for both. These tabs are similar to what you see on your Marketing home page, like Contacts, Leads, etc.
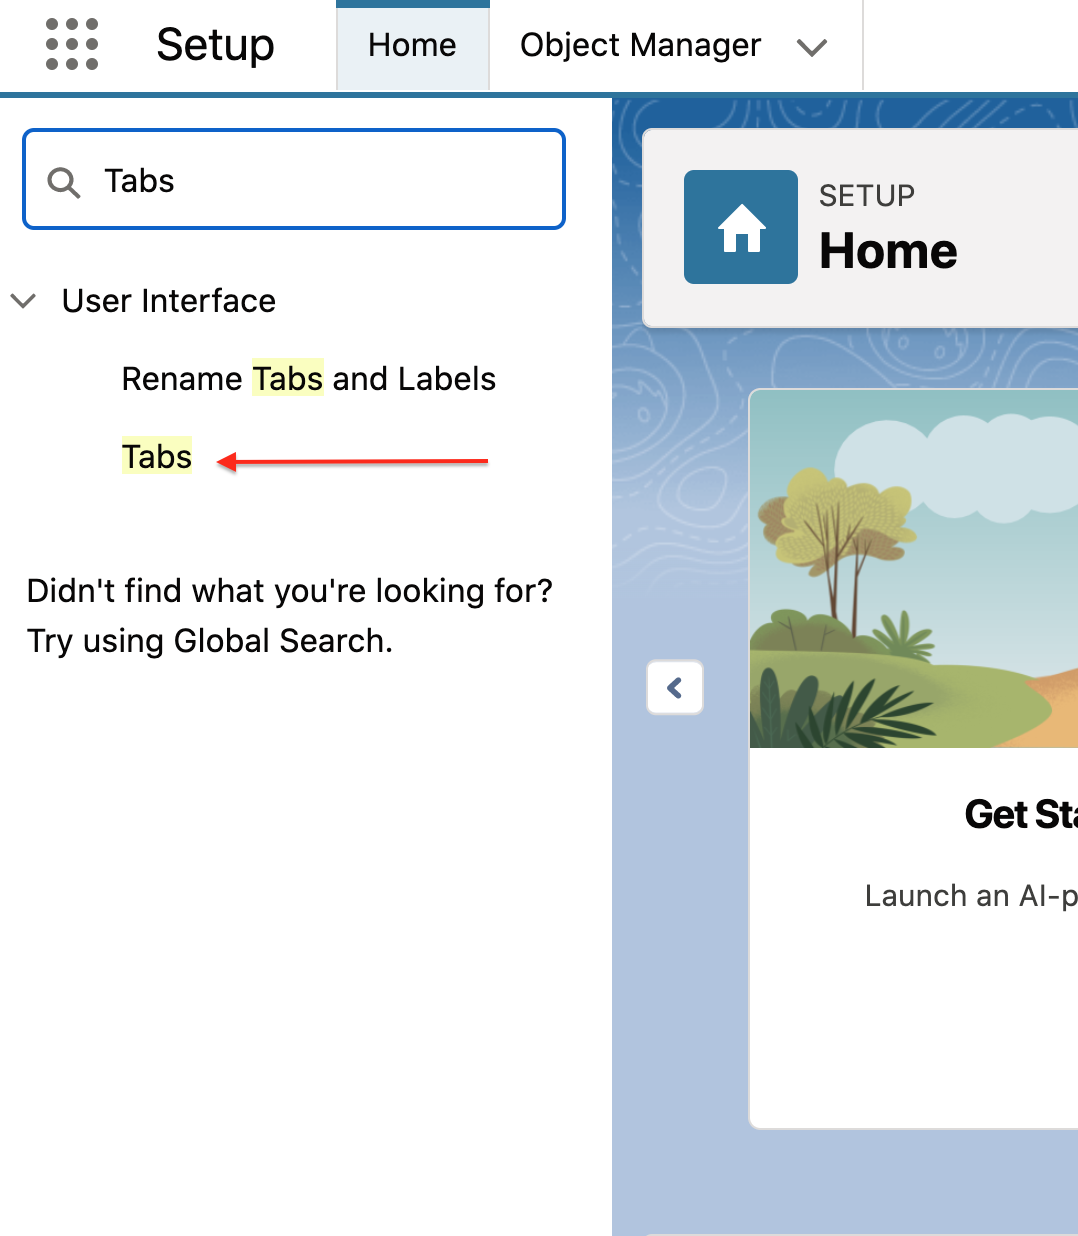
- Within Salesforce, use the Quick Find search for "Tabs", then click on the Tabs link.
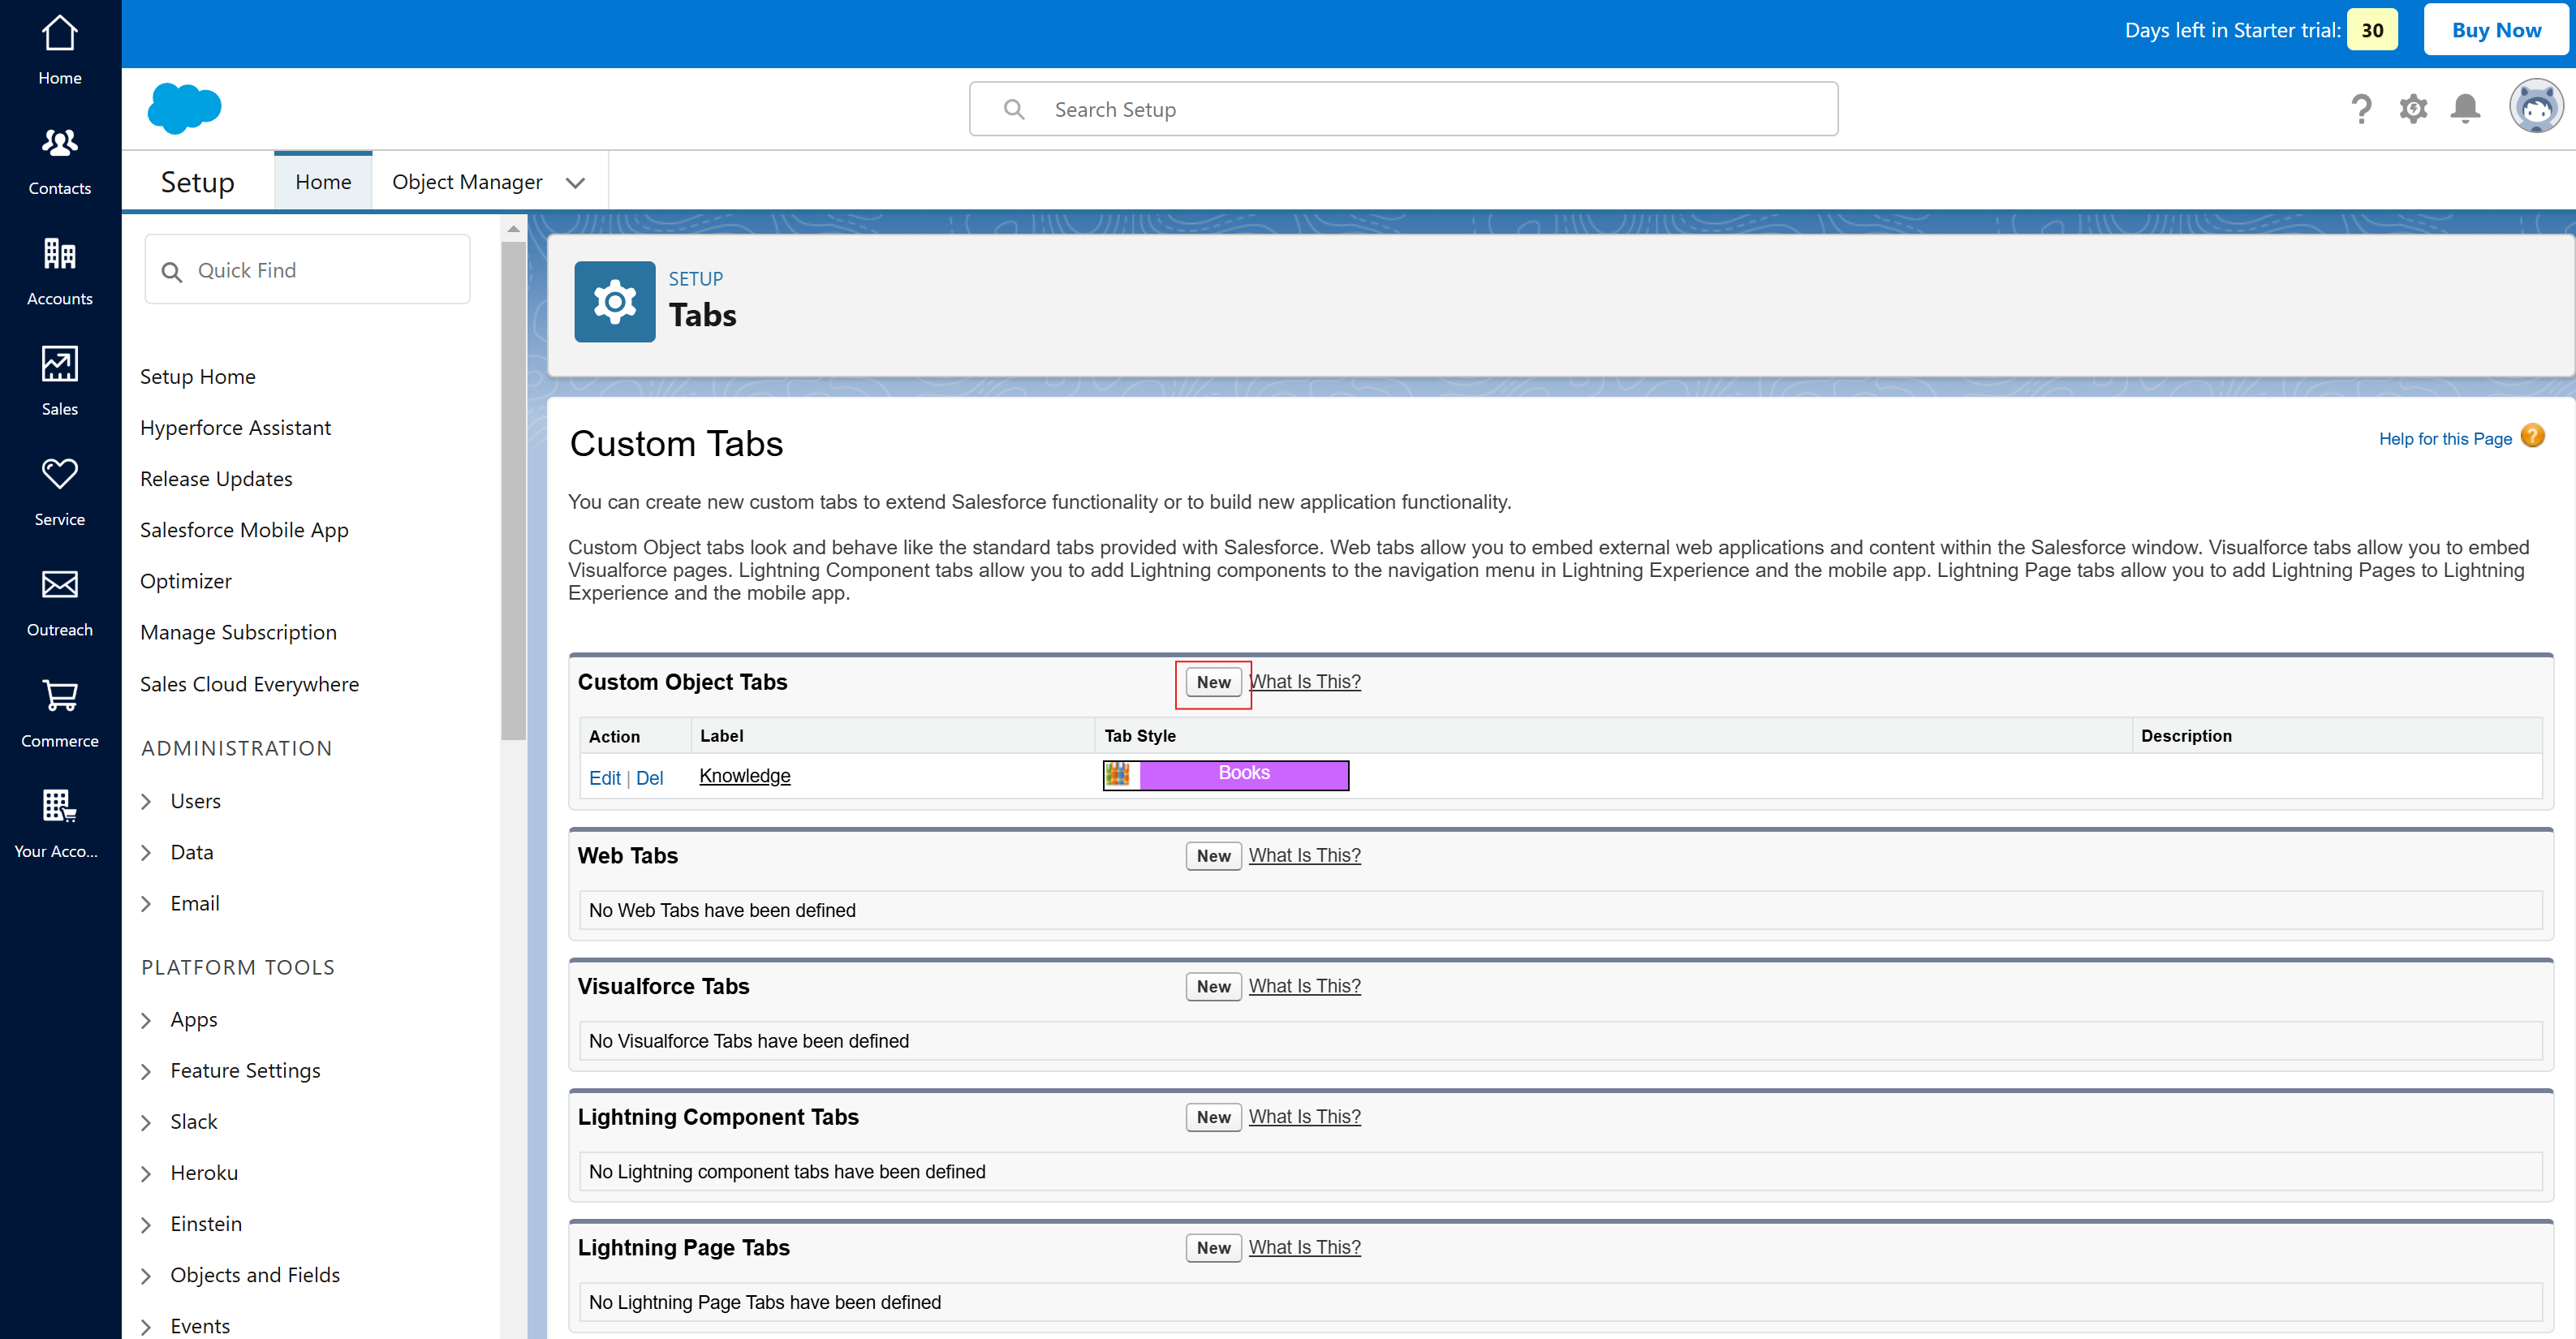
- You'll be redirected to the Custom Tabs page, where you need to click the New button to create a new tab for your custom object.
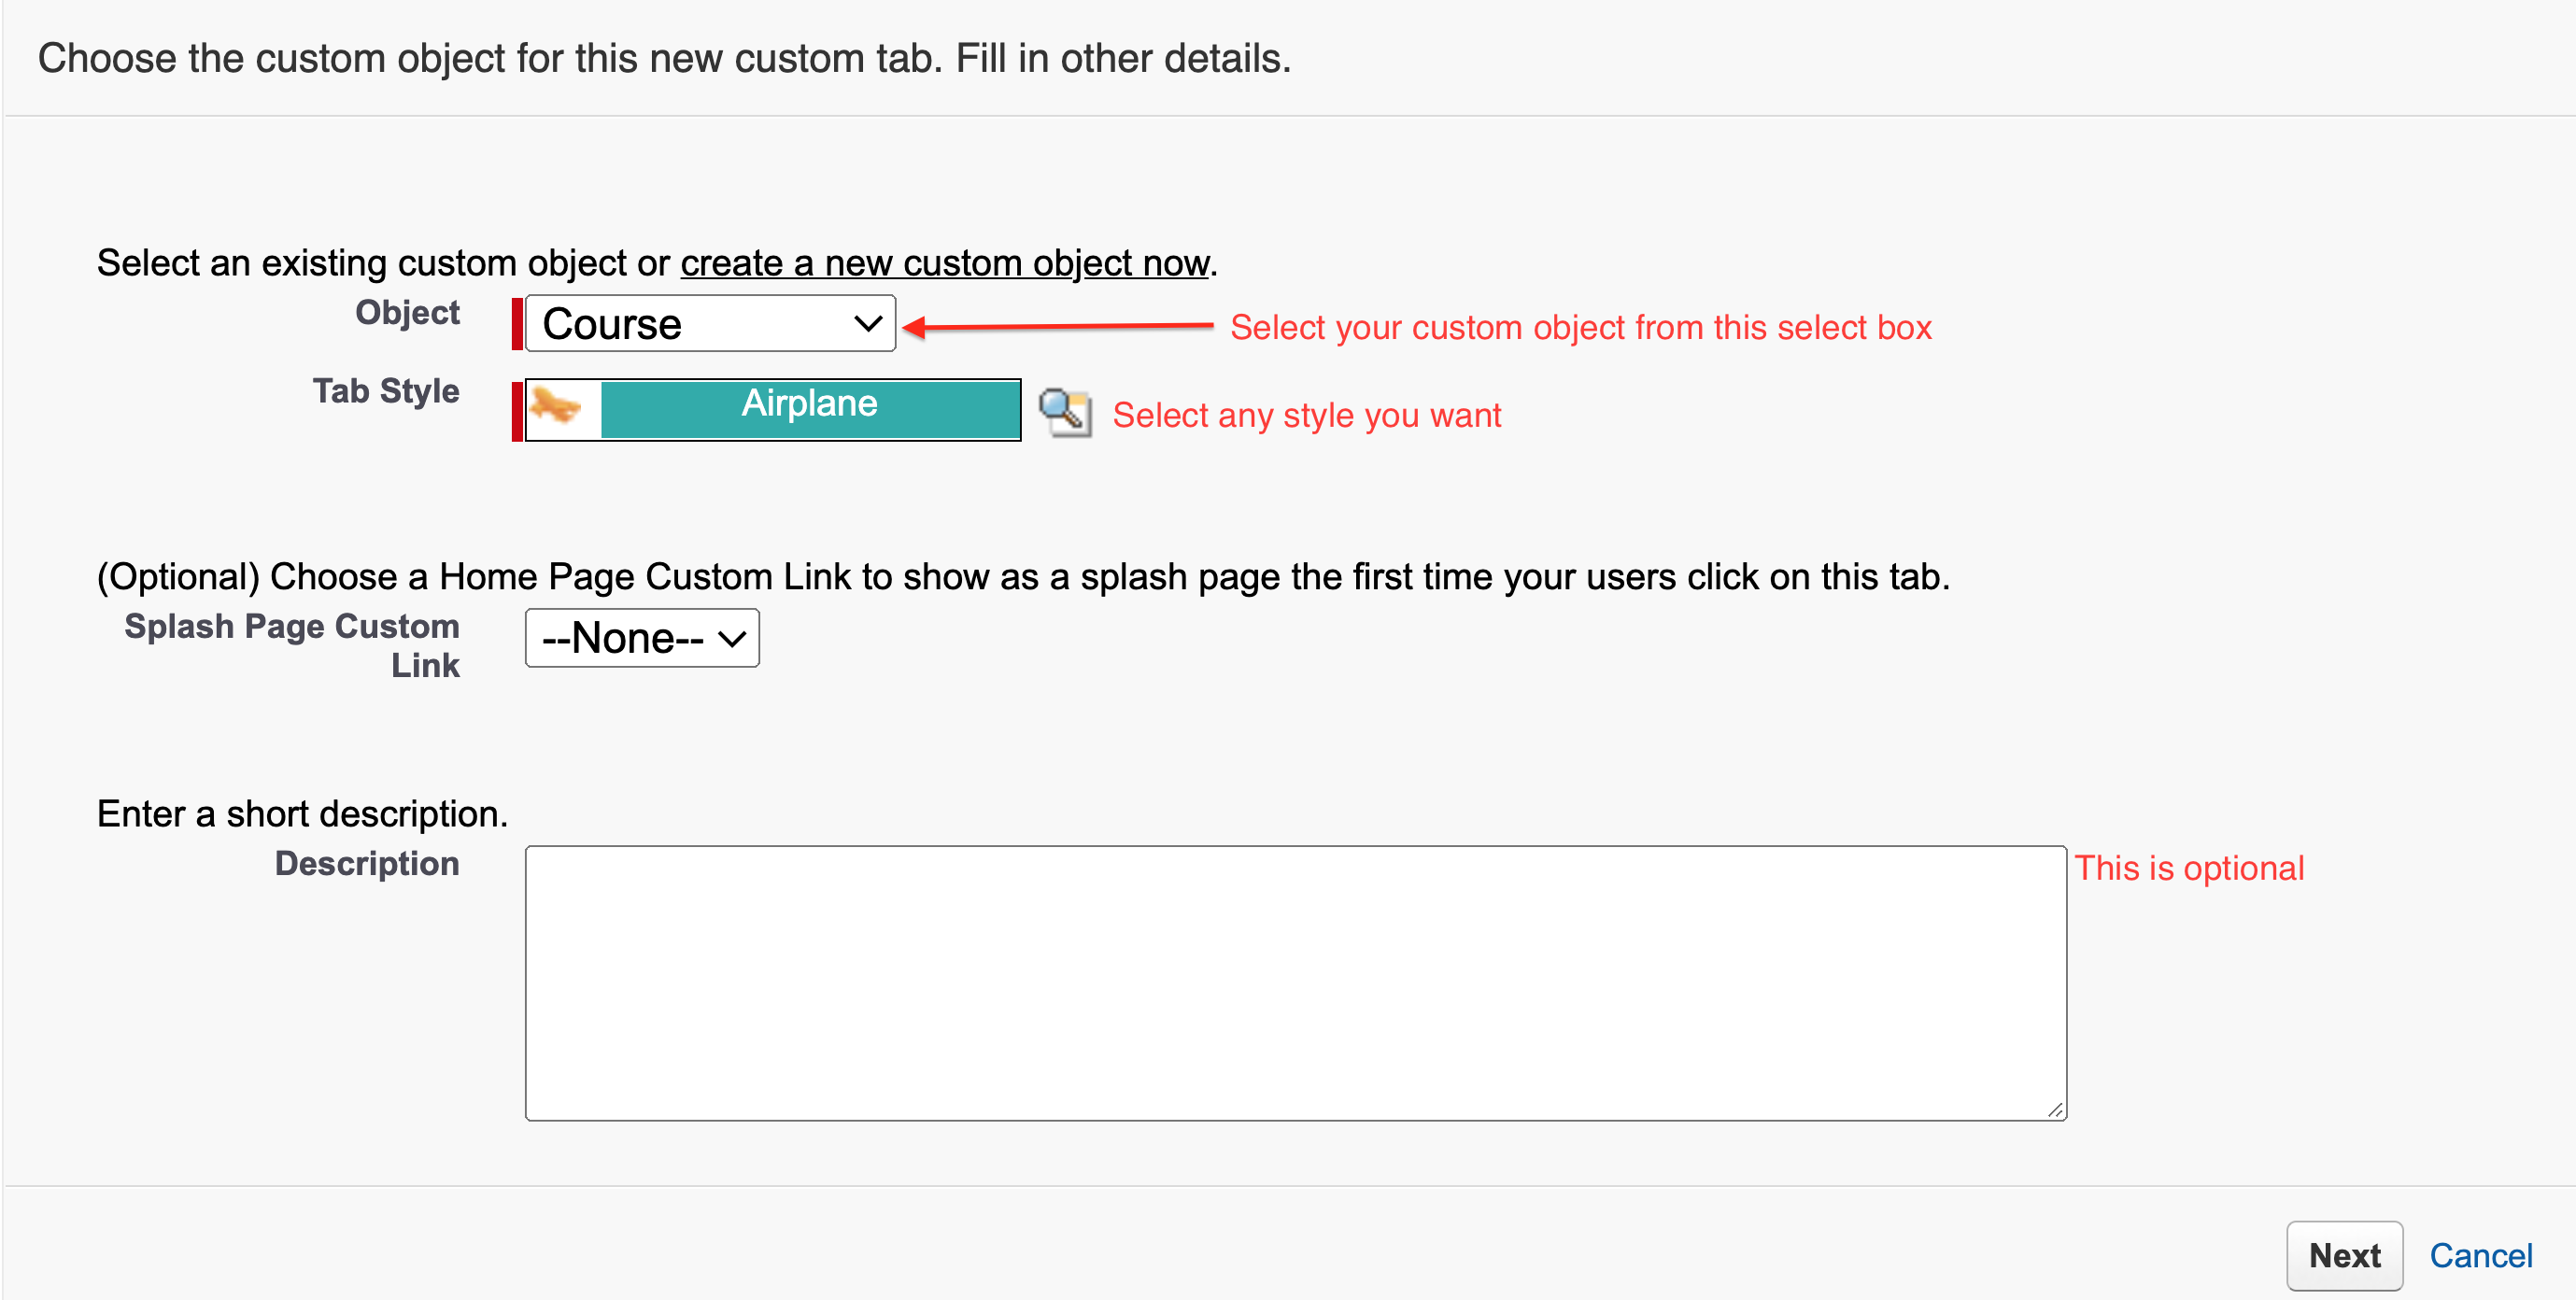
- You're now on the "New Custom Object Tab" page, where you'll go through 3 steps to create the tab.
Step 1: Choose the custom object for this new custom tab. Fill in the other details and click Next.
Step 2: Choose the user profiles for which the new custom tab will be available. You can leave the default settings as is for now and click Next. 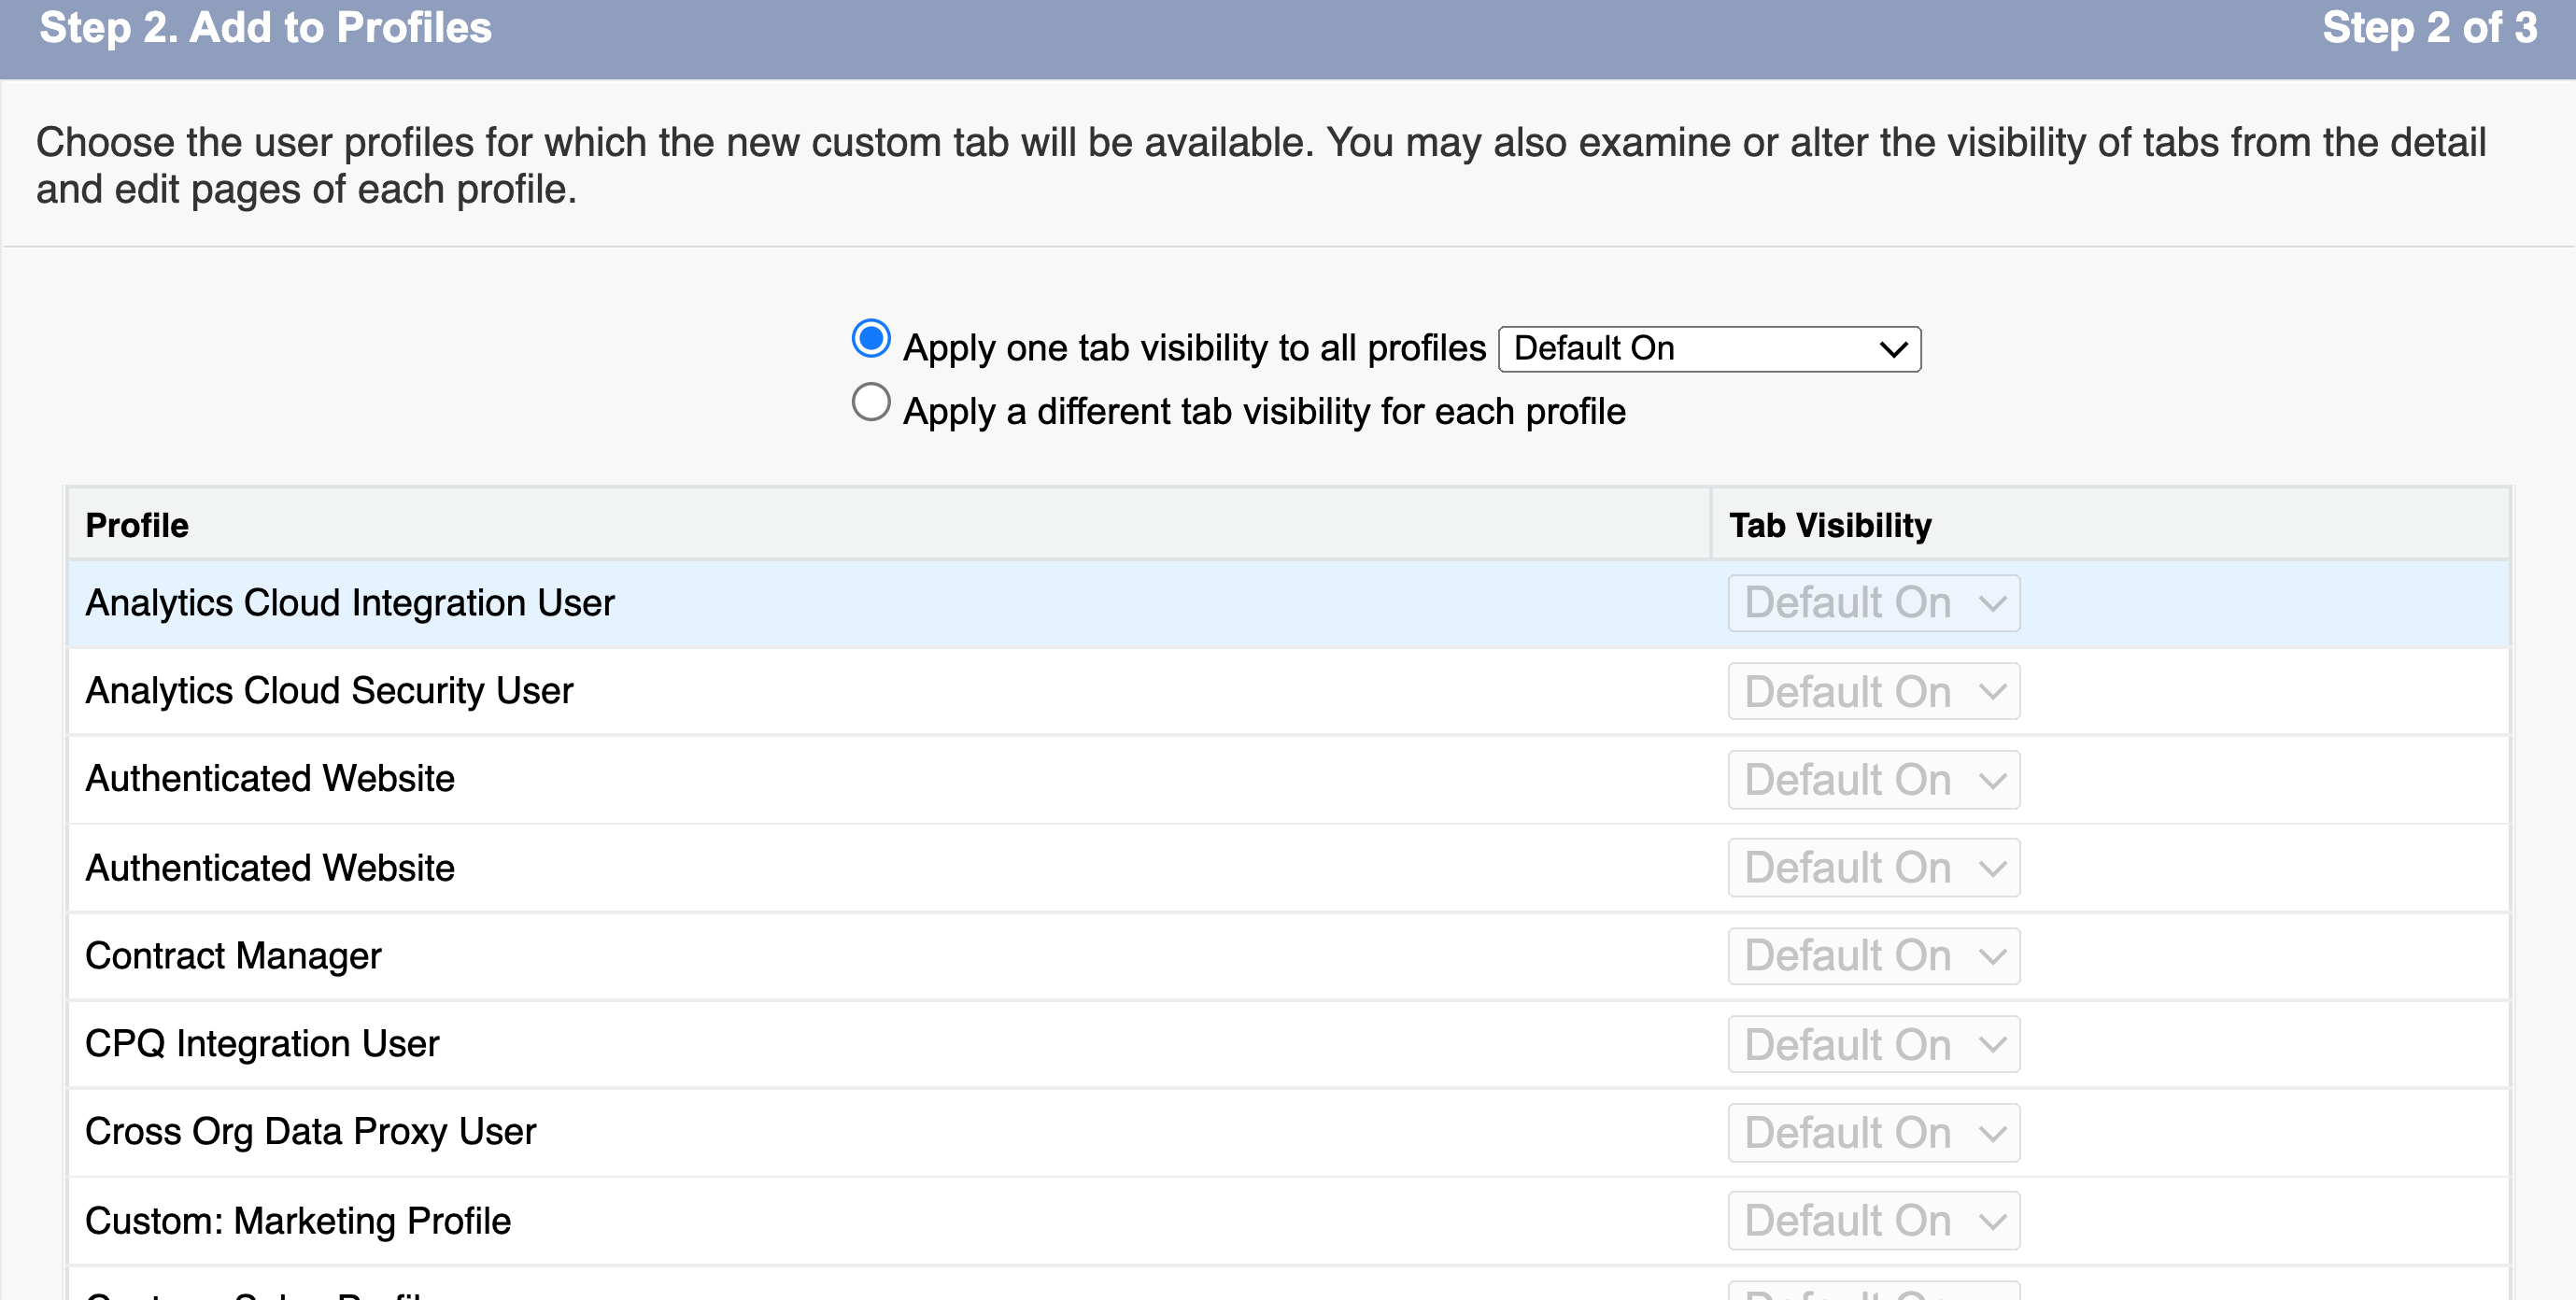
Step 3: Choose the custom apps for which the new custom tab will be available. You can leave the default settings as is for now and click Save.
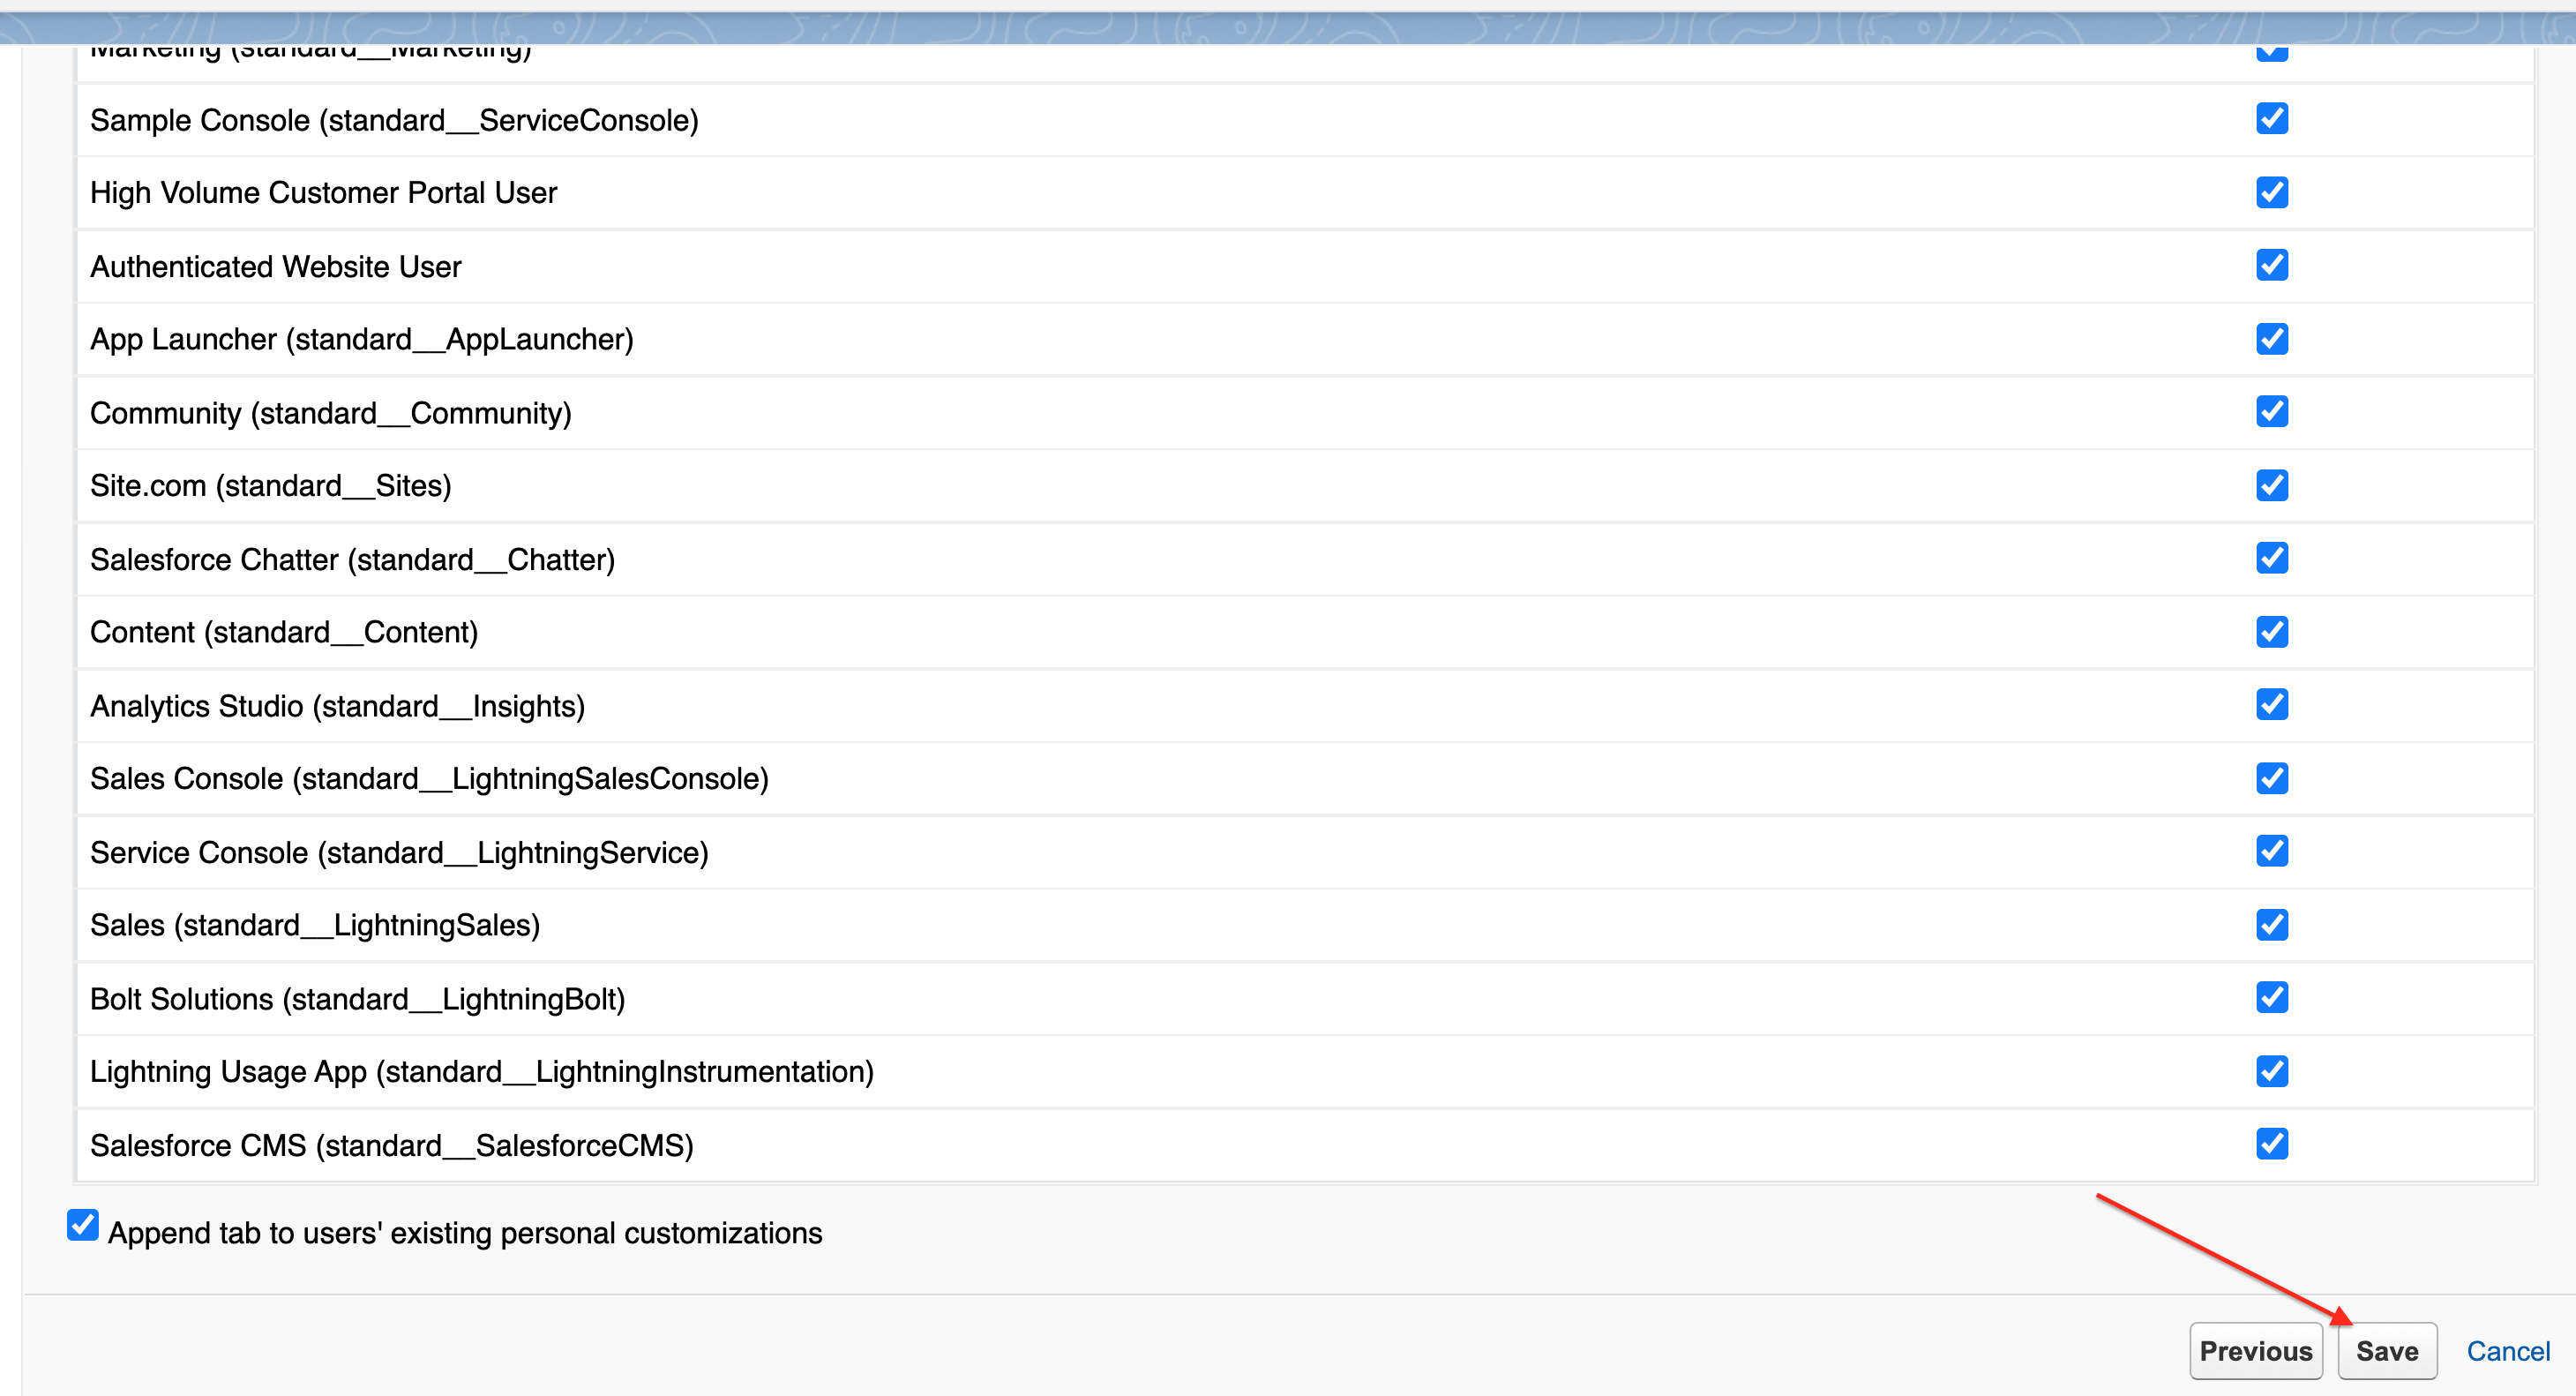
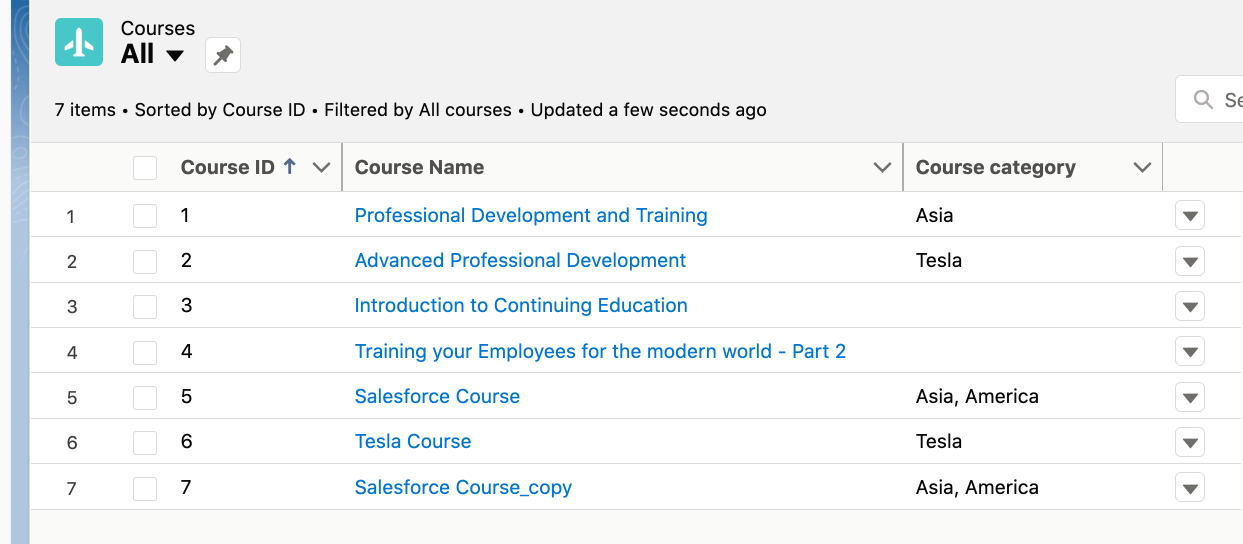
- The tab is created successfully. Now you can see the Course object data on your home page, just like Contacts and Leads, but first you need to navigate to the services page.
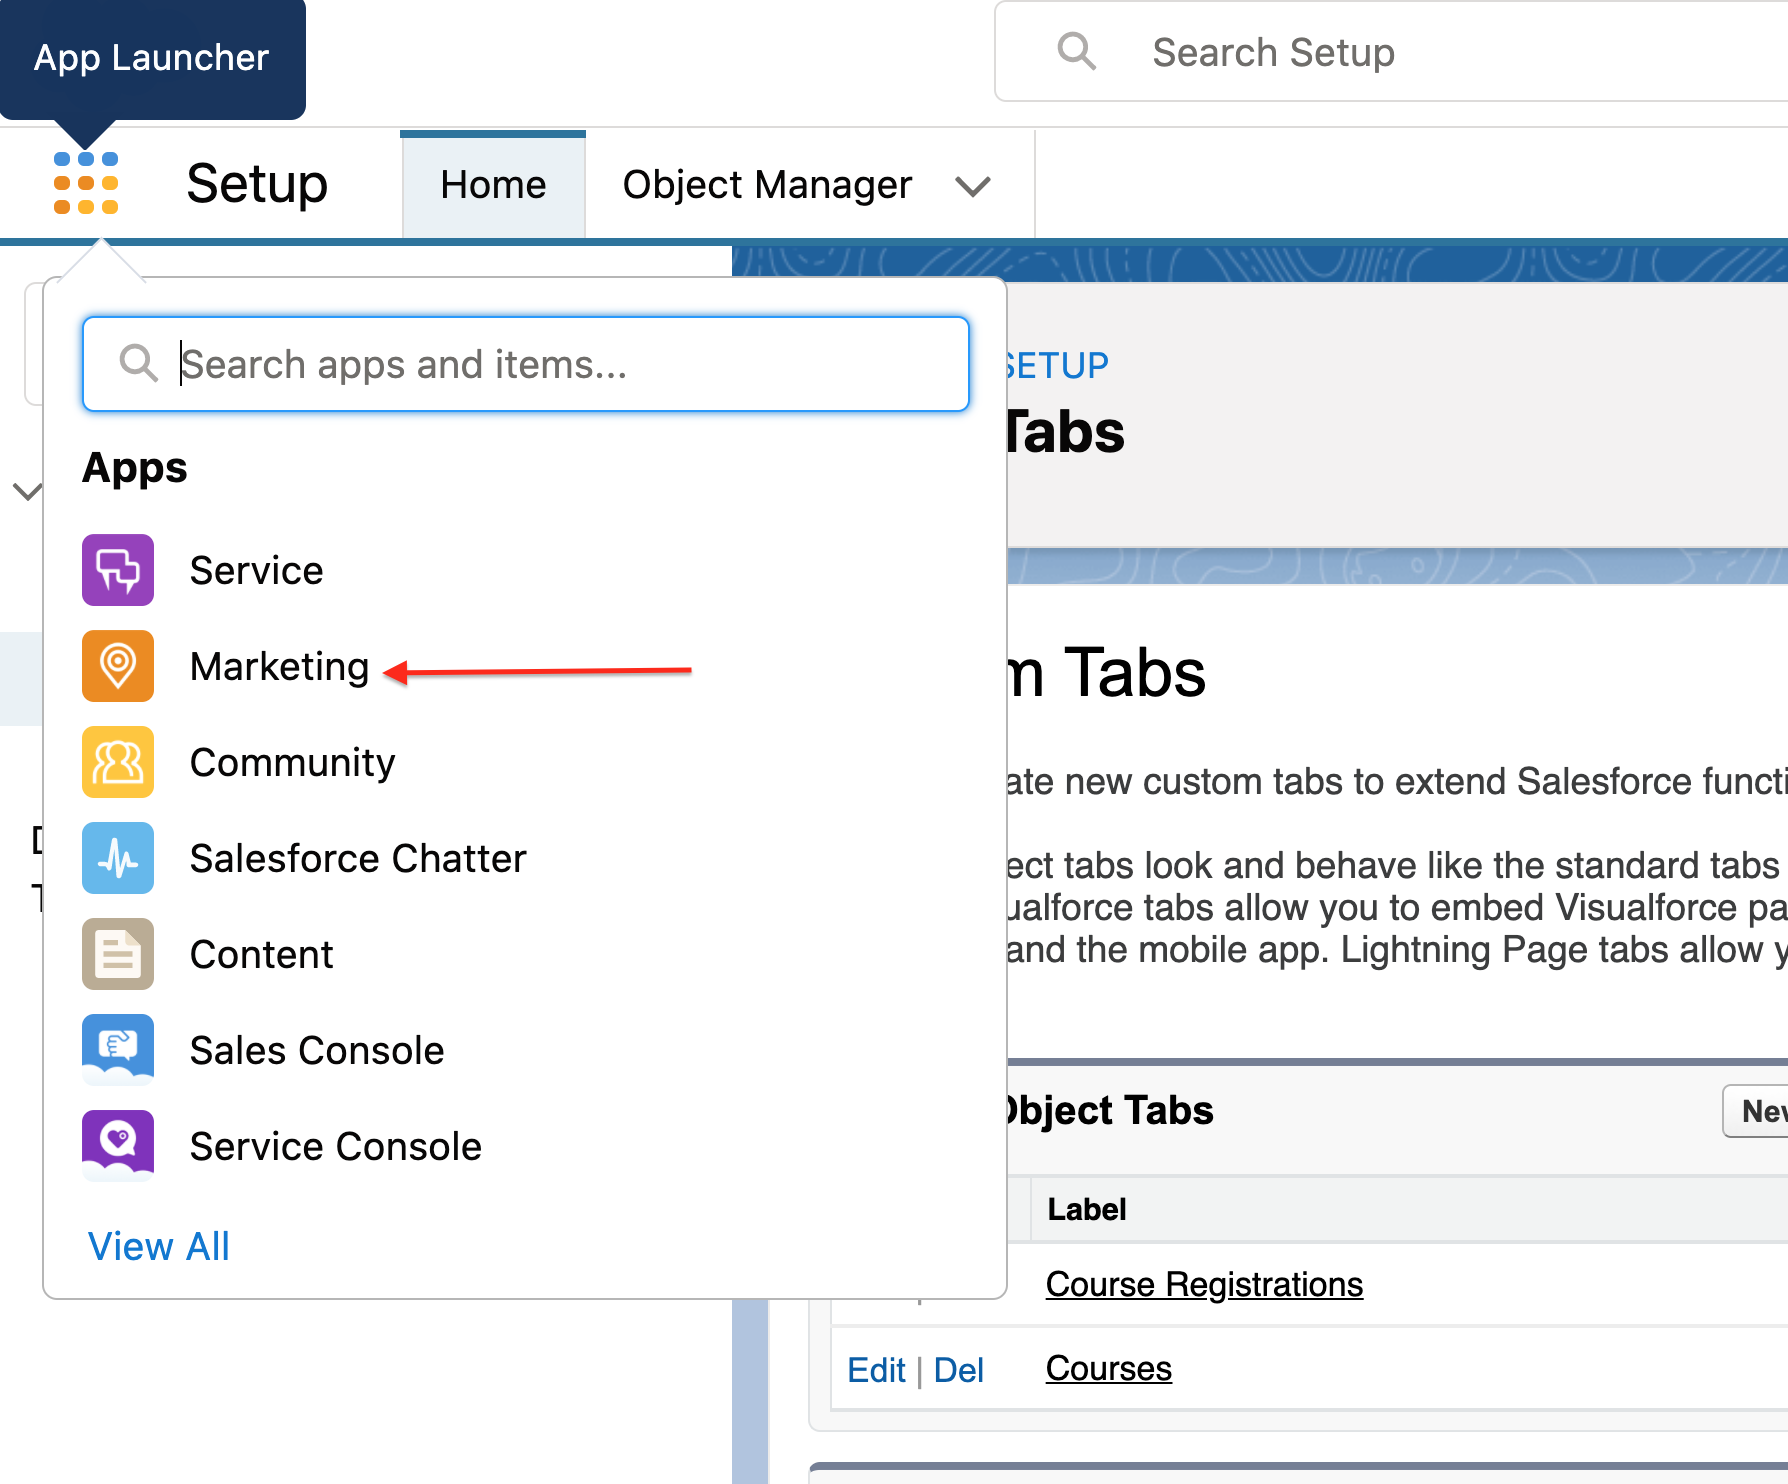
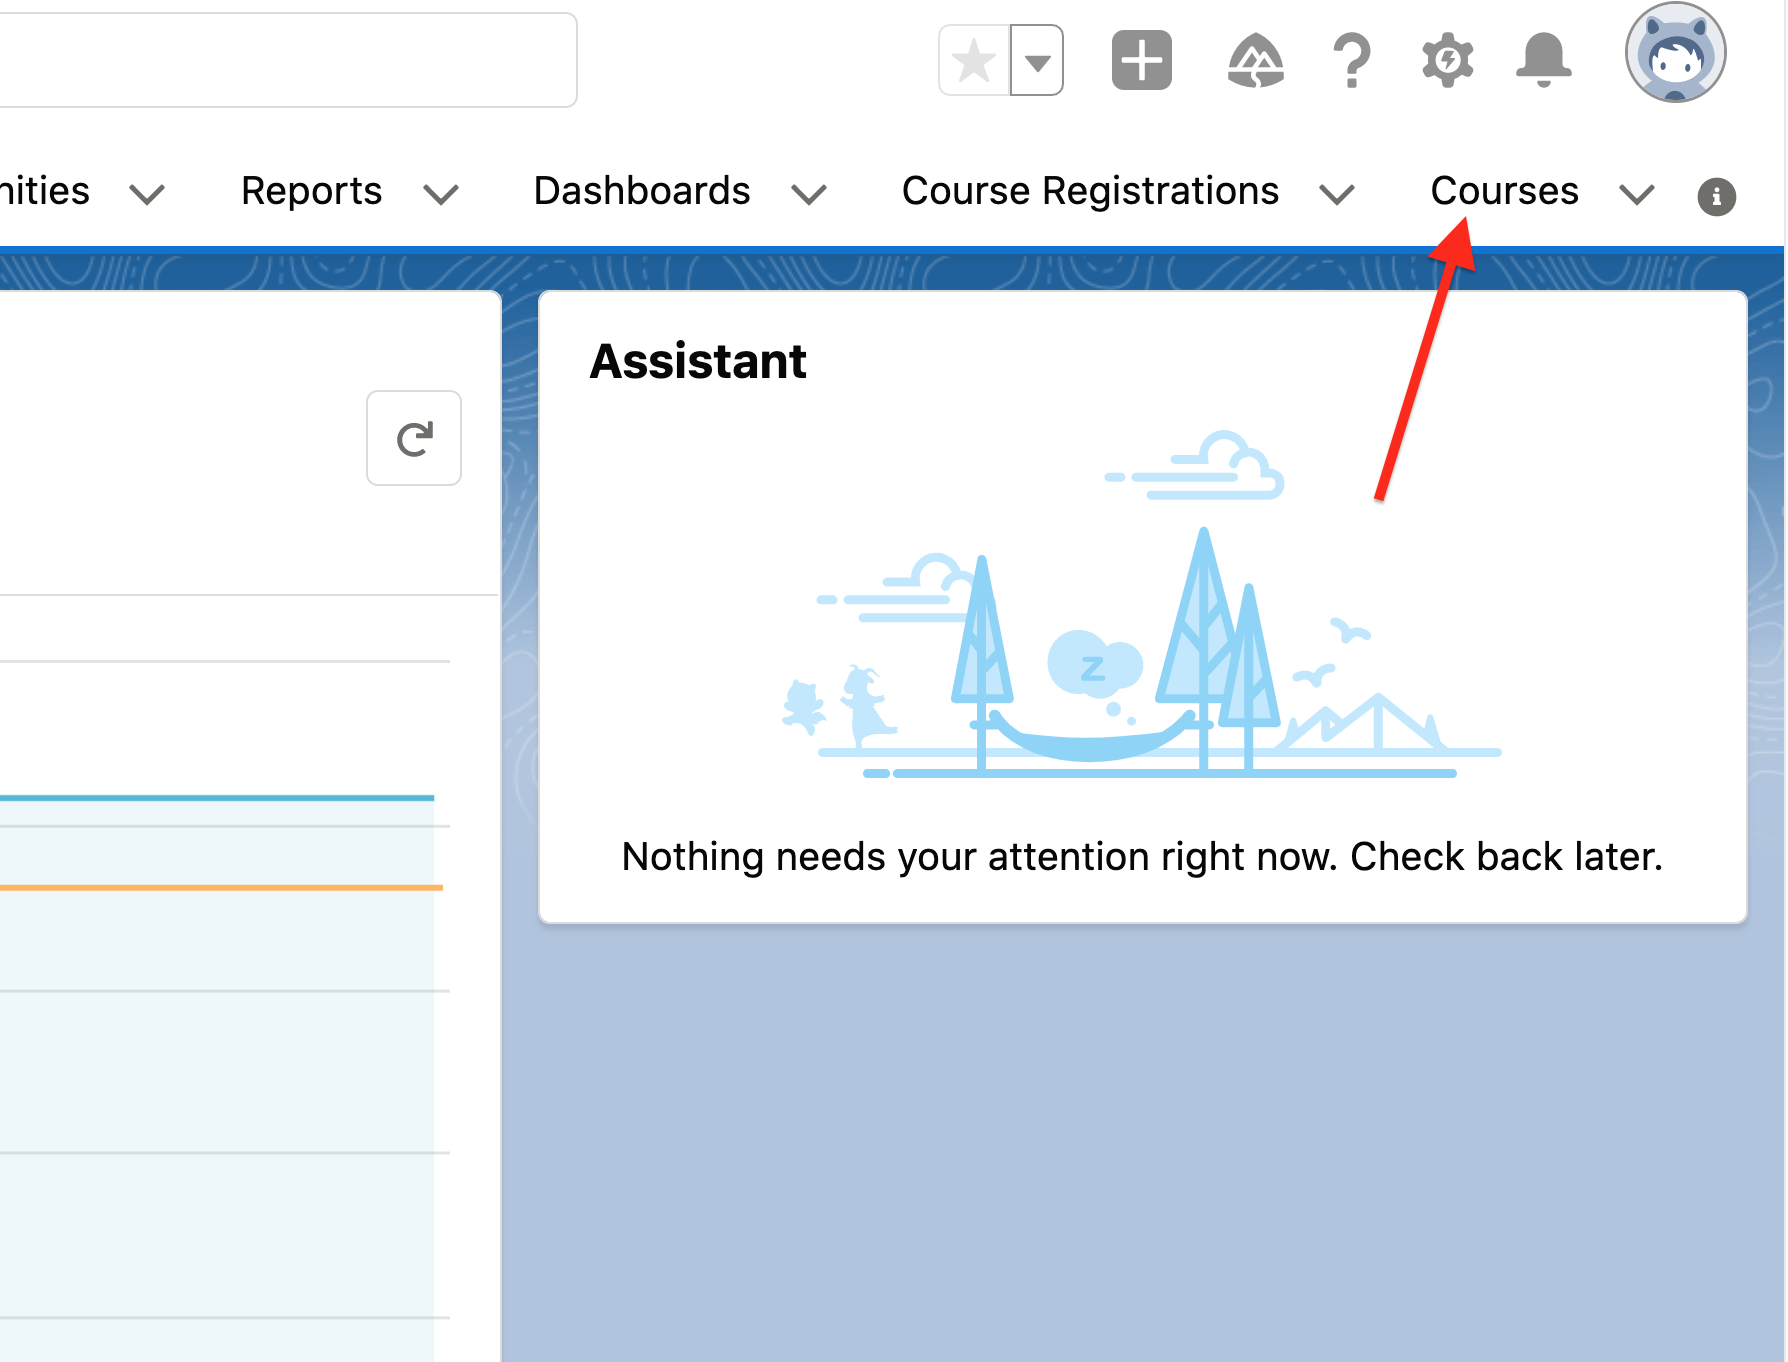
- Once you're redirected to the Marketing page, you'll see your new tab for the course, labeled "Courses". Click the "Courses" tab to see the course details.
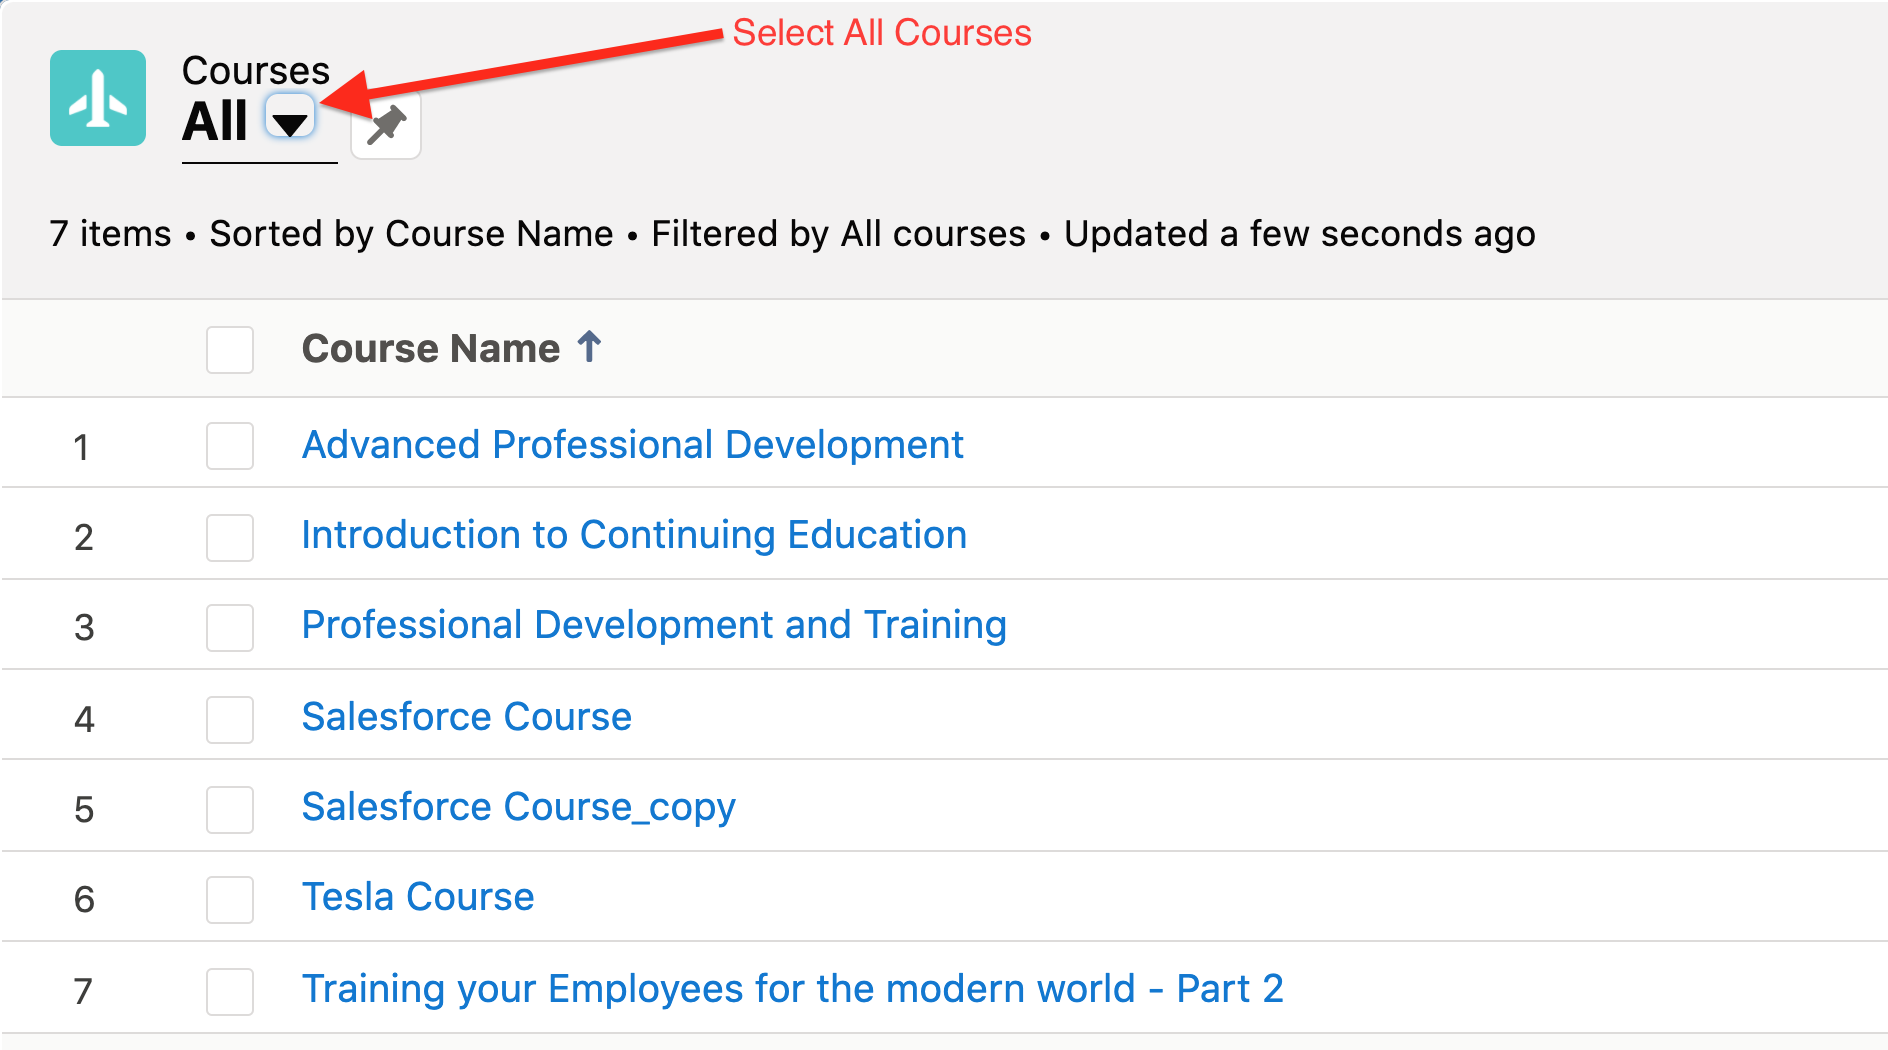
- You should see all the courses created in the LMS here. You can also select which fields to display on this screen.

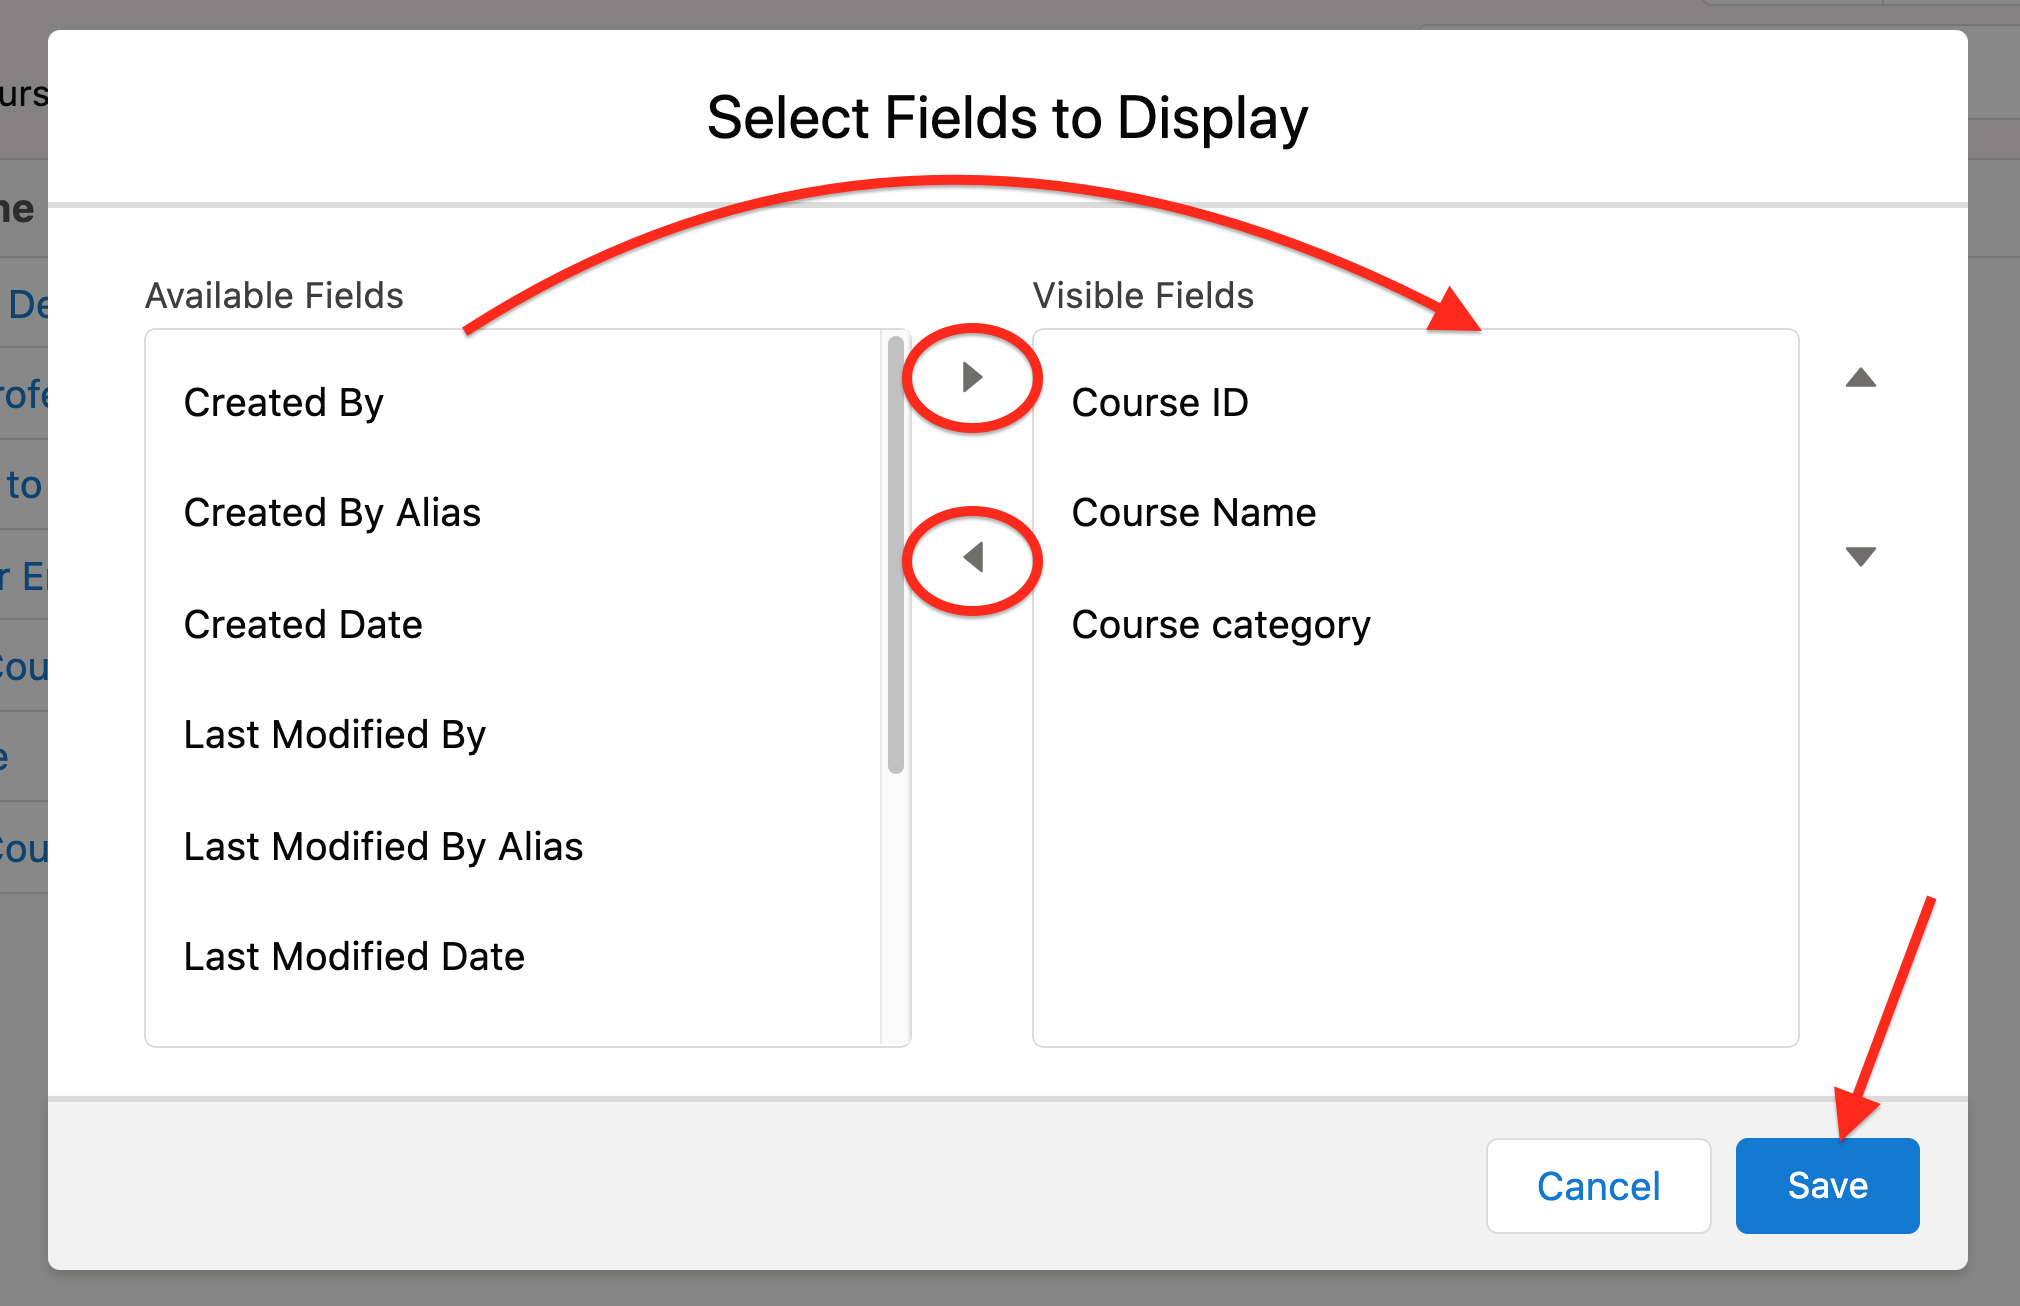
After clicking the Save button, you should see all the fields you selected to display.